Contents
Chapter 1
About Pagewise
Pagewise solves one problem: it turns the manual busywork scattered across keyword research, copywriting, page building, publishing, analytics, and page fixes into a single closed-loop pipeline. You maintain the AI's writing material in the knowledge base (pain points, scenes, selling points, internal links), generate a complete landing-page draft with one click, review and refine it in the visual editor, publish it as a real page on your storefront, then track every page's performance with Search Console and GA4 data and work through the prioritized optimization queue the app builds for you.
Stock the knowledge base→
AI drafts the page→
Polish in the editor→
Publish→
Monitor the data→
Optimize / regenerate
Modules at a glance
| Module | What it does |
|---|---|
| Home | Guided workspace: quick-start checklist, feature entry points, data overview (key metrics, GA4 conversion funnel, GSC × GA4 crossover insights, next batch priority), and recent pages. |
| Pages | The ledger of every page: status management, edit, preview, details, delete, and syncing existing store pages in. |
| Generate (AI landing pages) | Configure market / topic / scene / products and let AI generate a complete landing-page draft in one click. |
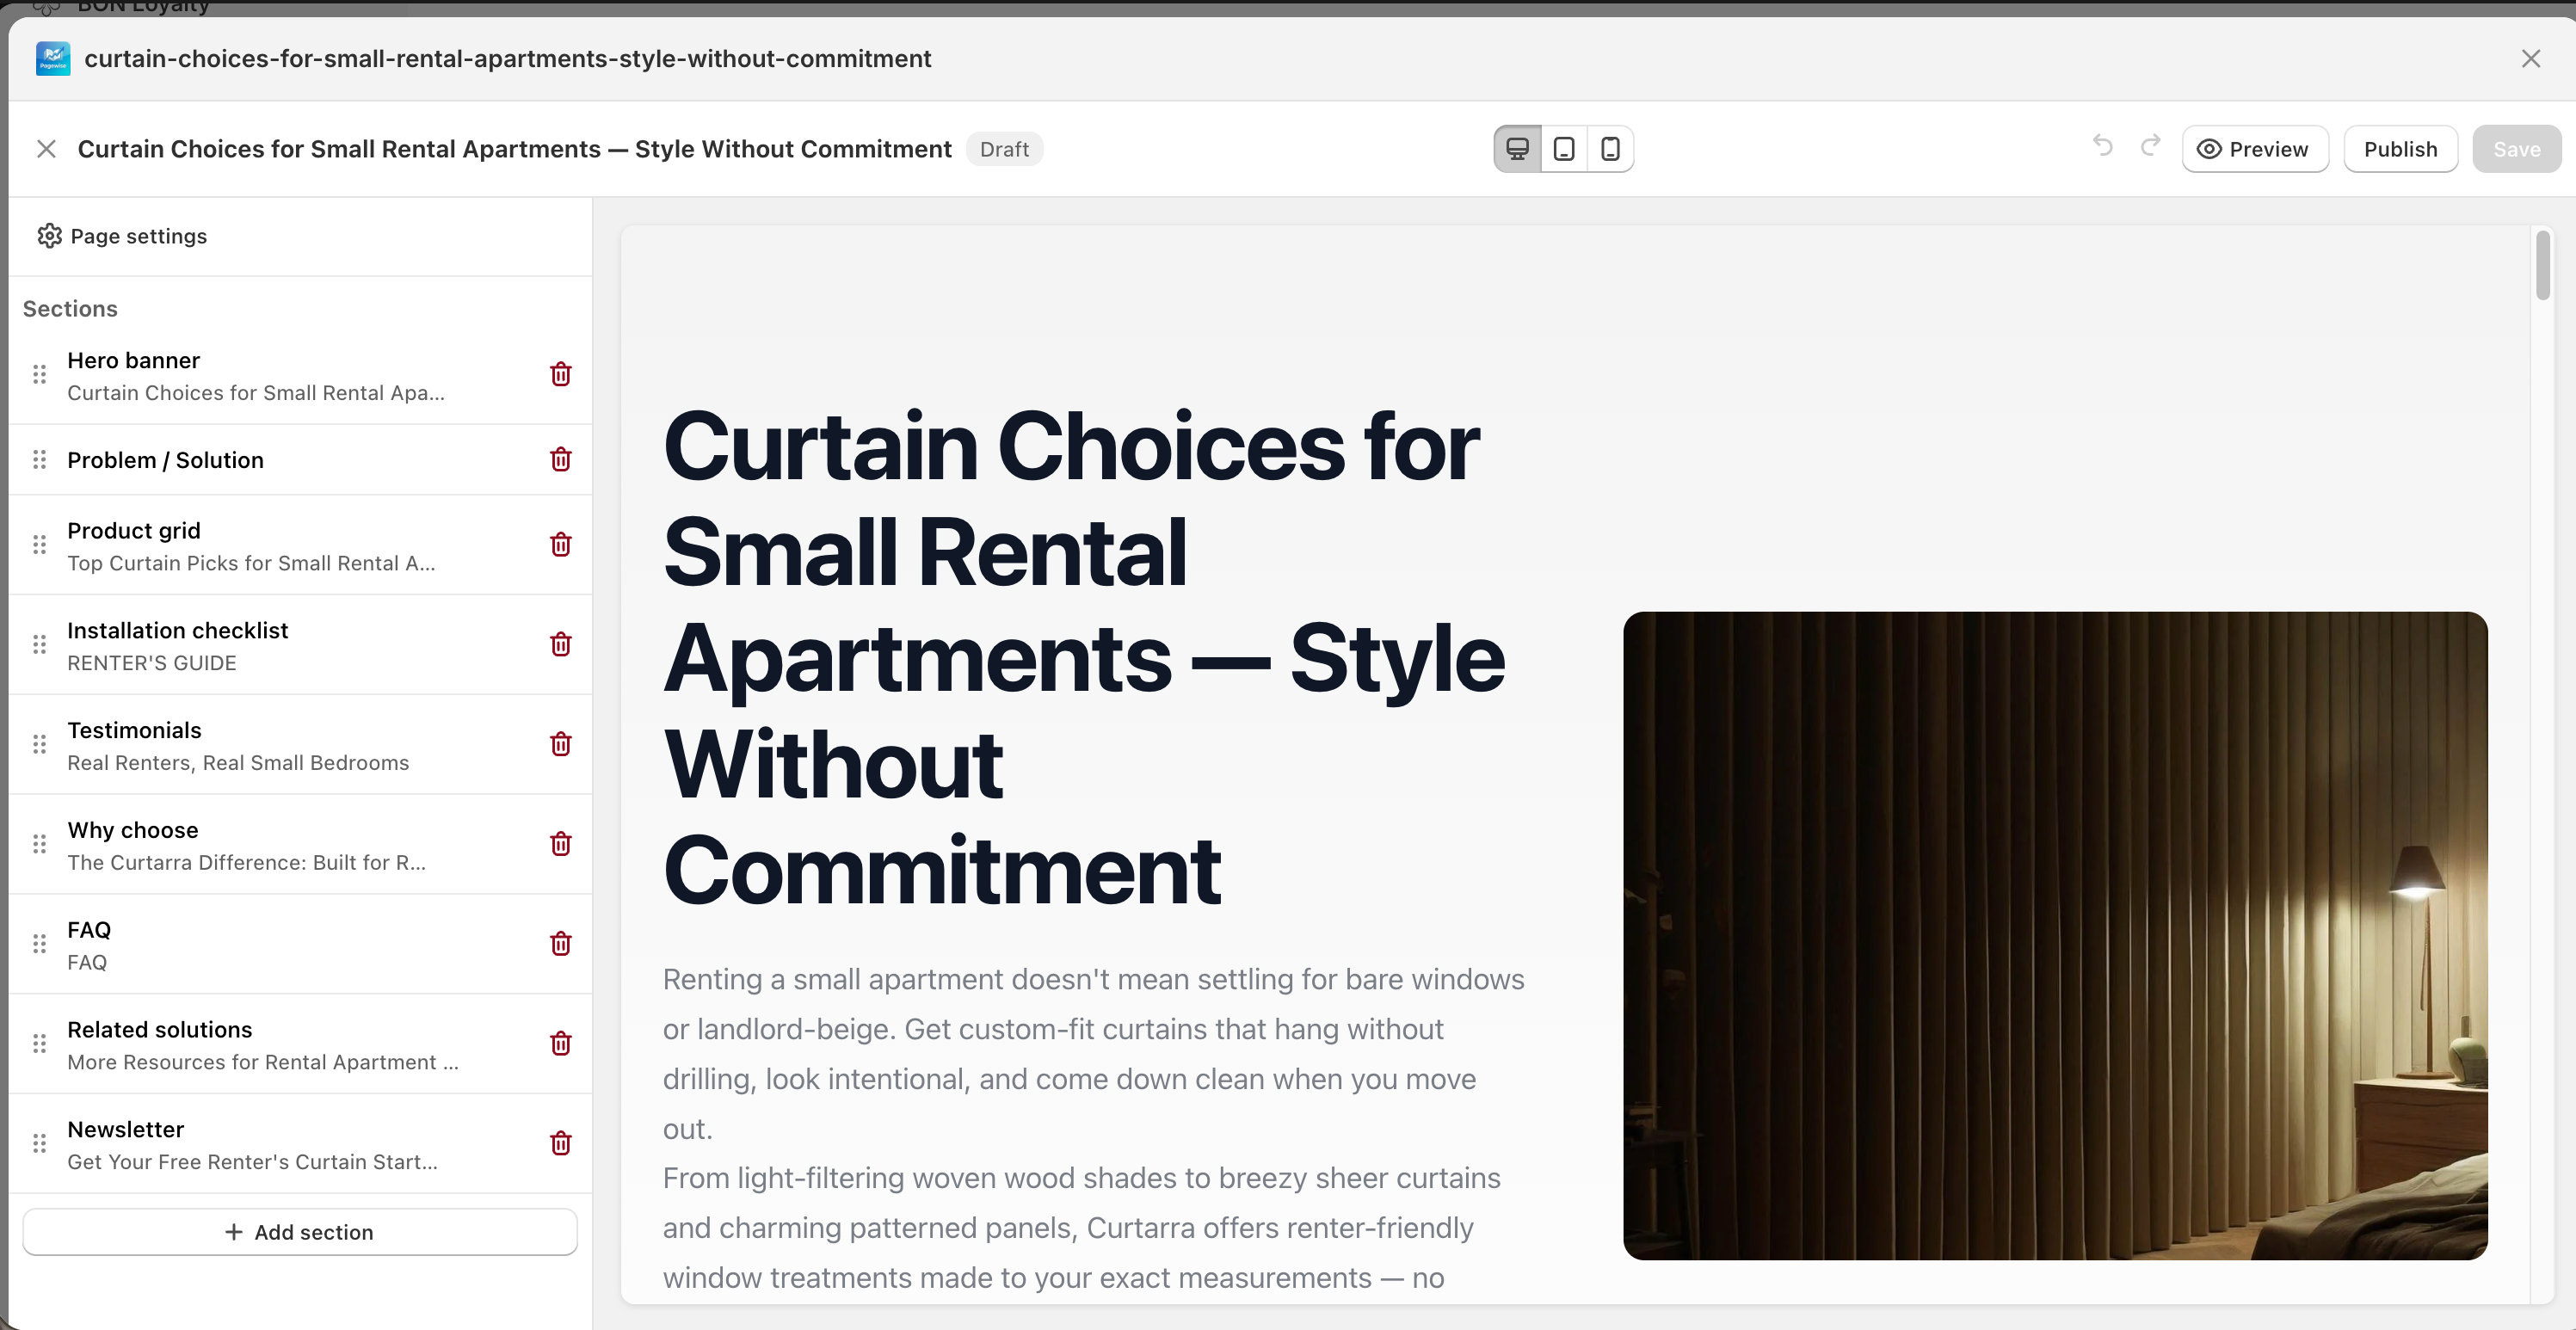
| Page editor | Full-screen visual editing: add / remove / reorder sections, AI rewrite, SEO settings, save and publish. |
| Knowledge base | The AI's writing material: collections, service features, internal links, pain topics, target scenes. |
| Search Console | Search Console data hub: KPIs, trends, per-page / per-query detail tables with opportunity labels. |
| Monitor & Insights | Action center: a prioritized to-do queue built by crossing GSC × GA4 data, with one-click AI rewrite. |
| Templates | Defines the brand look of generated pages: four colors + heading / body fonts. |
| Settings | Global configuration: brand info, default market, Google auto-sync, page storage, AI model. |
Three prerequisites before you start
- Your store must use an Online Store 2.0 theme (e.g. Dawn) — legacy themes can't display generated pages on the storefront. The setup wizard checks this automatically and warns you.
- AI is configured server-side by the developer. If you see "AI not configured", contact the developer; once it's set up, you only pick a model under Settings → AI integration.
- The interface defaults to English, which this manual follows. Prefer Simplified Chinese? Switch the UI under Settings → General → Interface language, and open the Chinese edition of this manual with the 中文 toggle in the top-right corner.
Chapter 2
Quick start
2.1 Open the app
In the Shopify admin, click Pagewise in the "Apps" list on the left. The app opens embedded in the admin and lands on Home. If you visit the app URL directly with an expired session, you'll see the "Log in to Pagewise" page first — enter your store domain (like my-store.myshopify.com) to continue installing or logging in.
2.2 Complete the setup wizard (~5 minutes)
On first use, click "Resume setup" on the first item of the Home quick-start guide to enter the 6-step wizard. You can leave at any point — completed steps are kept when you return. "Skip setup" in the top-right marks the wizard as done, but you'll still need to finish the remaining configuration on each screen.
- Brand & market — Enter your brand name, pick the primary market (🇺🇸 United States or 🇩🇪 Germany — this decides the language of generated pages), and click "Continue".
- Sync products — Click "Sync my products"; the "Continue" button unlocks once the "N products synced" badge appears.
- Page storage — The app checks whether your theme supports app pages; click "Create page storage" and continue once "Pages will be stored as: …" appears. If it warns your theme may not be supported, switch to an Online Store 2.0 theme and click "Re-check theme".
- Brand look — Click "Suggest from my theme" to pull colors automatically, or adjust the primary, accent, background, and text colors plus heading / body fonts by hand, then click "Save & continue".
- AI knowledge base — Click "Generate from my catalog": AI reads your product catalog and drafts three lists — pain topics, scenes, selling points. Review line by line and remove anything off-target ("Regenerate" if you're unhappy), click "Apply to knowledge base", then click "Import site pages" in the internal-links area.
- Sample page — Click "Generate sample page" (~20 seconds, sometimes longer; it runs in the background so you can leave the page). When it succeeds, click "View pages" to review the draft, then click "Finish".
2.3 Typical end-to-end workflow
- Finish the setup wizard above (brand → products → storage → look → knowledge base → sample page).
- Open "Knowledge" and complete your material: enter or AI-draft pain topics, target scenes, and service features; on the "Internal links" tab, click "Import site pages".
- Open "Generate": pick the target market, a pain topic, and a target scene, select 4 featured collections, and click "Generate draft with AI".
- Check the parameters in the "Confirm AI generation parameters" dialog, click "Confirm and generate draft", and wait 1–5 minutes (it runs in the background — you can leave the page).
- Find the new draft under "Pages" and click "Edit" to open the editor: adjust sections, replace each section's placeholder images with real ones (AI doesn't generate images yet), polish with "AI rewrite", fill in the SEO title and description, save, and preview.
- When it looks right, click "Publish" in the editor — the page becomes a real storefront page that customers and search engines can reach.
- Connect your data: configure daily auto-sync under Settings → Google auto-sync, or upload GSC / GA4 exports manually.
- Day to day, watch the data and mine keyword opportunities under "Search Console" (with one-click "Generate a page for this query"), and work the prioritized queue under "Monitor & Insights" — closing the loop.
Chapter 3
Home & navigation
Home is the first stop after opening Pagewise: the quick-start guide walks you through initial setup, feature tiles jump straight to the core modules, and the Overview block (key metrics, conversion funnel, crossover insights, next batch priority) plus recent pages keep you on top of pages and traffic at all times.
Where to find itOpening the app lands on Home; clicking the app name "Pagewise" at the top of the left nav returns you to Home from any screen.
Left navigation
The nav is a flat list of 6 items: Pages · Search Console · Monitor & Insights · Knowledge · Templates · Settings. Analytics live in the Overview block on Home — there is no separate dashboard screen.
Interface overview
| Area | Description |
|---|---|
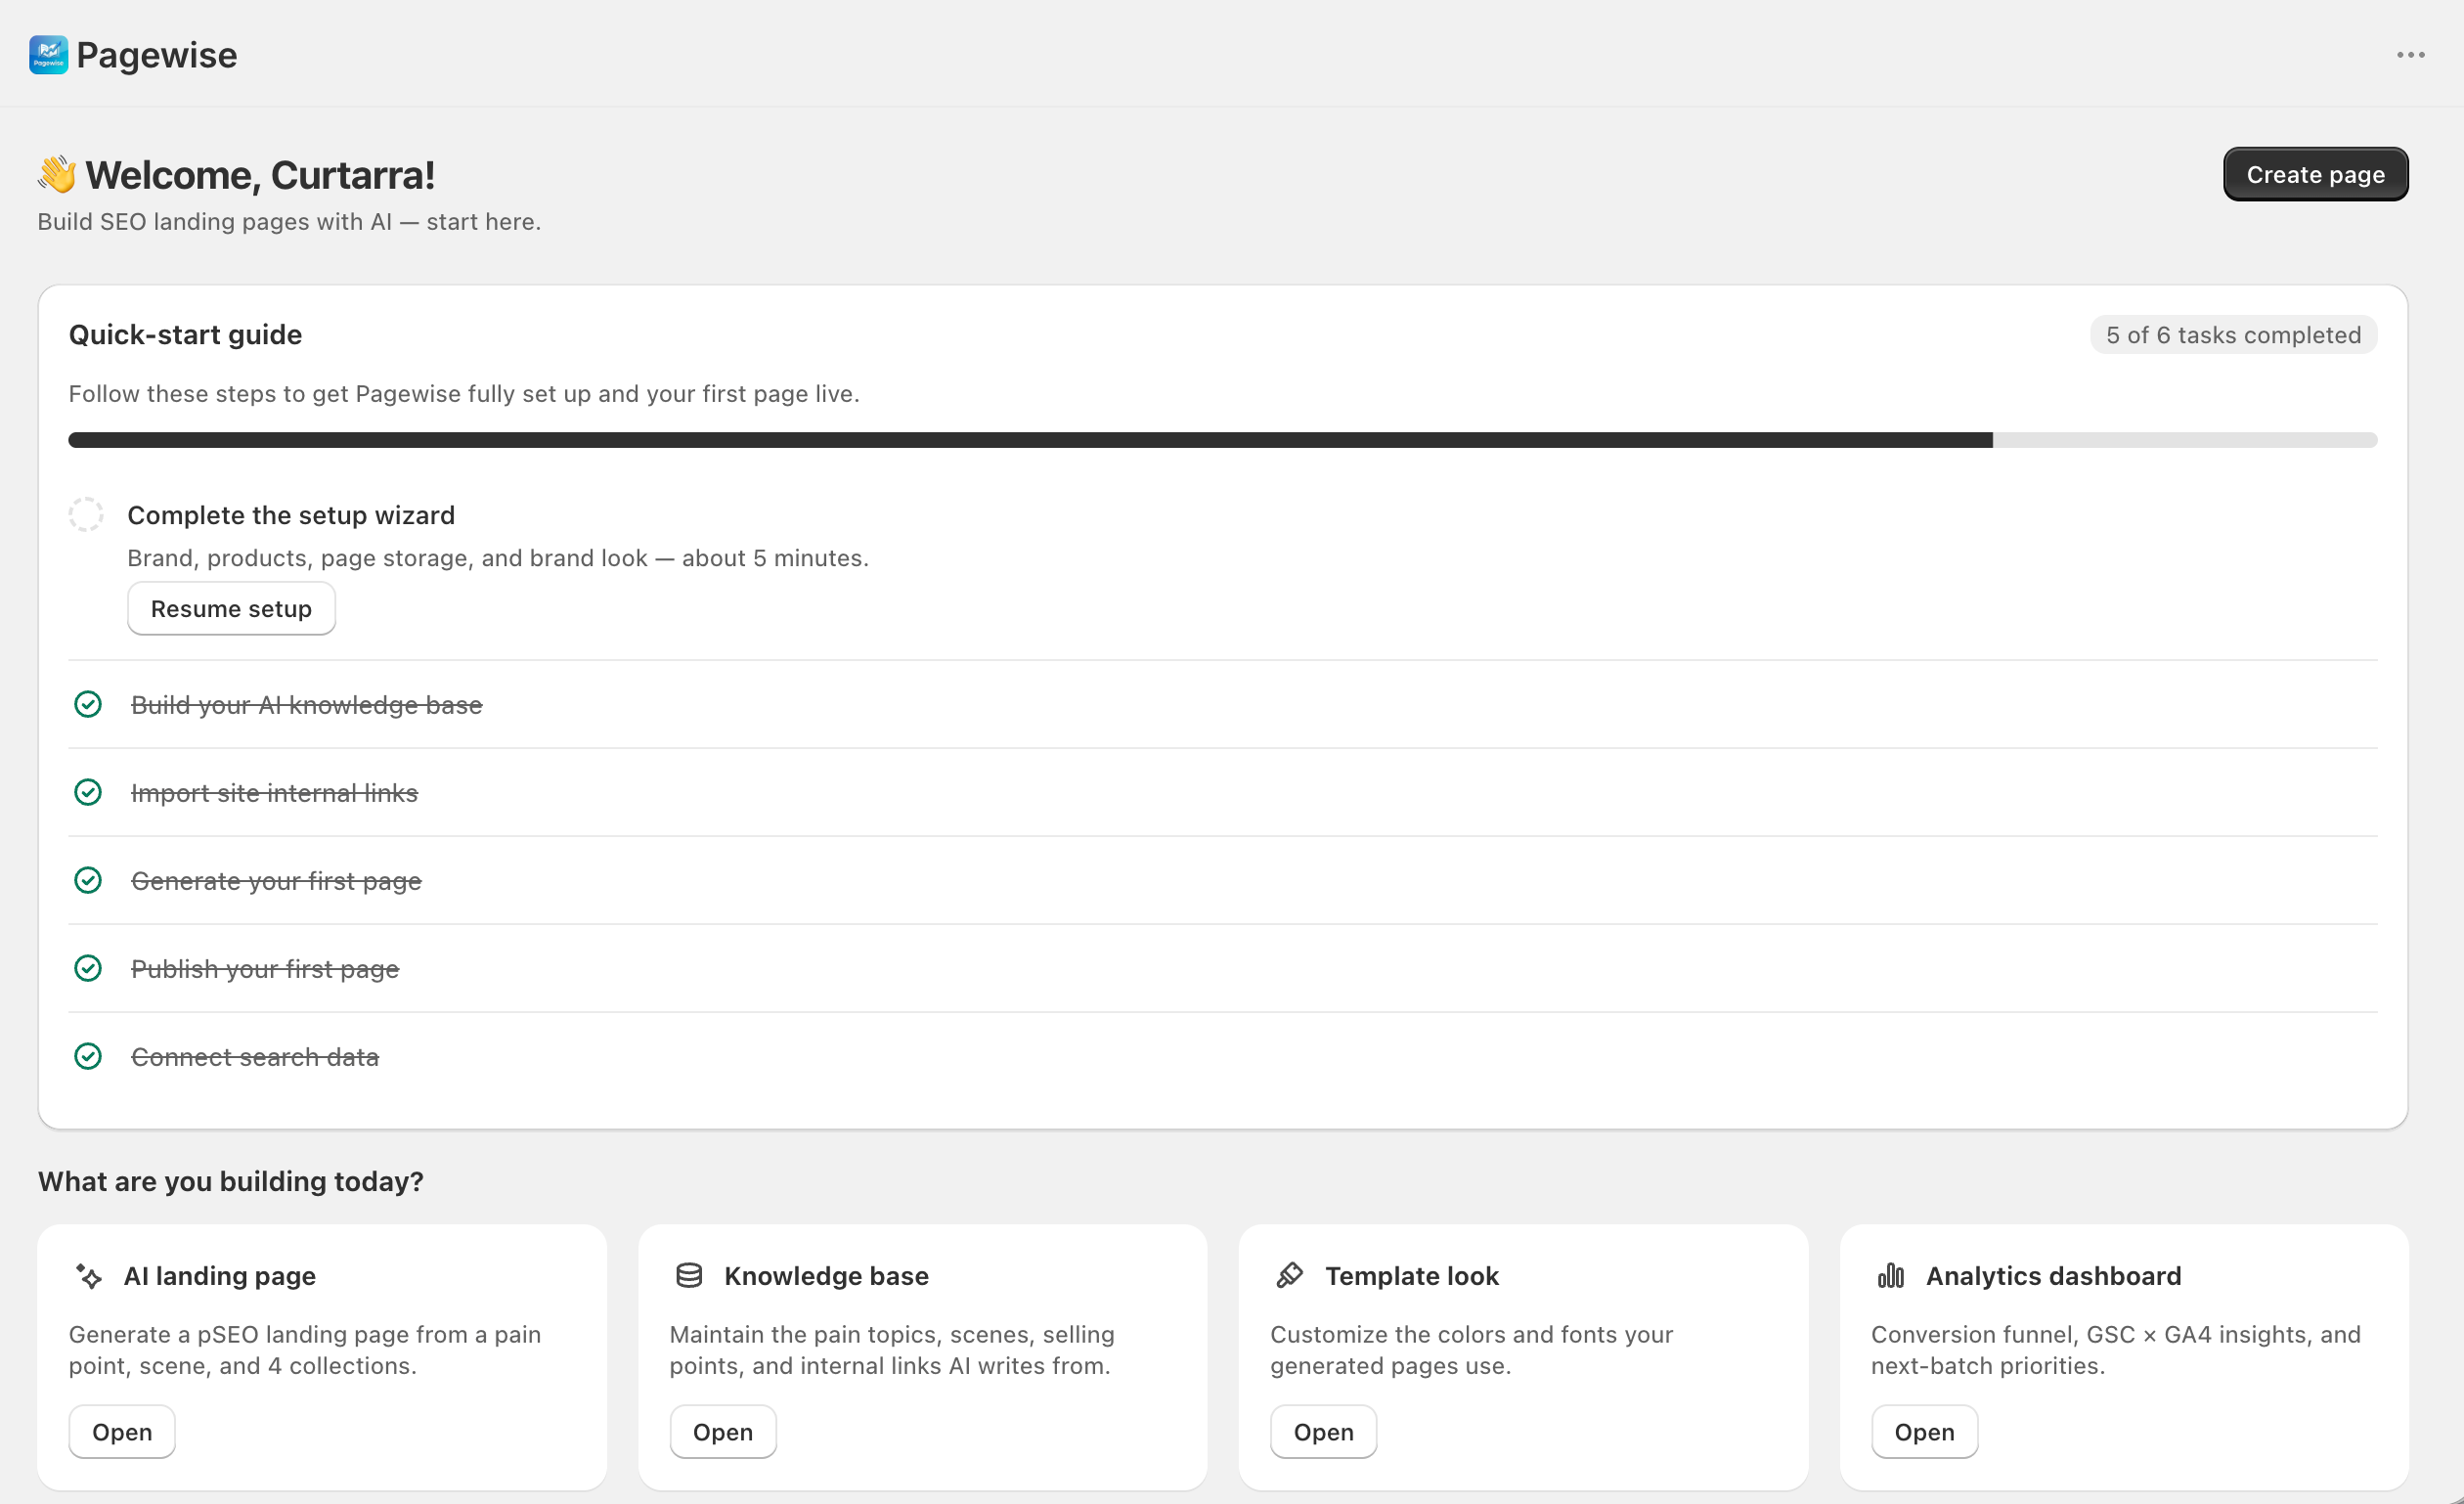
| Title & primary button | "👋 Welcome, {brand}!"; "Create page" in the top right jumps straight to AI generation. |
| Theme repair banner | After the store switches themes, a warning appears ("Re-publish your pages to the new theme"); click "Repair pages now" to re-push page templates to the new theme in one click. |
| Quick-start guide | 6 tasks with a progress bar: complete the setup wizard → build your AI knowledge base → import site internal links → generate your first page → publish your first page → connect search data. Completion is detected from real data (you can't tick items manually); the card disappears once all 6 are done. |
| What are you building today? | 3 feature tiles: AI landing page, Knowledge base, Template look. |
| Overview · stat cards | 5 cards: Live pages (with total page count), GSC impressions (with CTR, highlighted red when CTR is too low), GA4 sessions (with purchases), Revenue (with add-to-carts), AI generations this month (per calendar month, resets on the 1st). GA4-based cards show 0 until GA4 data is uploaded. |
| Overview · funnel & crossover | Left: "Conversion funnel (GA4)" with four stages — sessions → add to cart → checkout → purchase; when there are add-to-carts but zero checkouts, a red alert appears ("Add to cart → checkout drop-off 100% · check the checkout flow"). Right: "GSC × GA4 key crossover" lists standout pages found by crossing search performance with on-site behavior (e.g. ranks well but low CTR), with an "Act now" badge when action is needed; without data it prompts you to upload Search Console + GA4 first. |
| Overview · next batch priority | The suggested list of pages to work on next (up to 8): number, slug, type (Optimize / Draft / Retired), expected impact (impressions), priority (This week / Soon / Done). |
| Recent pages | The 5 most recently updated pages with status badges and relative times; "View all pages" opens Pages. |
Chapter 4
Pages
"Pages" is the ledger of every generated / published page: see each page's market, category, status, and recent search performance (impressions / CTR) in one place, and do the day-to-day maintenance — change status, open the editor, preview, view details, delete — plus pull the store's existing pages in with one click for unified management.
Where to find it"Pages" in the left nav; clicking a page from "Search Console" or "Monitor & Insights" also lands here and opens its details automatically.
Page statuses
| Status | Meaning |
|---|---|
| Draft | Not published; editable and previewable inside the app only. |
| Live | Published to the storefront; reachable by customers and search engines. |
| Retired | Deliberately taken offline: unpublished on the storefront, kept locally with a retired marker. |
| Detached | The Shopify-side content was deleted and only the local record remains. Marked automatically after the entry is deleted in the Shopify admin ("Sync existing pages" detects it too); it can't be picked manually in the status dropdown. |
Interface overview
| Area | Description |
|---|---|
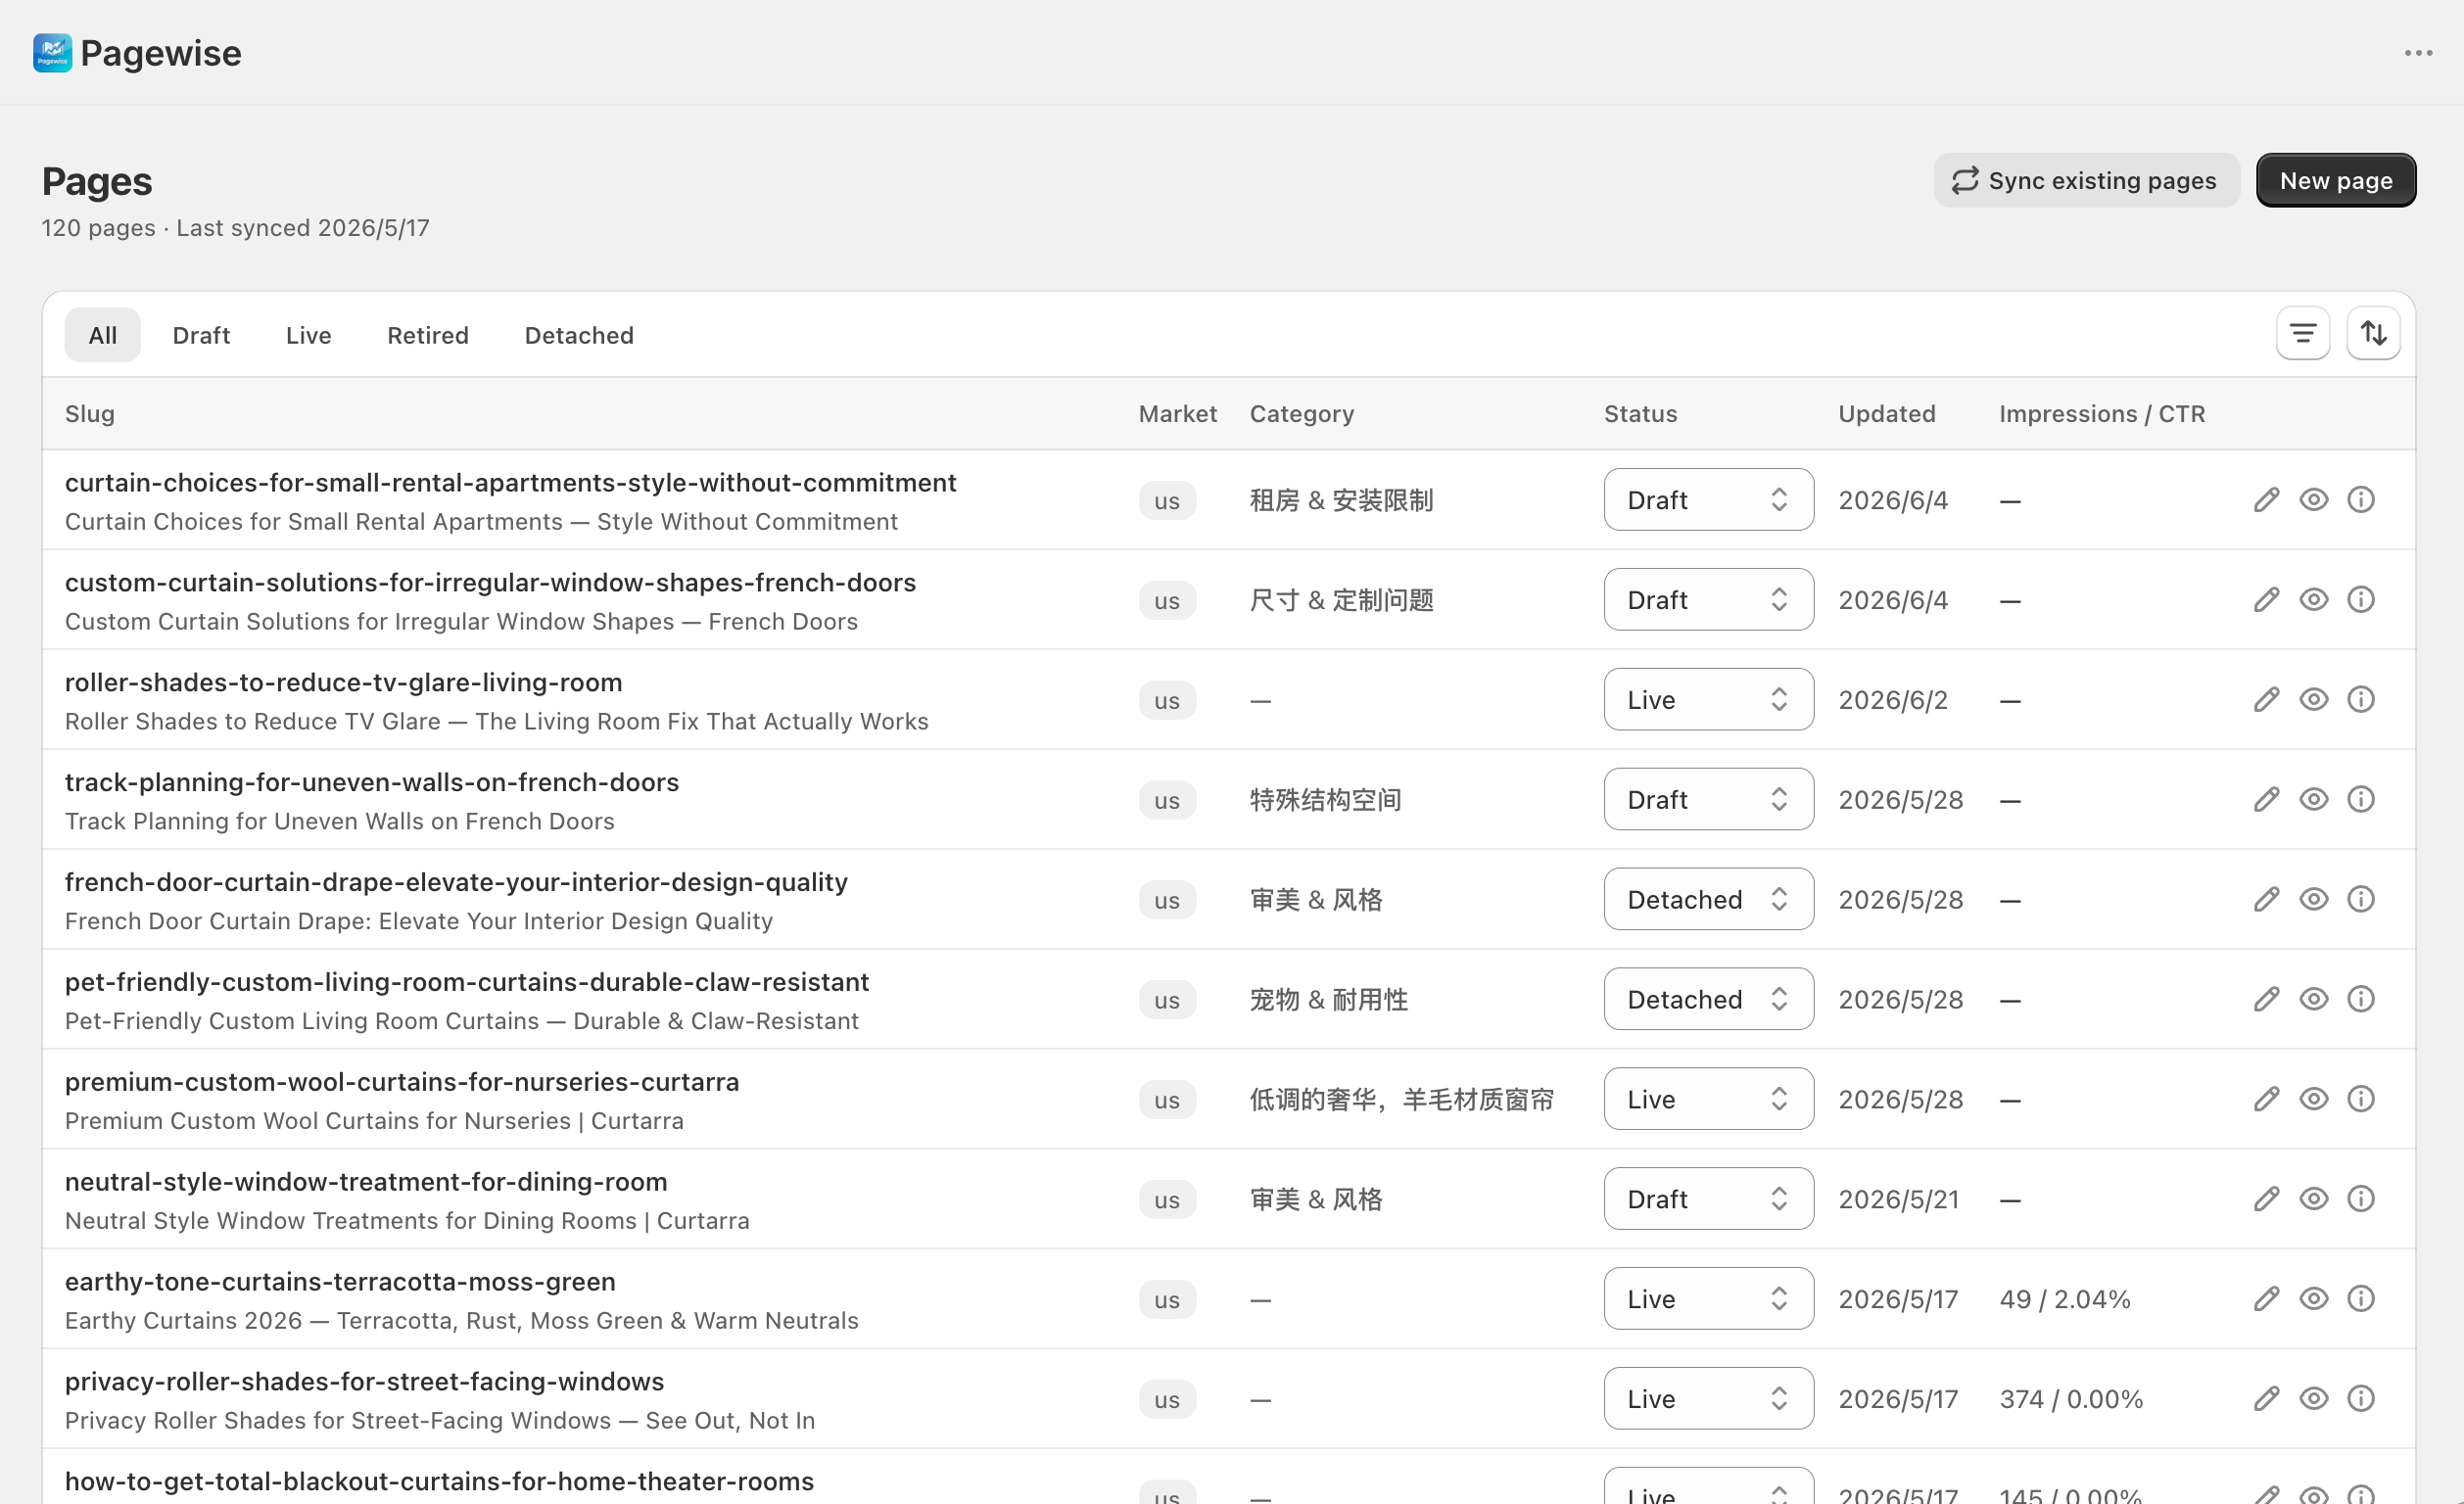
| Header | The subtitle shows the total page count and last sync time; "New page" (opens the generate flow) and "Sync existing pages" sit in the top right. |
| Status tabs | All / Draft / Live / Retired / Detached — click to filter. |
| Filter & sort | "Market" filter (🇺🇸 US / 🇩🇪 DE; active filters show as removable tags); sort by updated time, newest or oldest first. There is no keyword search box on this screen. |
| Page list | Columns: slug (the gray subline is the page title; clicking opens the editor), market, category, status (switchable inline via the dropdown), updated time, impressions / CTR (latest GSC period); three row icons: edit, preview, details. No multi-row bulk selection. |
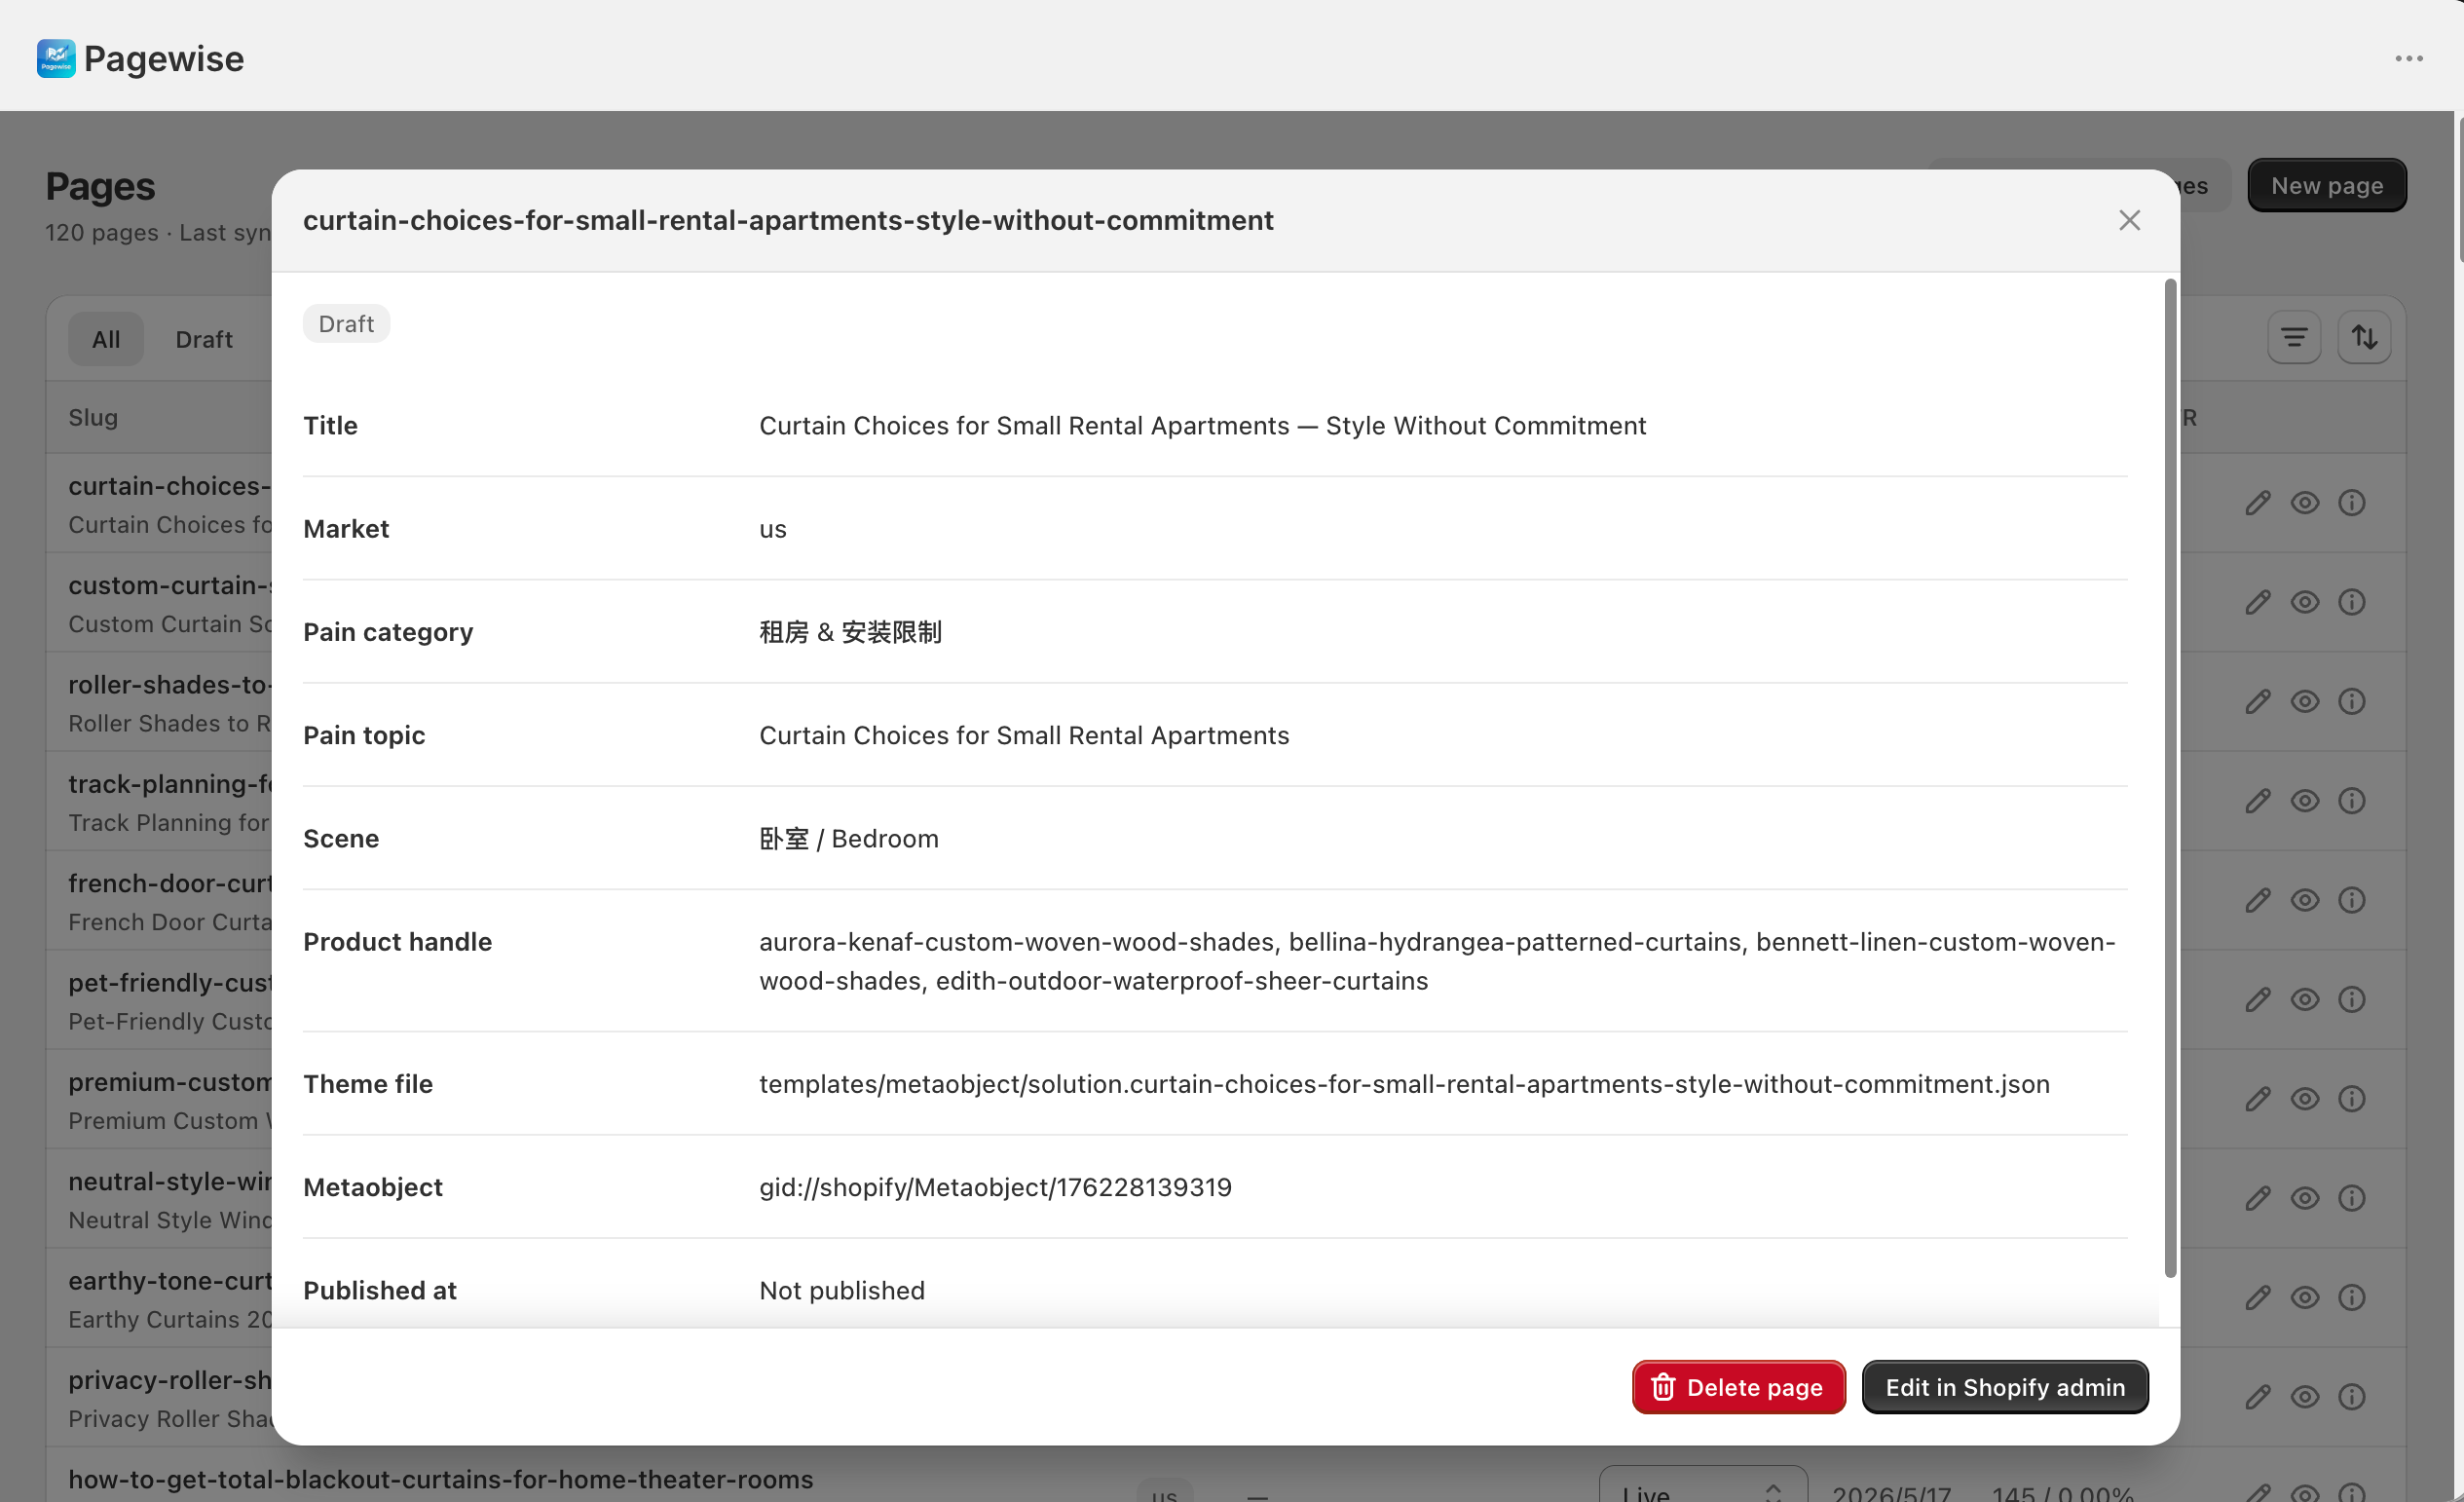
| Details dialog | Basic info (title, market, topic, scene, products, theme file, published time, etc.) + "Latest GSC snapshot" and "Latest GA4 snapshot"; at the bottom, red "Delete page" on the left and "Edit in Shopify admin" on the right (shown only for pages already synced to Shopify). |
| Sync dialog | First time, pick a definition under "Choose a sync source Metaobject", then the "Sync preview" appears: three checkable lists — will create / will update / detached detected — and "Confirm import (N)" to run it. |
Common tasks
Change a page's status (publish / unpublish)
- Find the page's dropdown in the "Status" column.
- Pick the new status: "Draft", "Live", or "Retired".
- The app syncs the status to Shopify first, then updates the local record; switching to "Live" records the publish time. If the sync fails, the dropdown snaps back to the previous status — just retry.
Sync existing store pages
- Click "Sync existing pages" in the top right. On first use, pick a definition under "Choose a sync source Metaobject" (only definitions with web-page publishing enabled are listed) and click "Save & preview".
- Review the three lists in the "Sync preview": will create (exists in Shopify, not locally), will update (fields changed — the changed fields are listed), detached detected (deleted in Shopify, still exists locally).
- Check the entries you want to process and click "Confirm import (N)", then review the "Sync complete" summary. Checking detached entries only marks the local status as Detached — nothing is deleted.
Delete a page
- Open the page's details dialog and click the red "Delete page" in the bottom left.
- Click "Delete" in the confirmation dialog.
Deletion is permanent on both ends
- Deleting removes the linked Shopify page entry and theme template file, then the local record — it cannot be undone. If you only want the page offline, switch its status to "Retired" instead.
Things to note
- Sync with the Shopify admin is two-way: edits to the page entry made in the Shopify admin (including via "Edit in Shopify admin" from the details dialog) flow back into Pagewise automatically; deleting the entry in the Shopify admin marks the page as Detached.
- "Preview" is unavailable while a page hasn't been synced to Shopify (details show "Not synced" for the metaobject) — publish or sync first.
- The "Impressions / CTR" column depends on GSC data; pages without data or without a match show "—".
- If the sync dialog says the store has no syncable Metaobject definitions, go to Settings → Page storage and click "Create Pagewise definition".
Chapter 5
Generate with AI
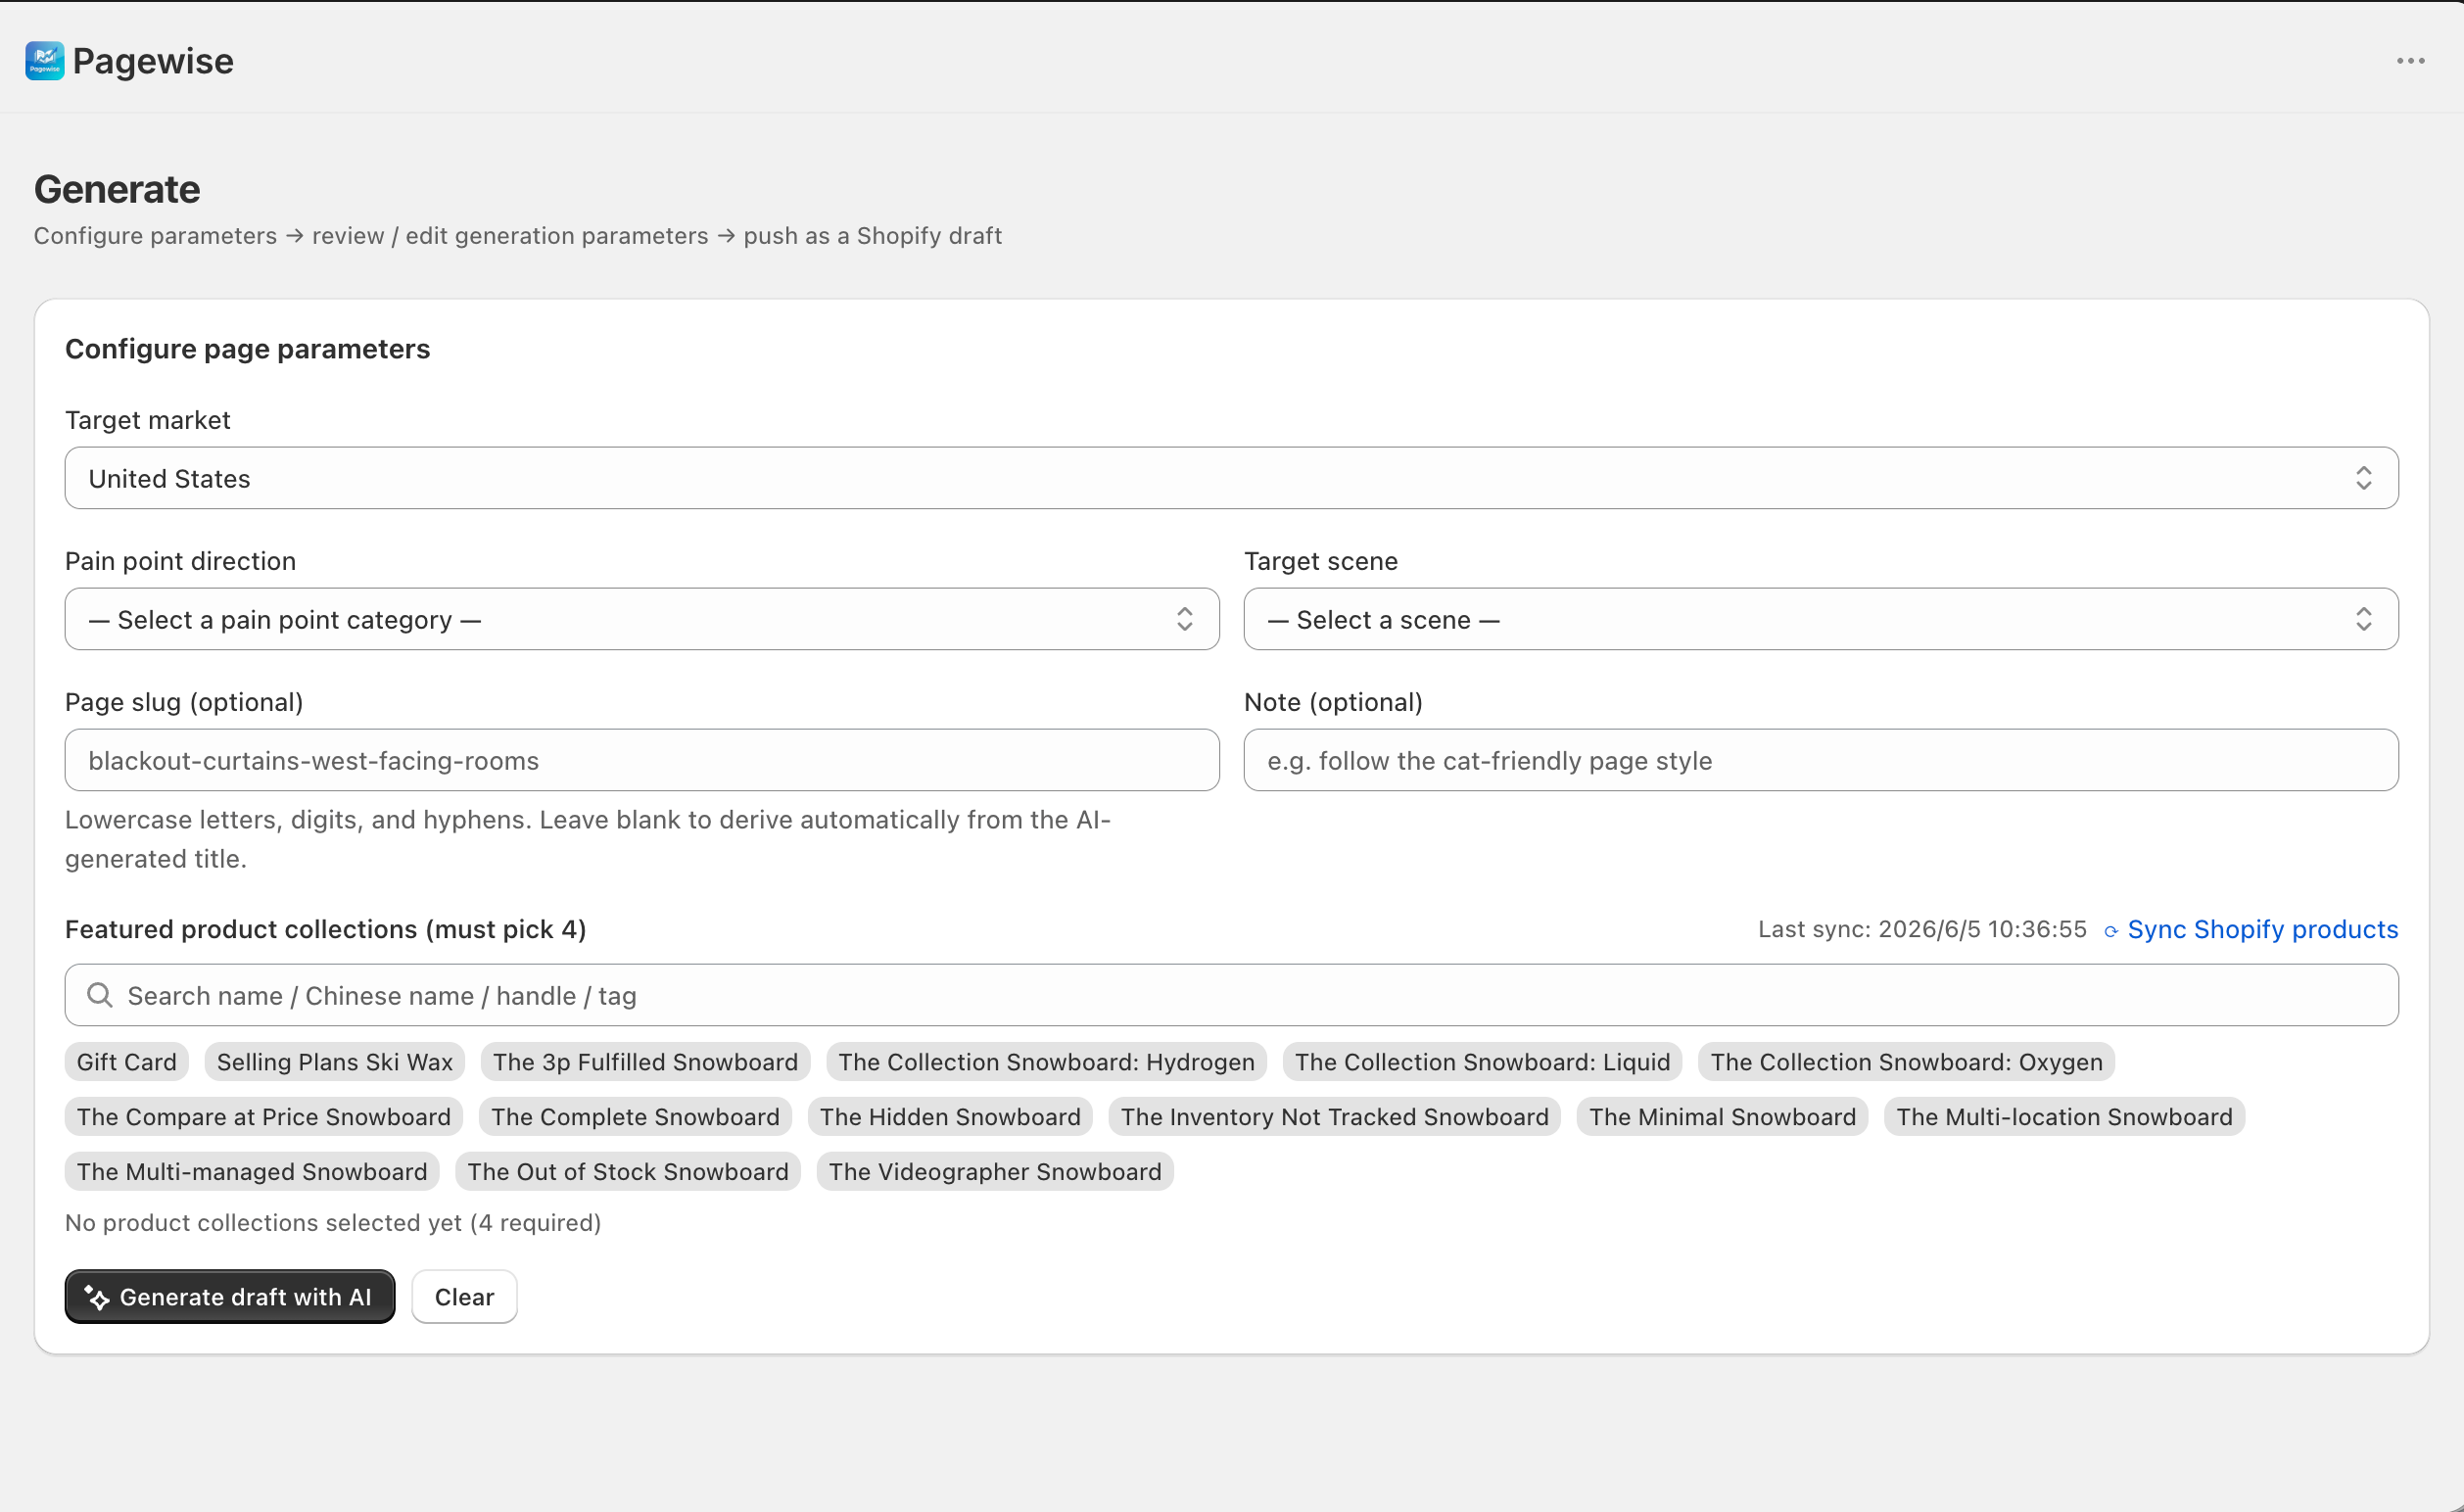
The "Generate" screen is the AI landing-page generator: pick the target market, a pain topic, a target scene, and 4 featured collections, and AI generates a fully structured landing-page draft in the background. The output format and structure are fixed by the system — you only provide and confirm the "what to write about" parameters.
Where to find it"Create page" in the top right of Home, the "AI landing page" tile on Home, or "New page" on the Pages screen; "Generate a page for this query" in a Search Console query's details brings the keyword along.
Interface overview
| Area | Description |
|---|---|
| Configure page parameters | Target market (dropdown, from your store's Markets), pain point direction + specific topic (two-level dropdowns fed by the knowledge base, with "Other (custom input)"), target scene (optional), page slug (optional — left blank, it's derived from the title), note (optional). |
| Featured product collections | Exactly 4 must be selected. Search box to filter plus clickable tags; a live "Selected N/4" count at the bottom. On first use, click "⟳ Sync Shopify products" to pull active products. |
| Action buttons | Primary "Generate draft with AI"; secondary "Clear" empties the form. The primary button is disabled while a background job is generating. |
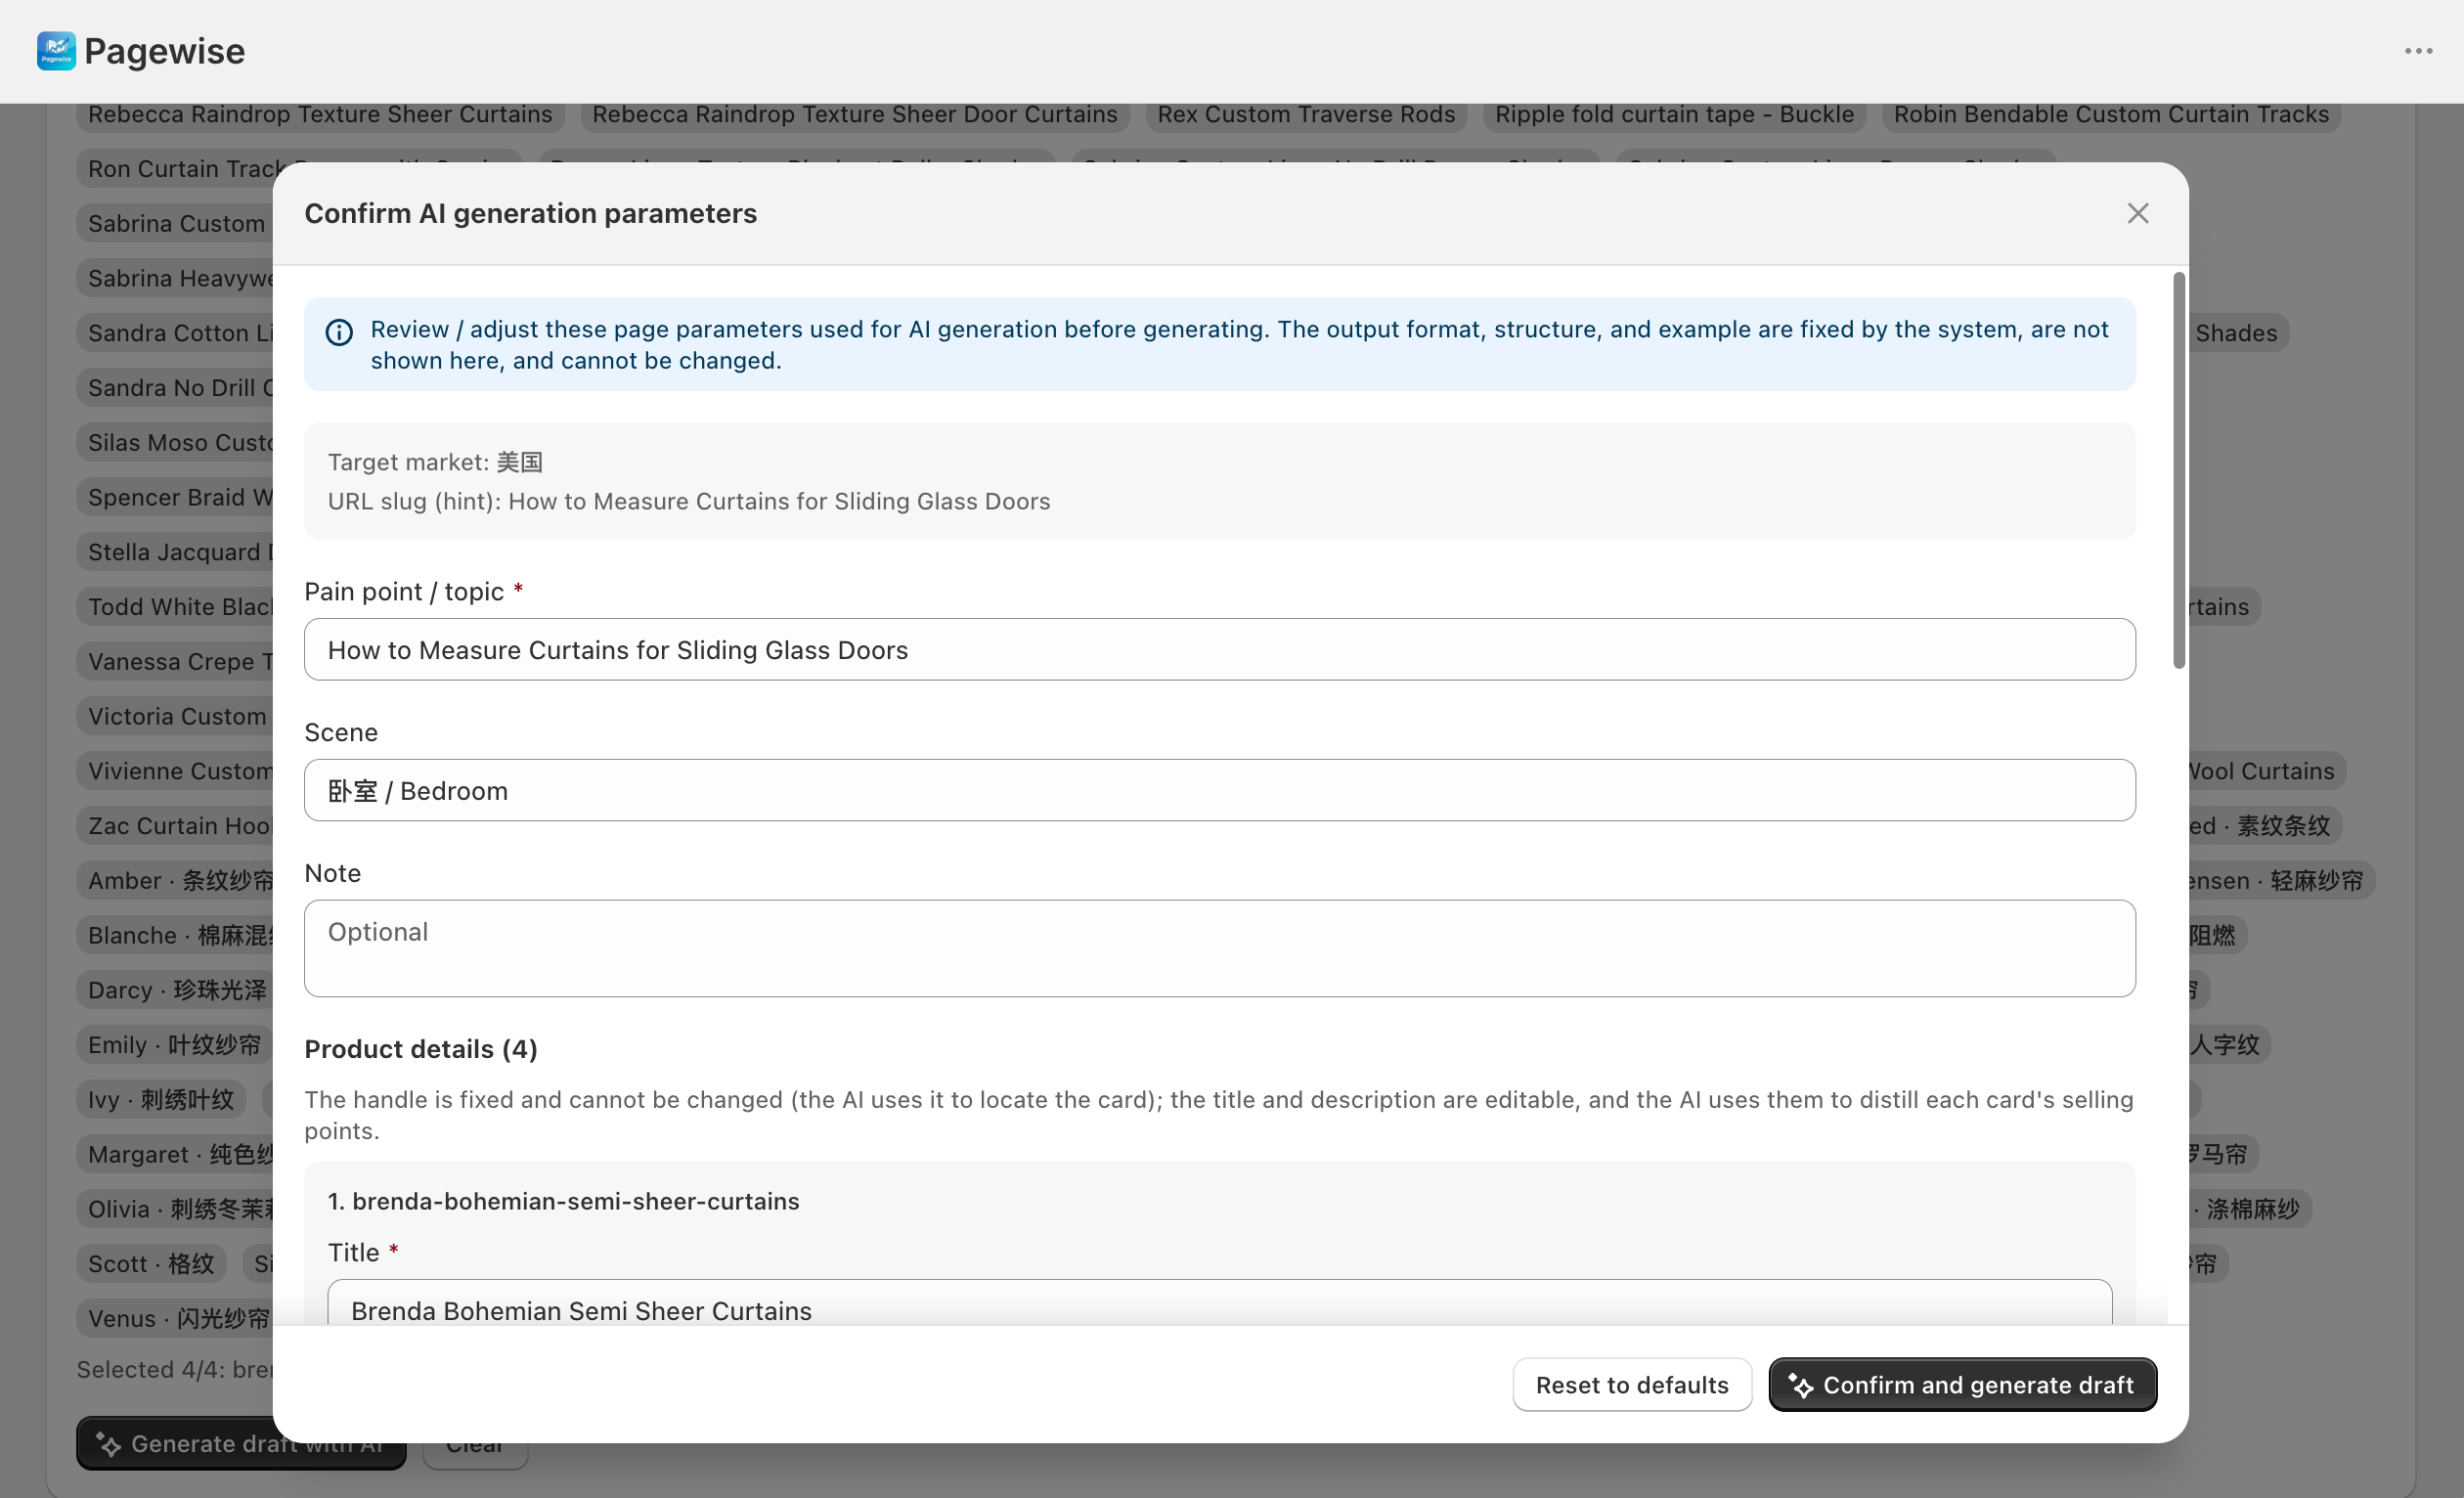
| Confirmation dialog | The last check before generating: read-only target market and slug hint; editable "Pain point / topic" (required), "Scene", and "Note"; each of the 4 products has "Title" and "Product description / selling points" (required — click "AI fill" to fill it automatically); "Add a row" appends extra requirements. At the bottom: "Confirm and generate draft" and "Reset to defaults". |
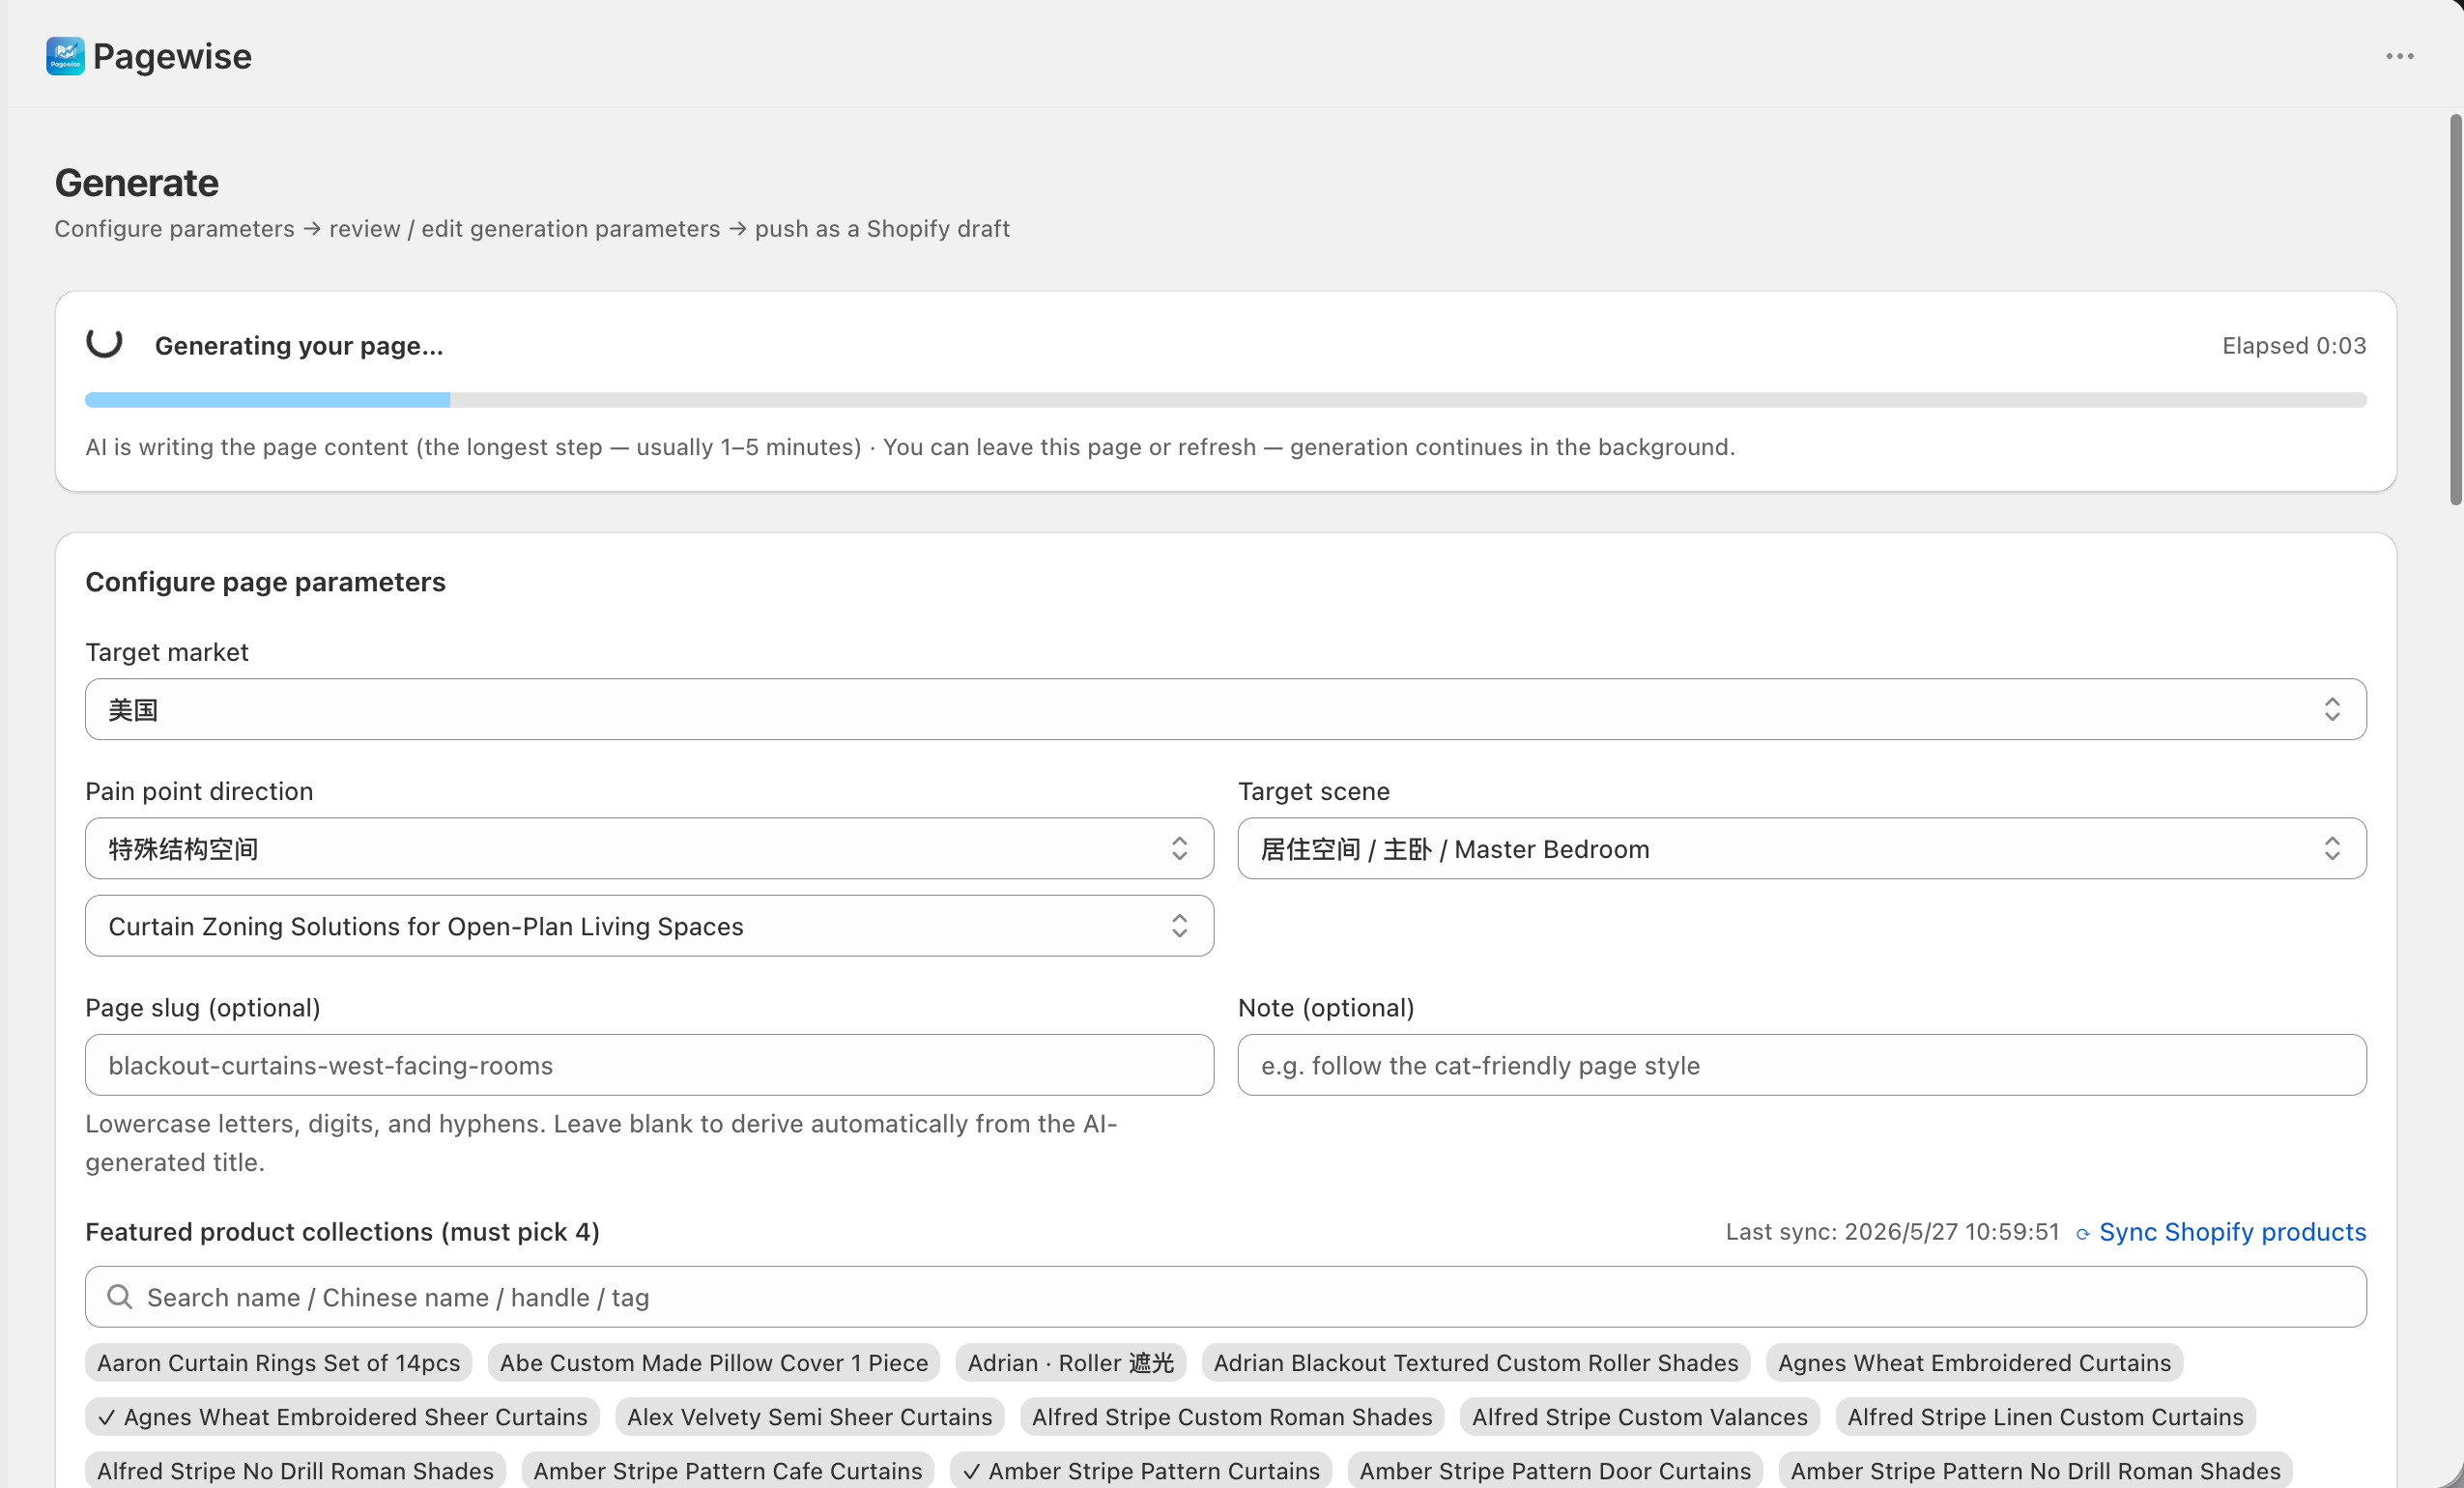
| Progress card | Appears at the top after confirming: Queued → AI is writing the page content (the slowest step, 1–5 minutes) → Injecting real product data → Pushing to Shopify → Saving the page record. |
Step by step
First use: sync Shopify products
- In the "Featured product collections" area, click "⟳ Sync Shopify products" to pull all active products from the store.
- Wait for the green banner with the sync result (fetched / added / updated / deactivated counts); the product tags are now clickable.
Configure parameters and generate
- Pick the "Target market".
- Pick a category under "Pain point direction", then a "Specific topic"; if nothing fits, choose "Other (custom input)" and type your own.
- (Optional) Pick a "Target scene" and fill in the "Page slug" and "Note". Slugs may only use lowercase letters, digits, and hyphens; left blank, one is derived from the AI-generated title.
- Select exactly 4 collections (use the search box to filter).
- Click "Generate draft with AI" — the app fetches live data for the selected products and opens the confirmation dialog.
- Review / edit the parameters in the dialog: check the pain topic and scene, then each of the 4 products' titles and selling-point descriptions (click "AI fill" for empty descriptions). Use "Add a row" for extra requirements (e.g. "emphasize pet-friendly"). Made a mess? Click "Reset to defaults".
- Click "Confirm and generate draft" — the progress card appears at the top. You can leave the page or refresh; generation continues in the background.
- When it succeeds, click "View pages" to review the draft under Pages; on failure the reason is shown — adjust the parameters and regenerate.
Things to note
- You must select exactly 4 collections — no more, no fewer.
- The pain-topic / scene dropdowns are fed by the knowledge base; if it's empty you can only type custom values — better to stock the knowledge base first.
- Only one generation job can run at a time; the AI writing step is the slowest, usually 1–5 minutes.
- The result is a draft — it is never published automatically. Review it under Pages / in the editor and publish manually.
- AI doesn't generate images yet: apart from product images pulled from Shopify, every other section uses gray placeholder images. Replace them in the editor before publishing (see Chapter 6).
- "AI not configured" means the developer still needs to configure the server; the "Additional permissions required" banner means the app must be reinstalled to grant new scopes.
- "Target market" relies on Shopify Markets; if it can't be read, enable Markets in the Shopify admin and reinstall the app.
Chapter 6
Page editor
The editor is a full-screen workspace for refining a single page: editing on the left, live preview on the right. Adjust section content and order, change the title and SEO fields, rewrite individual copy with AI, then save and publish to the storefront.
Where to find itClick a slug or the "Edit" icon in the Pages list; the editor covers the admin as a full-screen layer — click × in the top left to close and return to the list.
AI doesn't generate images yet — replace the placeholders before publishing
- Generated pages don't include images for now: except for the "Product grid", which automatically uses the live Shopify product images, every other section (hero banner, problem / solution, why choose, related solutions, …) ships with gray placeholder images.
- Before publishing, check each section's image fields in the editor and replace them via "Upload image" or "Browse images" — ideally with brand-supplied assets that match the page's topic.
- Publishing without replacing them shows gray placeholders on your storefront, hurting both looks and conversion.
Interface overview
| Area | Description |
|---|---|
| Top toolbar | Left: close, page title, status badge (Live / Draft), "Unsaved changes" badge. Center: desktop / tablet / mobile view switch. Right: Undo, Redo, "Preview", "Publish" ("Unpublish" when live), "Save". |
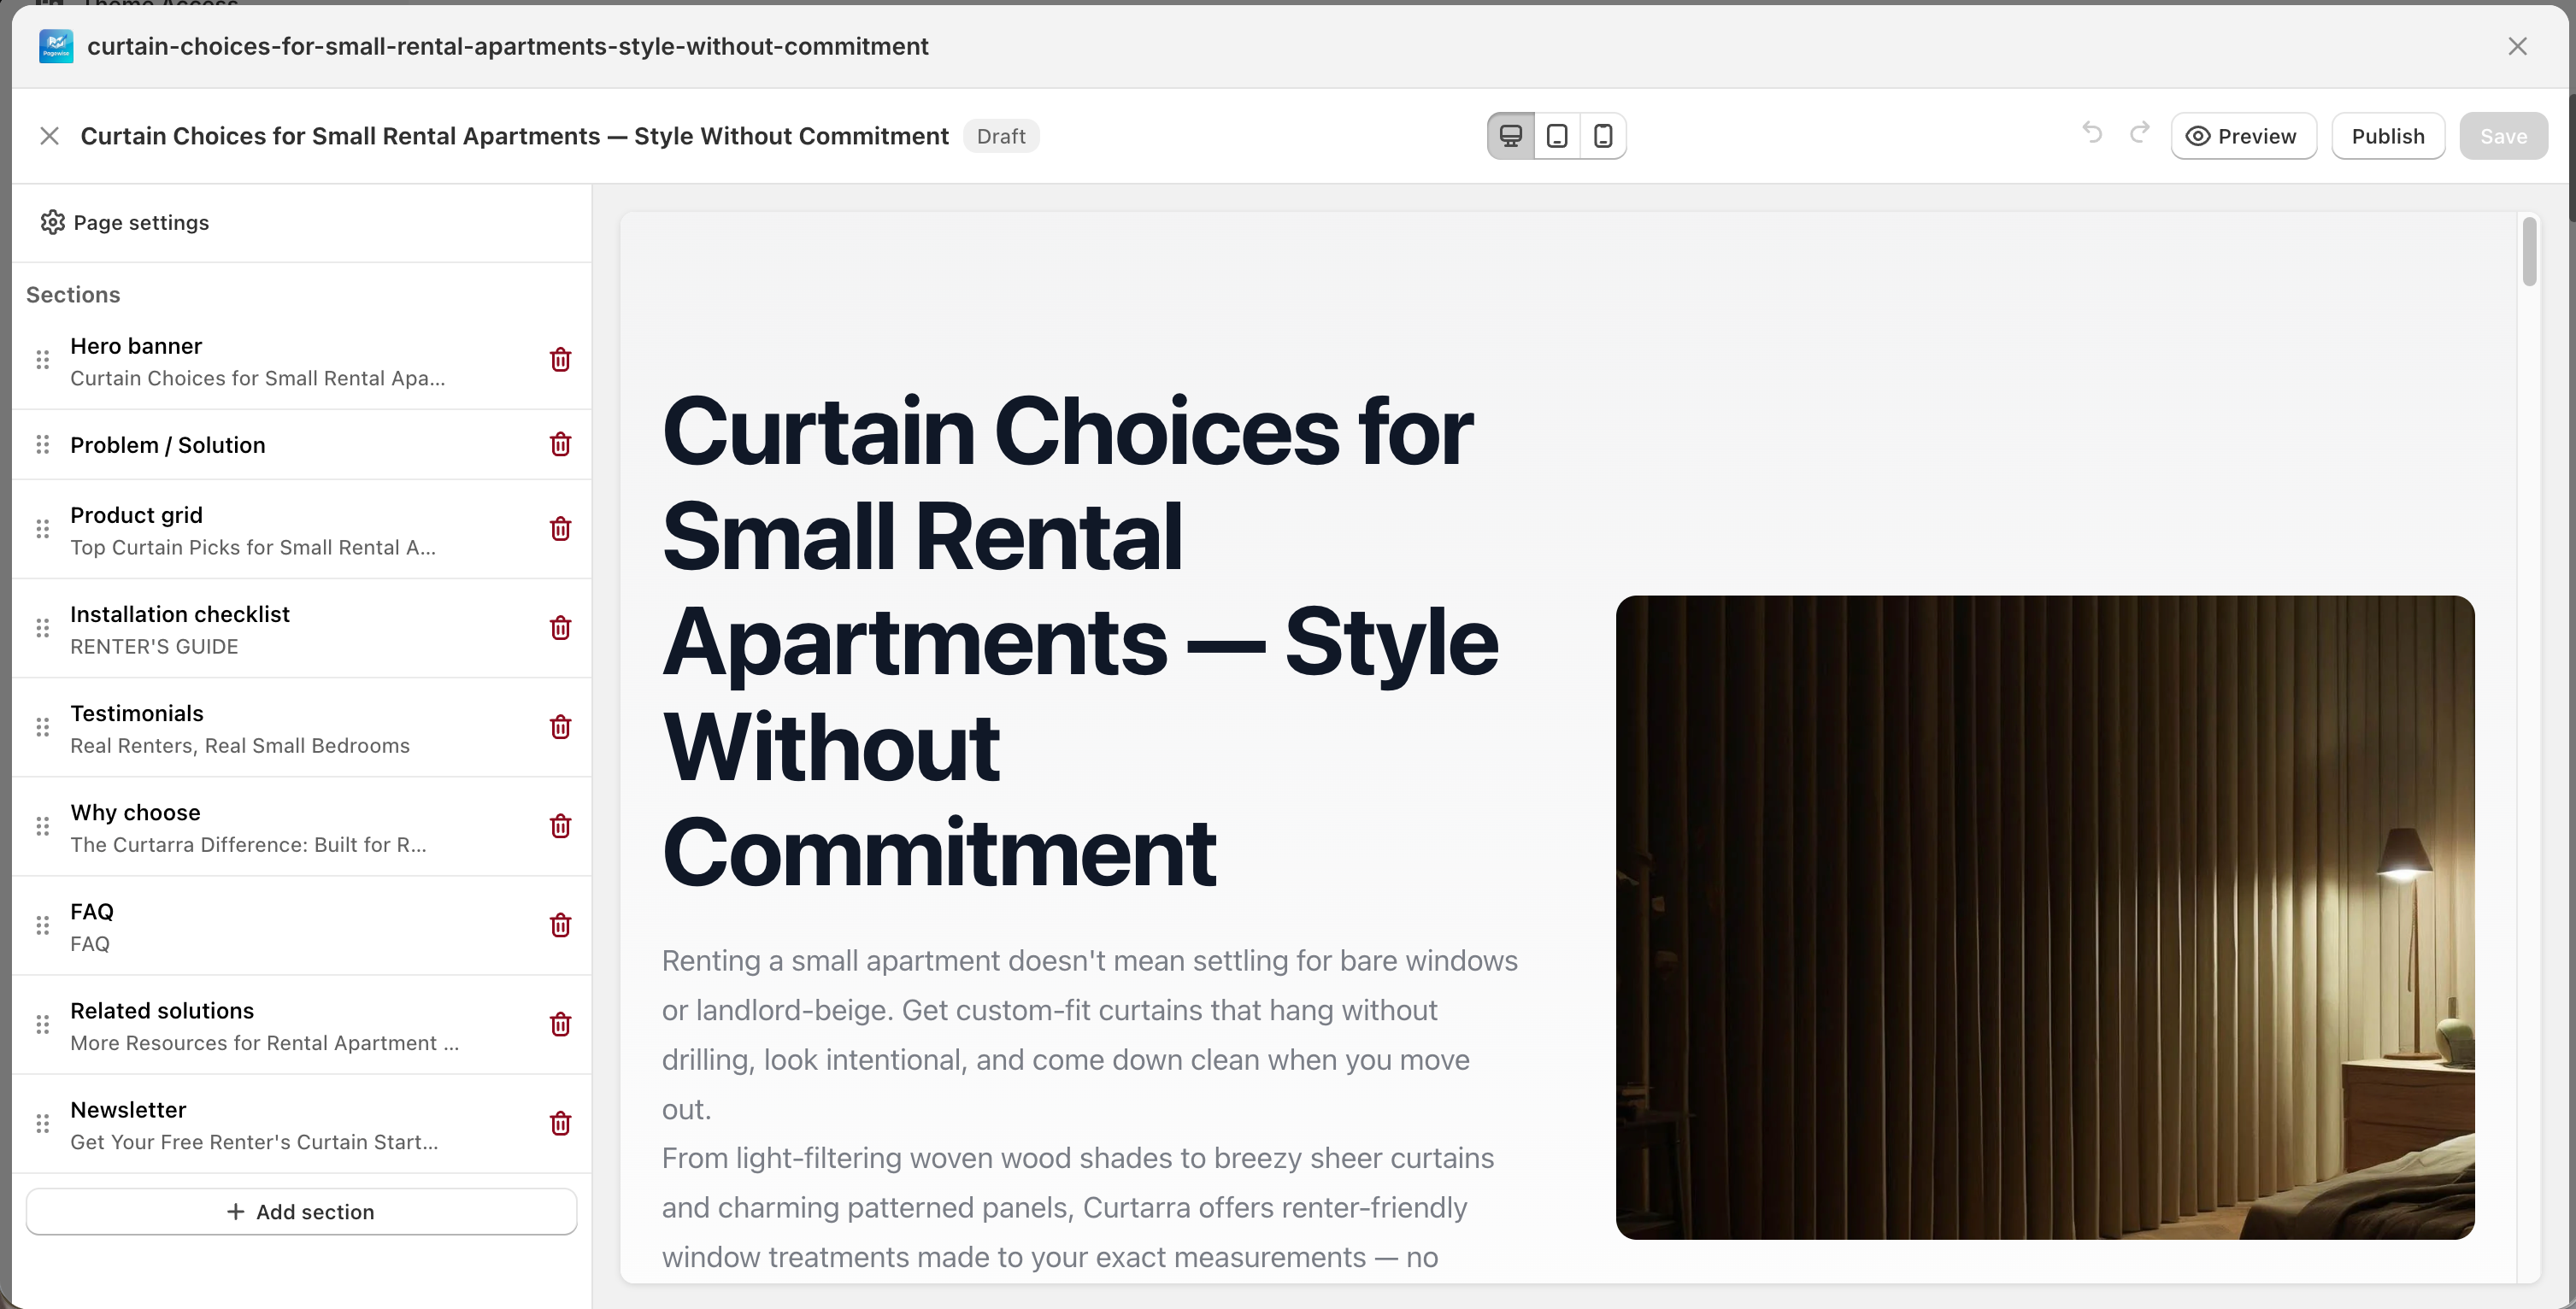
| Left · section list | All sections in page order — drag to reorder, click to open settings, trash icon to remove (with confirmation). "Add section" offers 9 section types: hero banner, problem / solution, product grid, installation checklist, customer reviews, why choose, FAQ, related solutions, newsletter. |
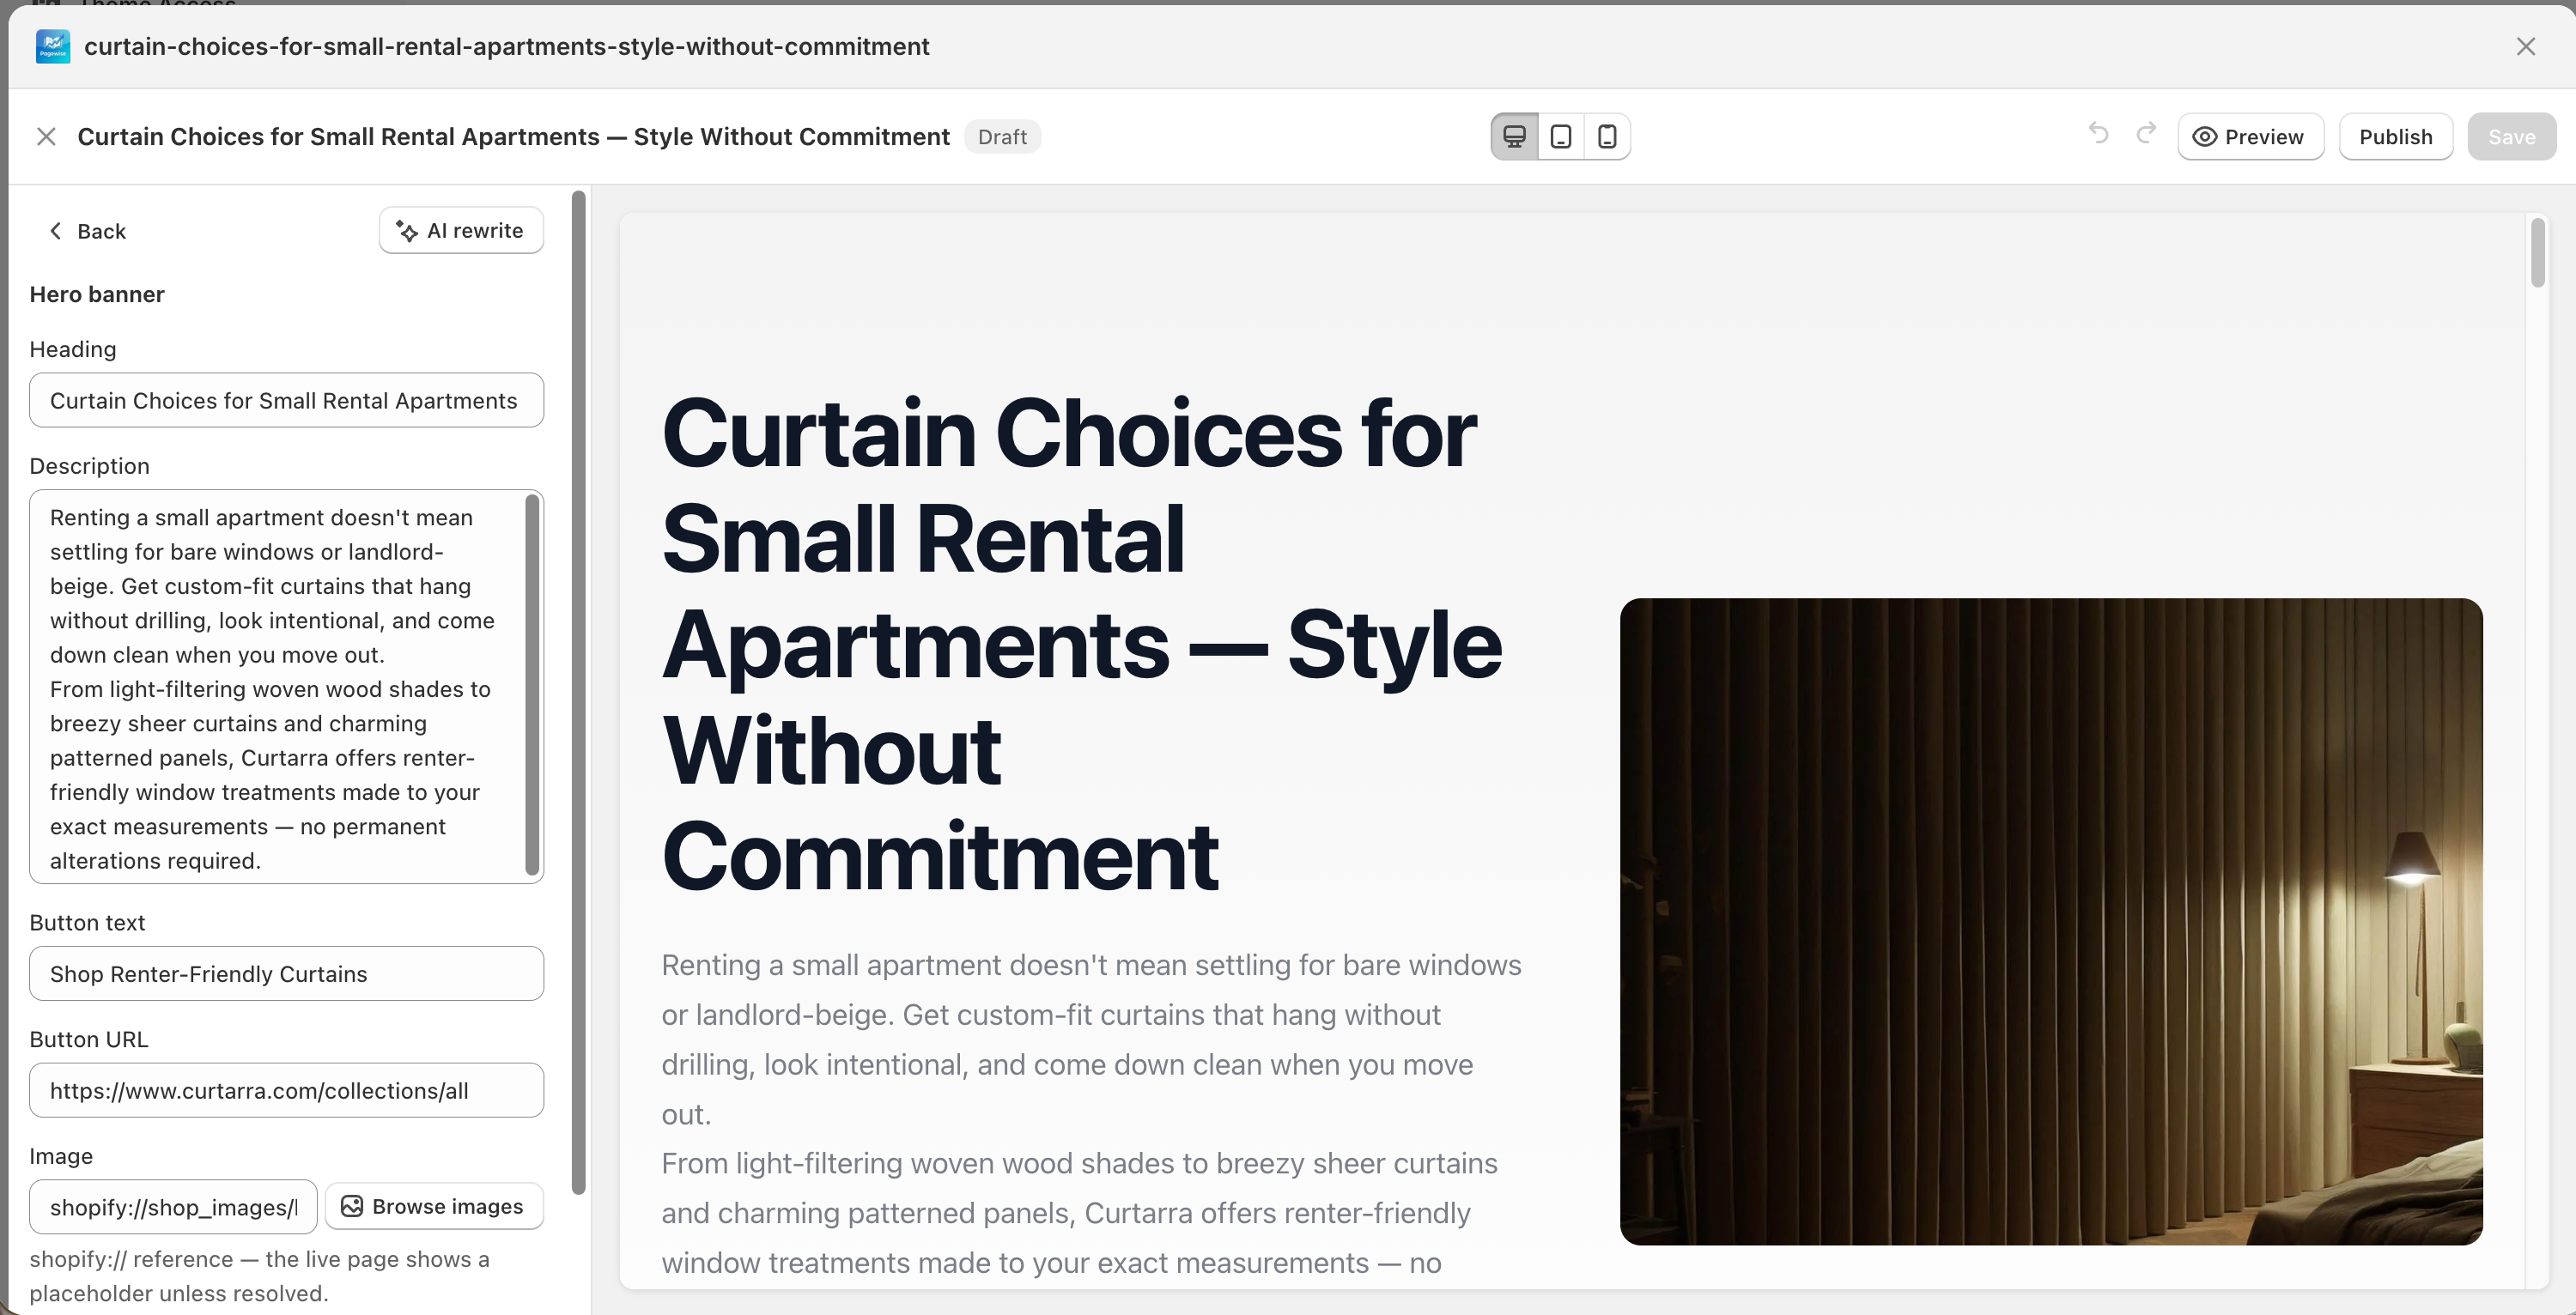
| Left · section settings | The section's field form (heading, description, button, image, product picker, …) plus its "Blocks" list (e.g. each FAQ entry or review — add, remove, expand to edit, drag to reorder). "Back" and "AI rewrite" at the top. Image fields support "Browse images" and "Upload image". |
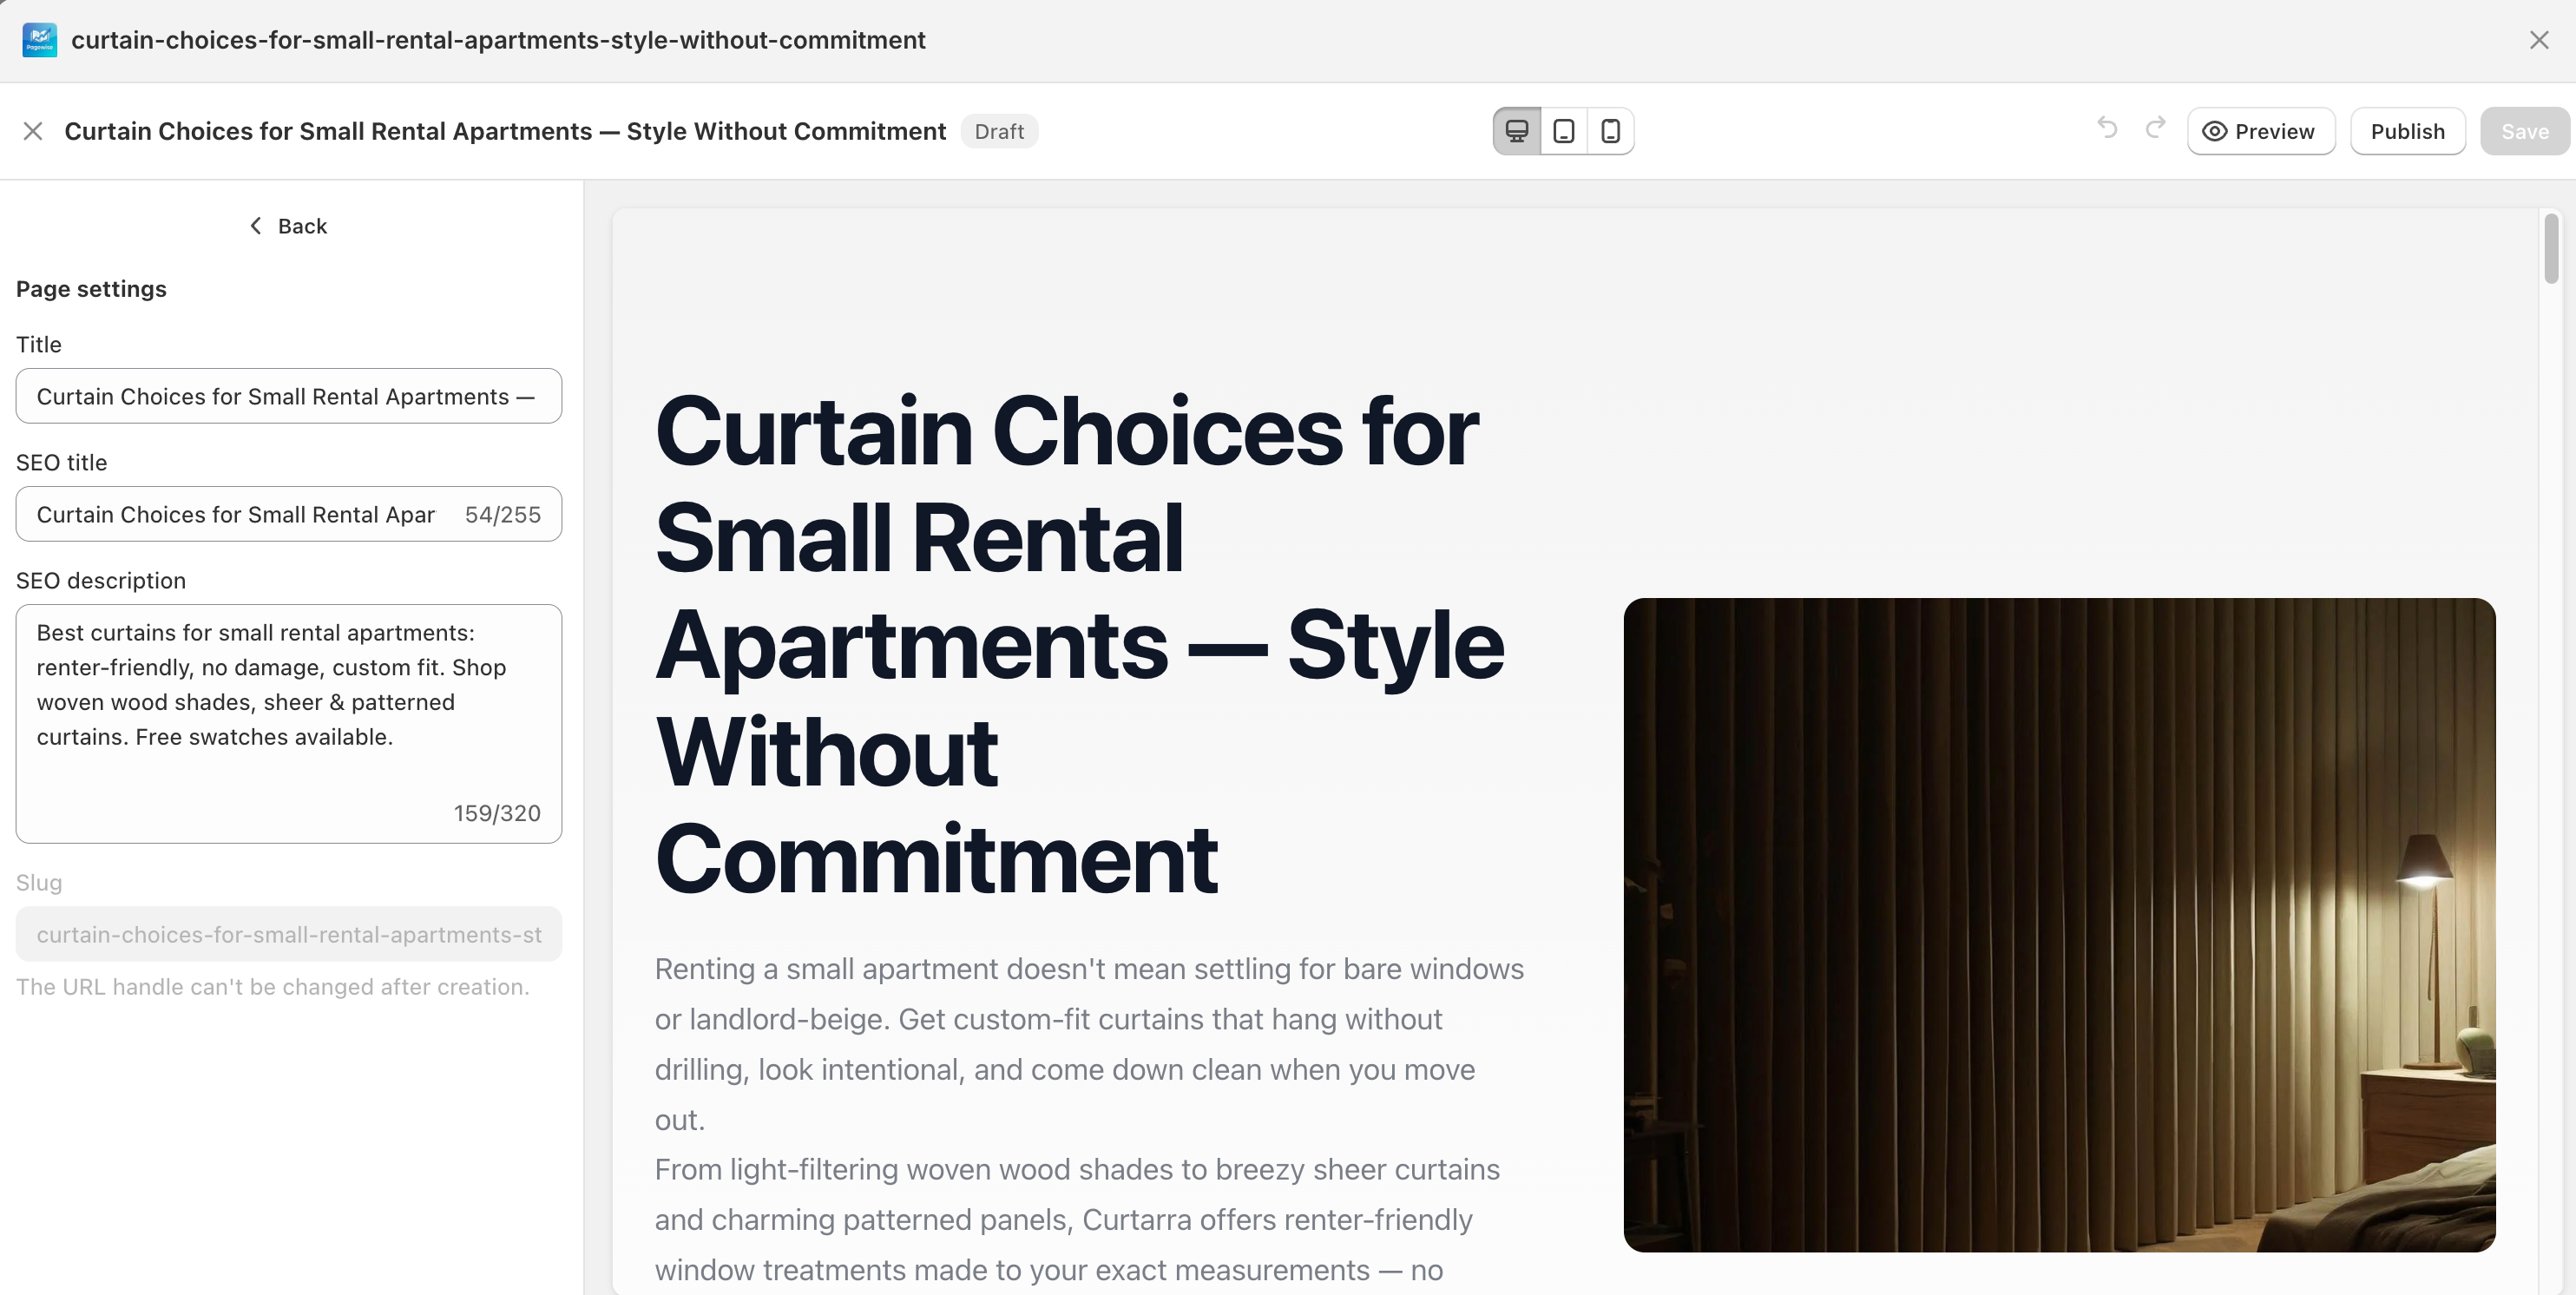
| Left · page settings | Title, SEO title (max 255 characters, with counter), SEO description (max 320 characters); the slug is read-only (fixed after creation). |
| Right · live canvas | Renders your edits live, refreshing shortly after you stop typing. Clicking a section on the canvas opens its settings on the left; selecting a section on the left smooth-scrolls the canvas to it. |
Step by step
Edit section content
- Click the section in the left list (or click the matching area on the canvas).
- Edit the text, links, images, and other fields — the canvas refreshes live. List-style content (e.g. a single FAQ entry) is edited by expanding it under "Blocks", where you can also add, remove, and drag to reorder.
- Click "Back" to return to the section list, then "Save" in the toolbar.
Rewrite a section with AI
- Open the section's settings panel and click "AI rewrite" in the top right.
- Describe the change under "What should change?" — e.g. "Make it warmer and mention free shipping" — and click "Rewrite".
- The result is applied directly with the hint "Rewrite applied — review and save." Check the canvas; press ⌘Z to undo if you don't like it, or "Save" if you do.
Preview and publish
- Click "Save" first — the preview link shows saved content only; unsaved edits won't appear.
- Click "Preview": a temporary preview link opens in a new tab, shareable with teammates (preview pages aren't indexed by search engines). Links expire — go back to the editor and click "Preview" again for a fresh one.
- When everything checks out, click "Publish" — the badge flips to "Live" and the page is reachable on your storefront (URL like
your-domain/pages/…). To take it offline, click "Unpublish" in the same spot.
Save ≠ publish — know which one you're clicking
- "Save" only updates page content and never changes the live status; "Publish / Unpublish" only toggles visibility and never saves in-progress edits. The right order: save first, then publish.
- If the page is already "Live", clicking "Save" updates the live content immediately — customers see it right away. For major edits to a live page, consider "Unpublish" first or work during a quiet window.
Things to note
- Shortcuts: ⌘Z undo, ⇧⌘Z redo, ⌘S save (Ctrl on Windows).
- Crash protection: if the browser closes unexpectedly, reopening the editor asks "Restore unsaved edits?" — click "Restore" to get your changes back.
- The slug (URL handle) is fixed after creation — to keep indexed links alive, the field is read-only in the editor.
- "AI rewrite" only touches the current section and can be undone; if it says AI isn't configured, the developer needs to set it up server-side.
- Closing the editor with unsaved edits triggers a "Discard unsaved changes?" confirmation.
- A popup blocker can stop the preview tab from opening — allow popups for this site. Rapid-fire saves may be rate-limited briefly; wait a moment and retry.
Chapter 7
Knowledge base
The knowledge base is the AI's material store, holding five kinds of information: collections, service features, internal links, pain topics, and target scenes. Pain topics and target scenes become the dropdown options on the Generate screen, service features get quoted in generated copy, and internal links are embedded into pages automatically. The more complete the material, the closer generated pages fit your store.
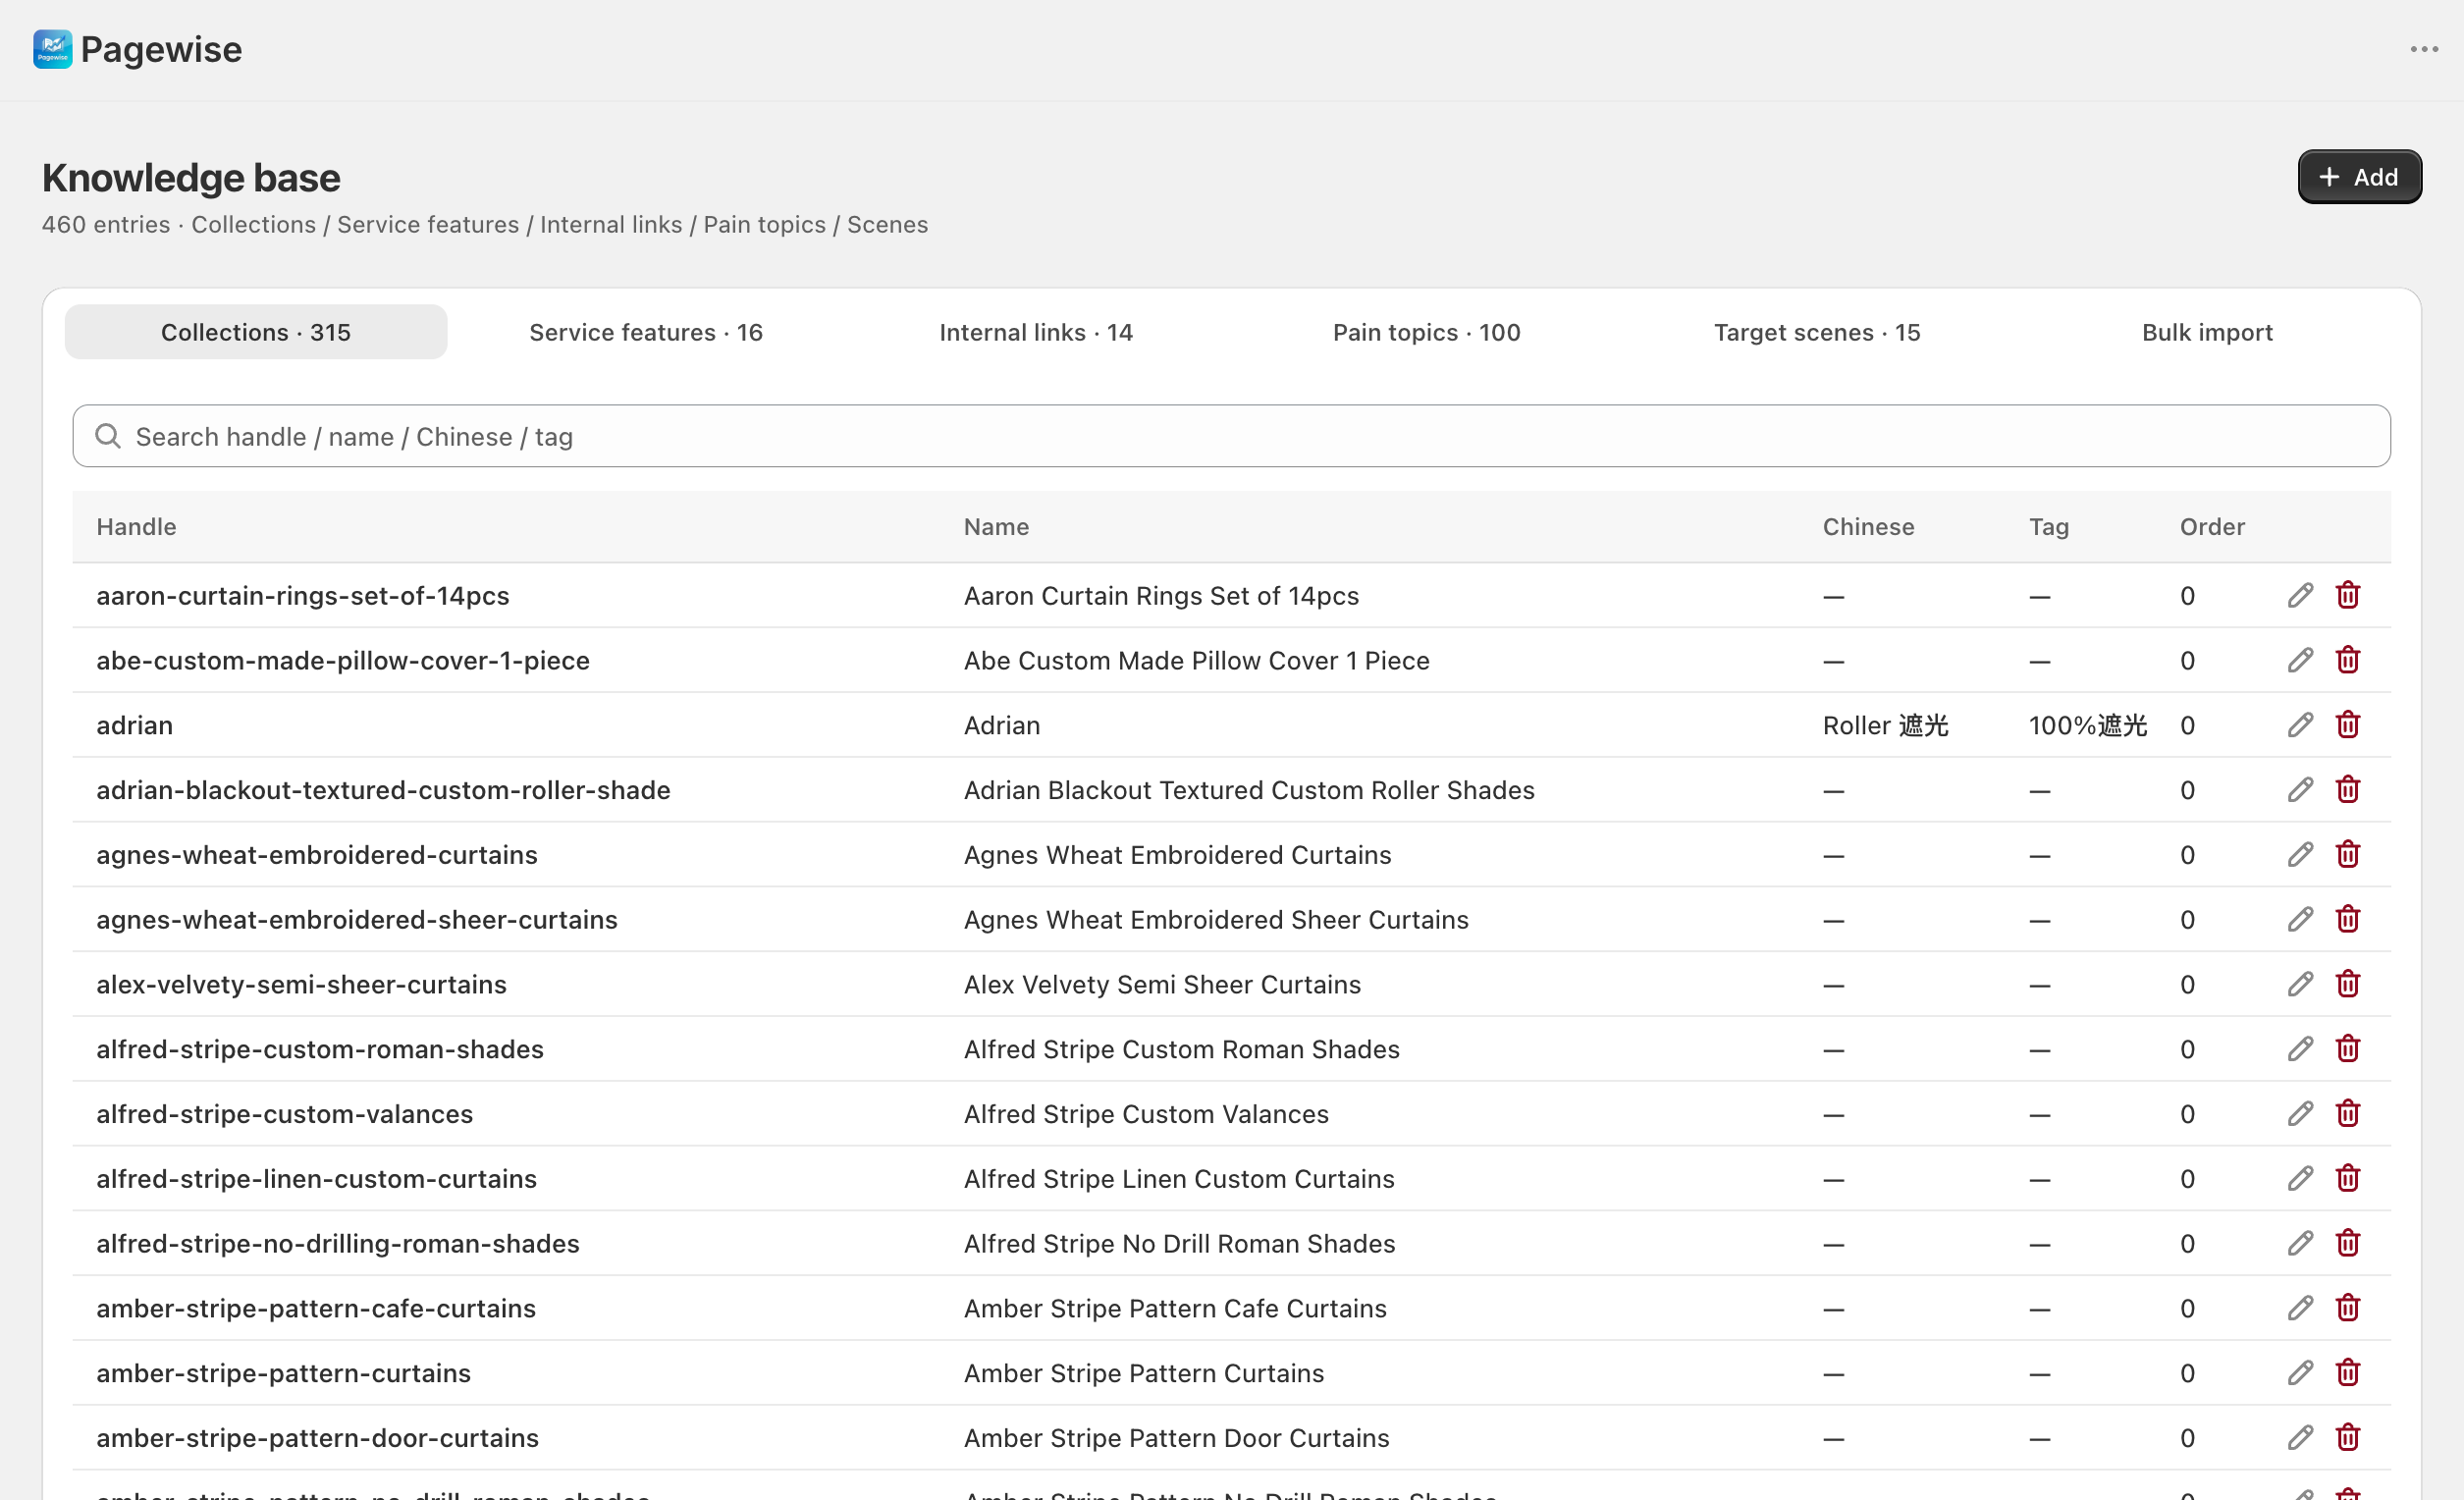
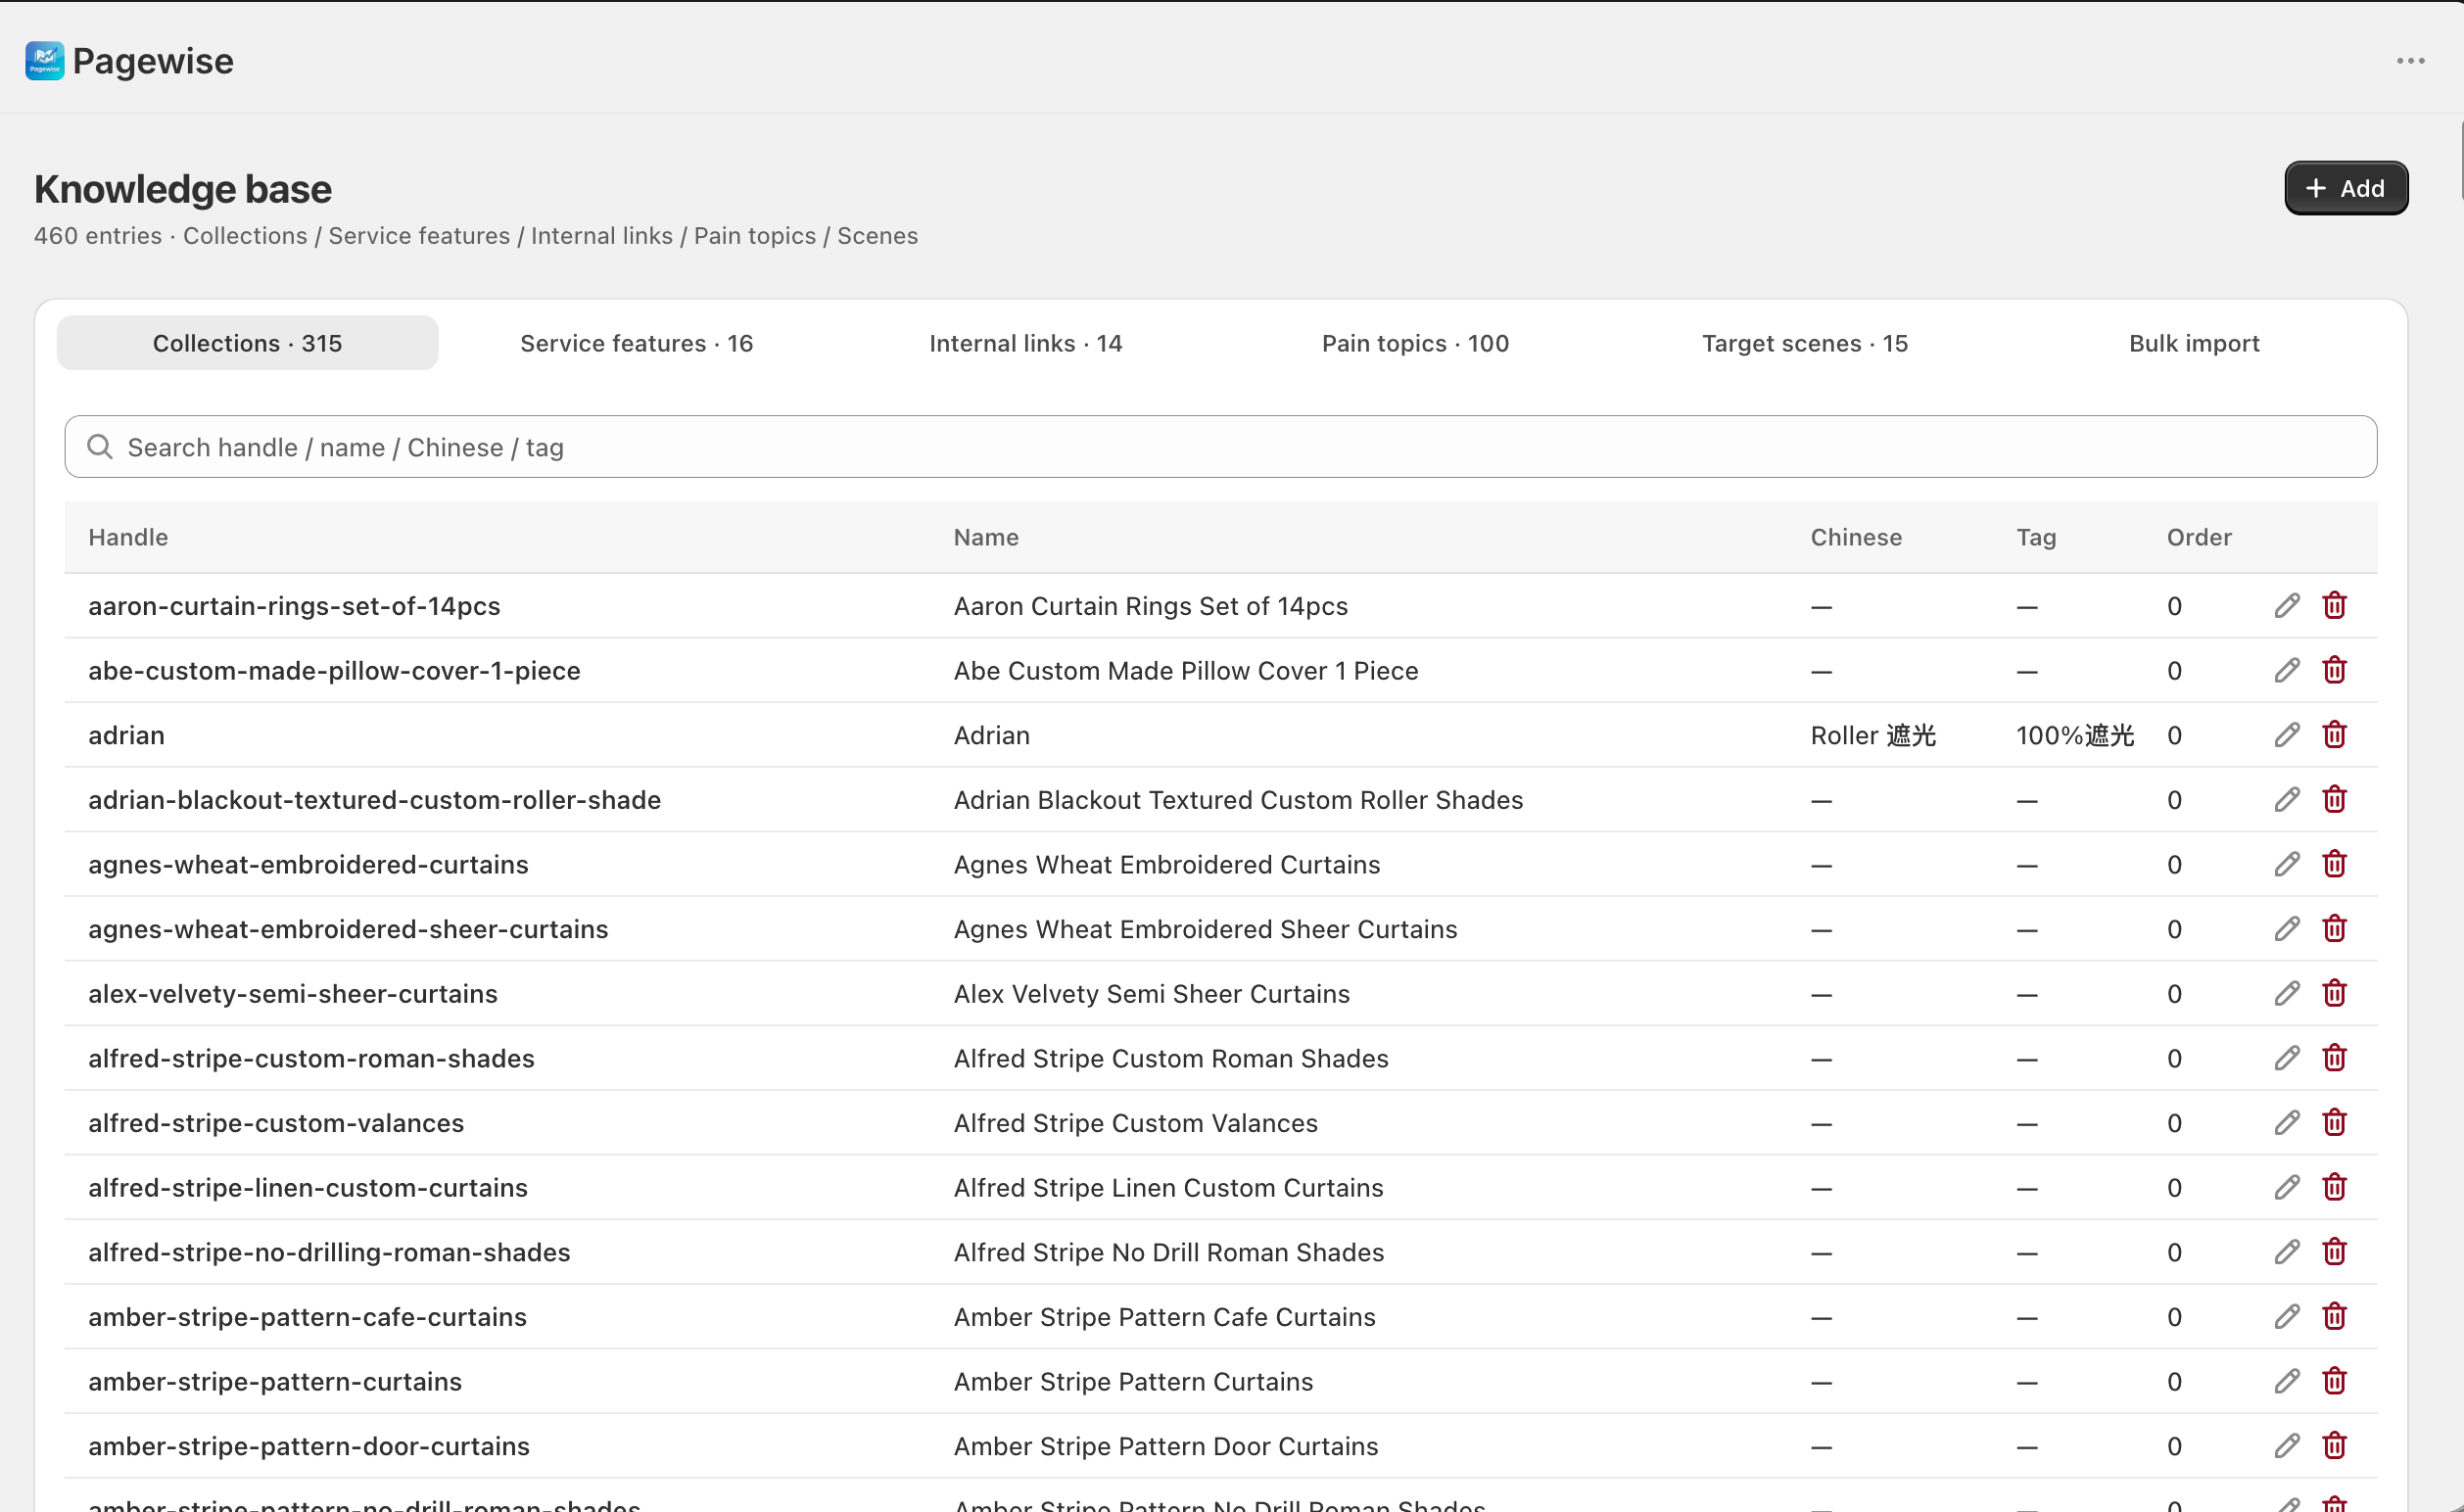
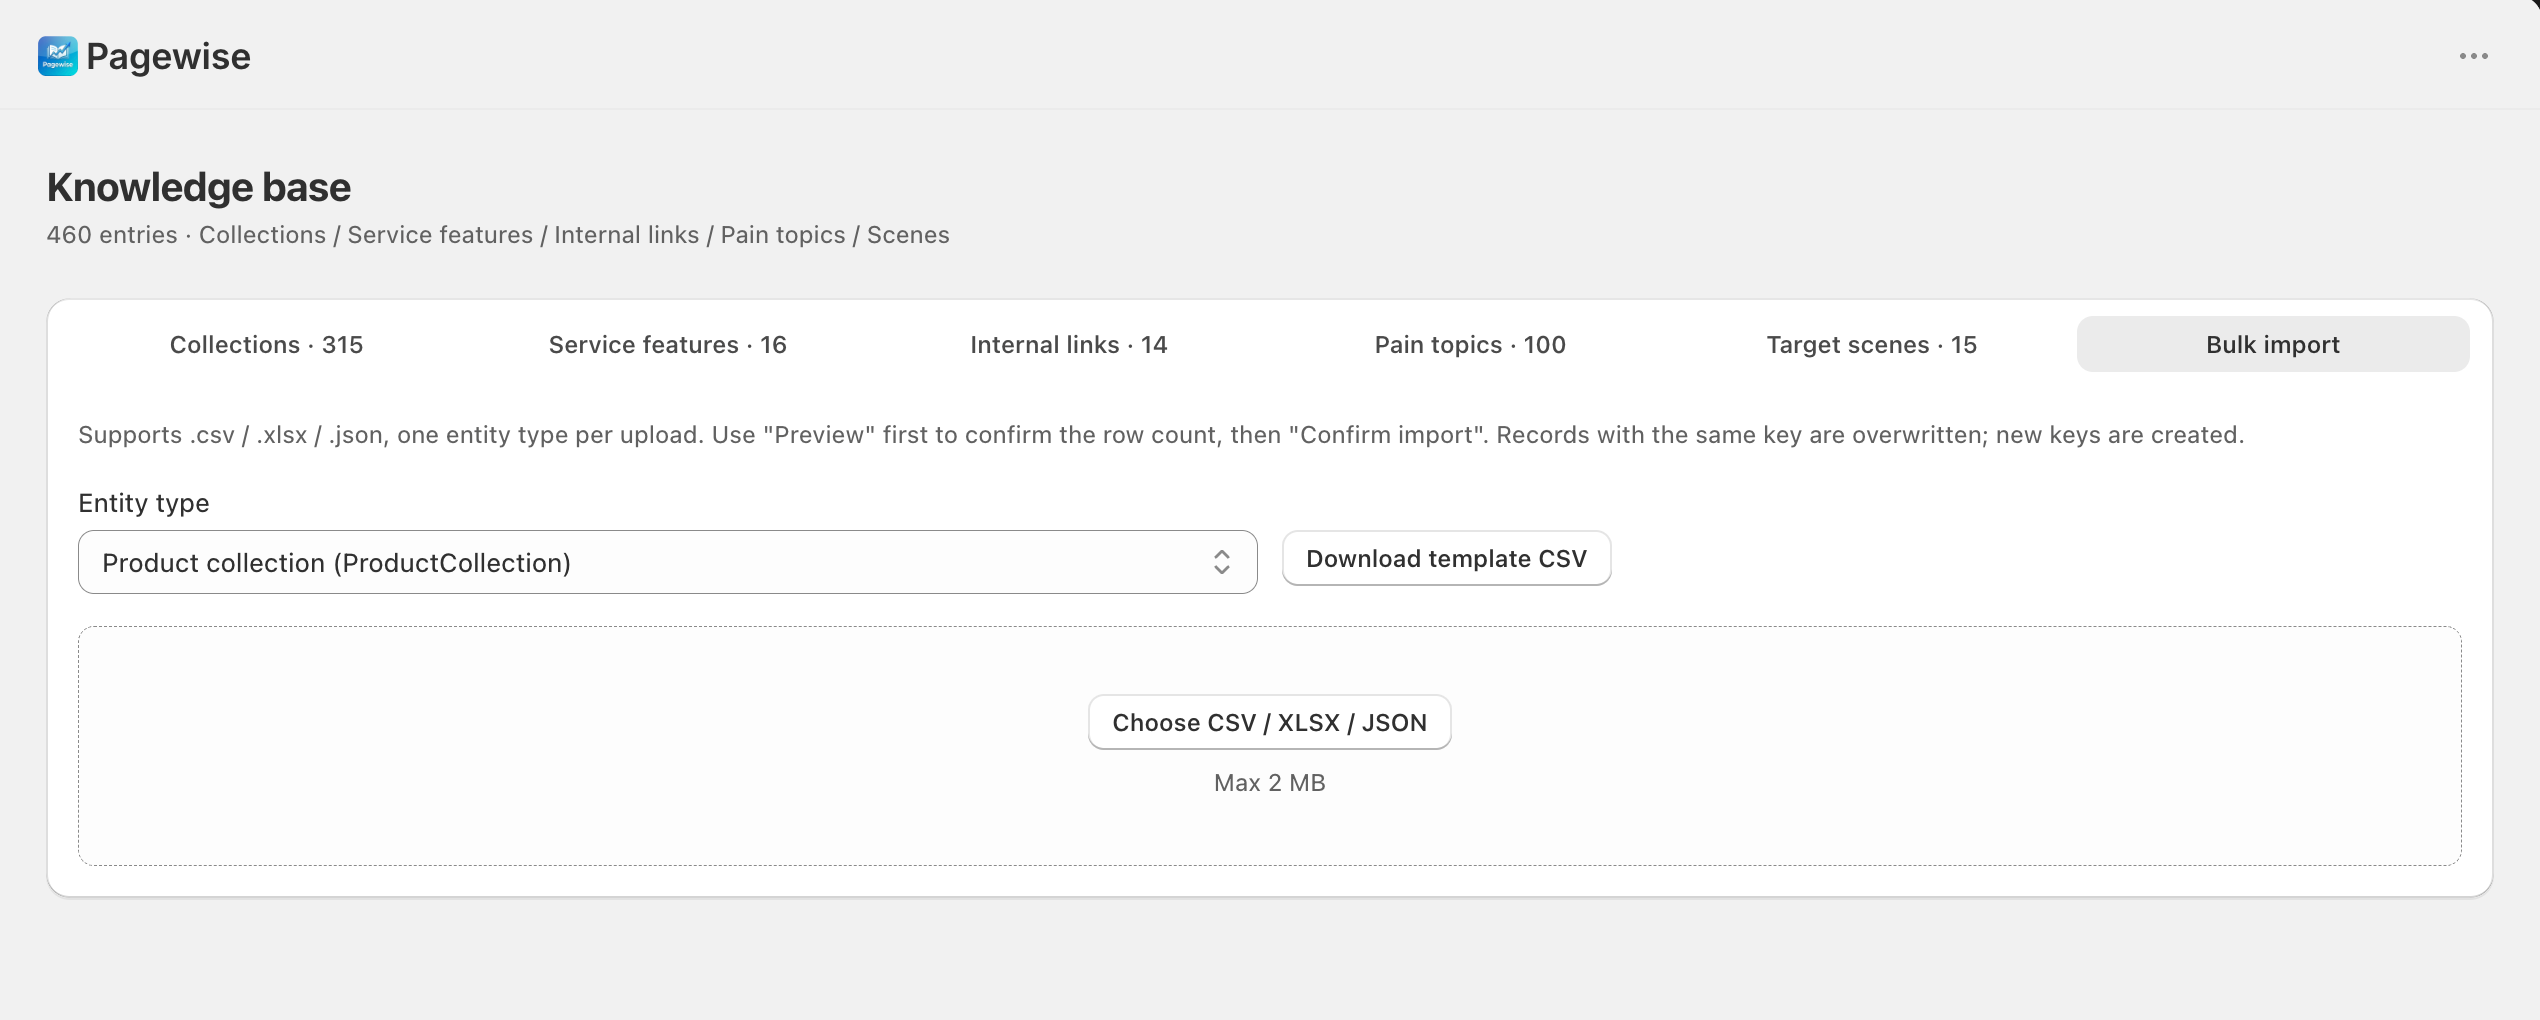
Where to find it"Knowledge" in the left nav. Tabs: Collections · Service features · Internal links · Pain topics · Target scenes · Bulk import (the first five tab titles show entry counts).
Interface overview
| Tab | Content & special features |
|---|---|
| Collections | Handle, name (English / Chinese), tag, display order; the search box filters instantly by handle / name / Chinese name / tag. |
| Service features | Selling-point copy reused across pages (key, label, market us/de, order); when empty, "✨ AI generate from your catalog" appears. |
| Internal links | Frequently used store links (slug, title, category, priority); "Import site pages (pages / blogs / collections)" in the top right. |
| Pain topics | Customer pain points registered by category (category, topic, market) — the topic material for generating pages; can be AI-generated when empty. |
| Target scenes | Usage scenes entered by group (e.g. Living space → Bedroom); can be AI-generated when empty. |
| Bulk import | Import any entity type from CSV / XLSX / JSON: pick the "Entity type" → optionally "Download template CSV" → upload → preview → "Confirm import". |
Step by step
Add / edit / delete entries by hand
- Switch to the target tab, click "Add" in the top right, fill in the dialog form (fields vary per tab; empty required fields turn red), and click "Create".
- Edit: click the pencil icon in the row, then "Save".
- Delete: click the trash icon in the row and confirm in the "Confirm delete?" dialog. Deletion cannot be undone.
Generate material with AI
- When the "Service features", "Pain topics", or "Target scenes" tab is empty, click "✨ AI generate from your catalog" in the empty state.
- AI reads your synced product catalog, generates all three kinds of material in one pass, and imports them into their tabs; edit them like any other entry afterwards.
Import site links in one click
- Switch to the "Internal links" tab and click "Import site pages (pages / blogs / collections)".
- The app imports every published page, blog article, and collection as internal-link entries, then reports "Imported X, updated Y." Safe to re-run any time — entries are deduplicated and updated by URL.
Bulk import (file upload)
- Switch to the "Bulk import" tab and pick the type under "Entity type" (one type per upload).
- Unsure about the format? Click "Download template CSV" and fill it in.
- Drop or pick a CSV / XLSX / JSON file (max 2 MB) — it parses automatically and shows "Preview N rows"; rows missing required fields are skipped with a banner.
- When the preview looks right, click "Confirm import" — the result reads "Imported: X added · Y updated".
Things to note
- Records sharing a key (a collection's handle, a feature's key, a link's slug) are overwritten on import; new keys create new entries — so re-importing the same file is safe.
- "✨ AI generate from your catalog" has two prerequisites: the product catalog is synced and AI is configured; the button only appears while the tab is empty.
- A collection's Metadata field must be valid JSON (e.g.
{"gsm":290}) or it won't save. - Stock the material before generating pages — knowledge-base content directly drives AI output quality.
Chapter 8
Search Console
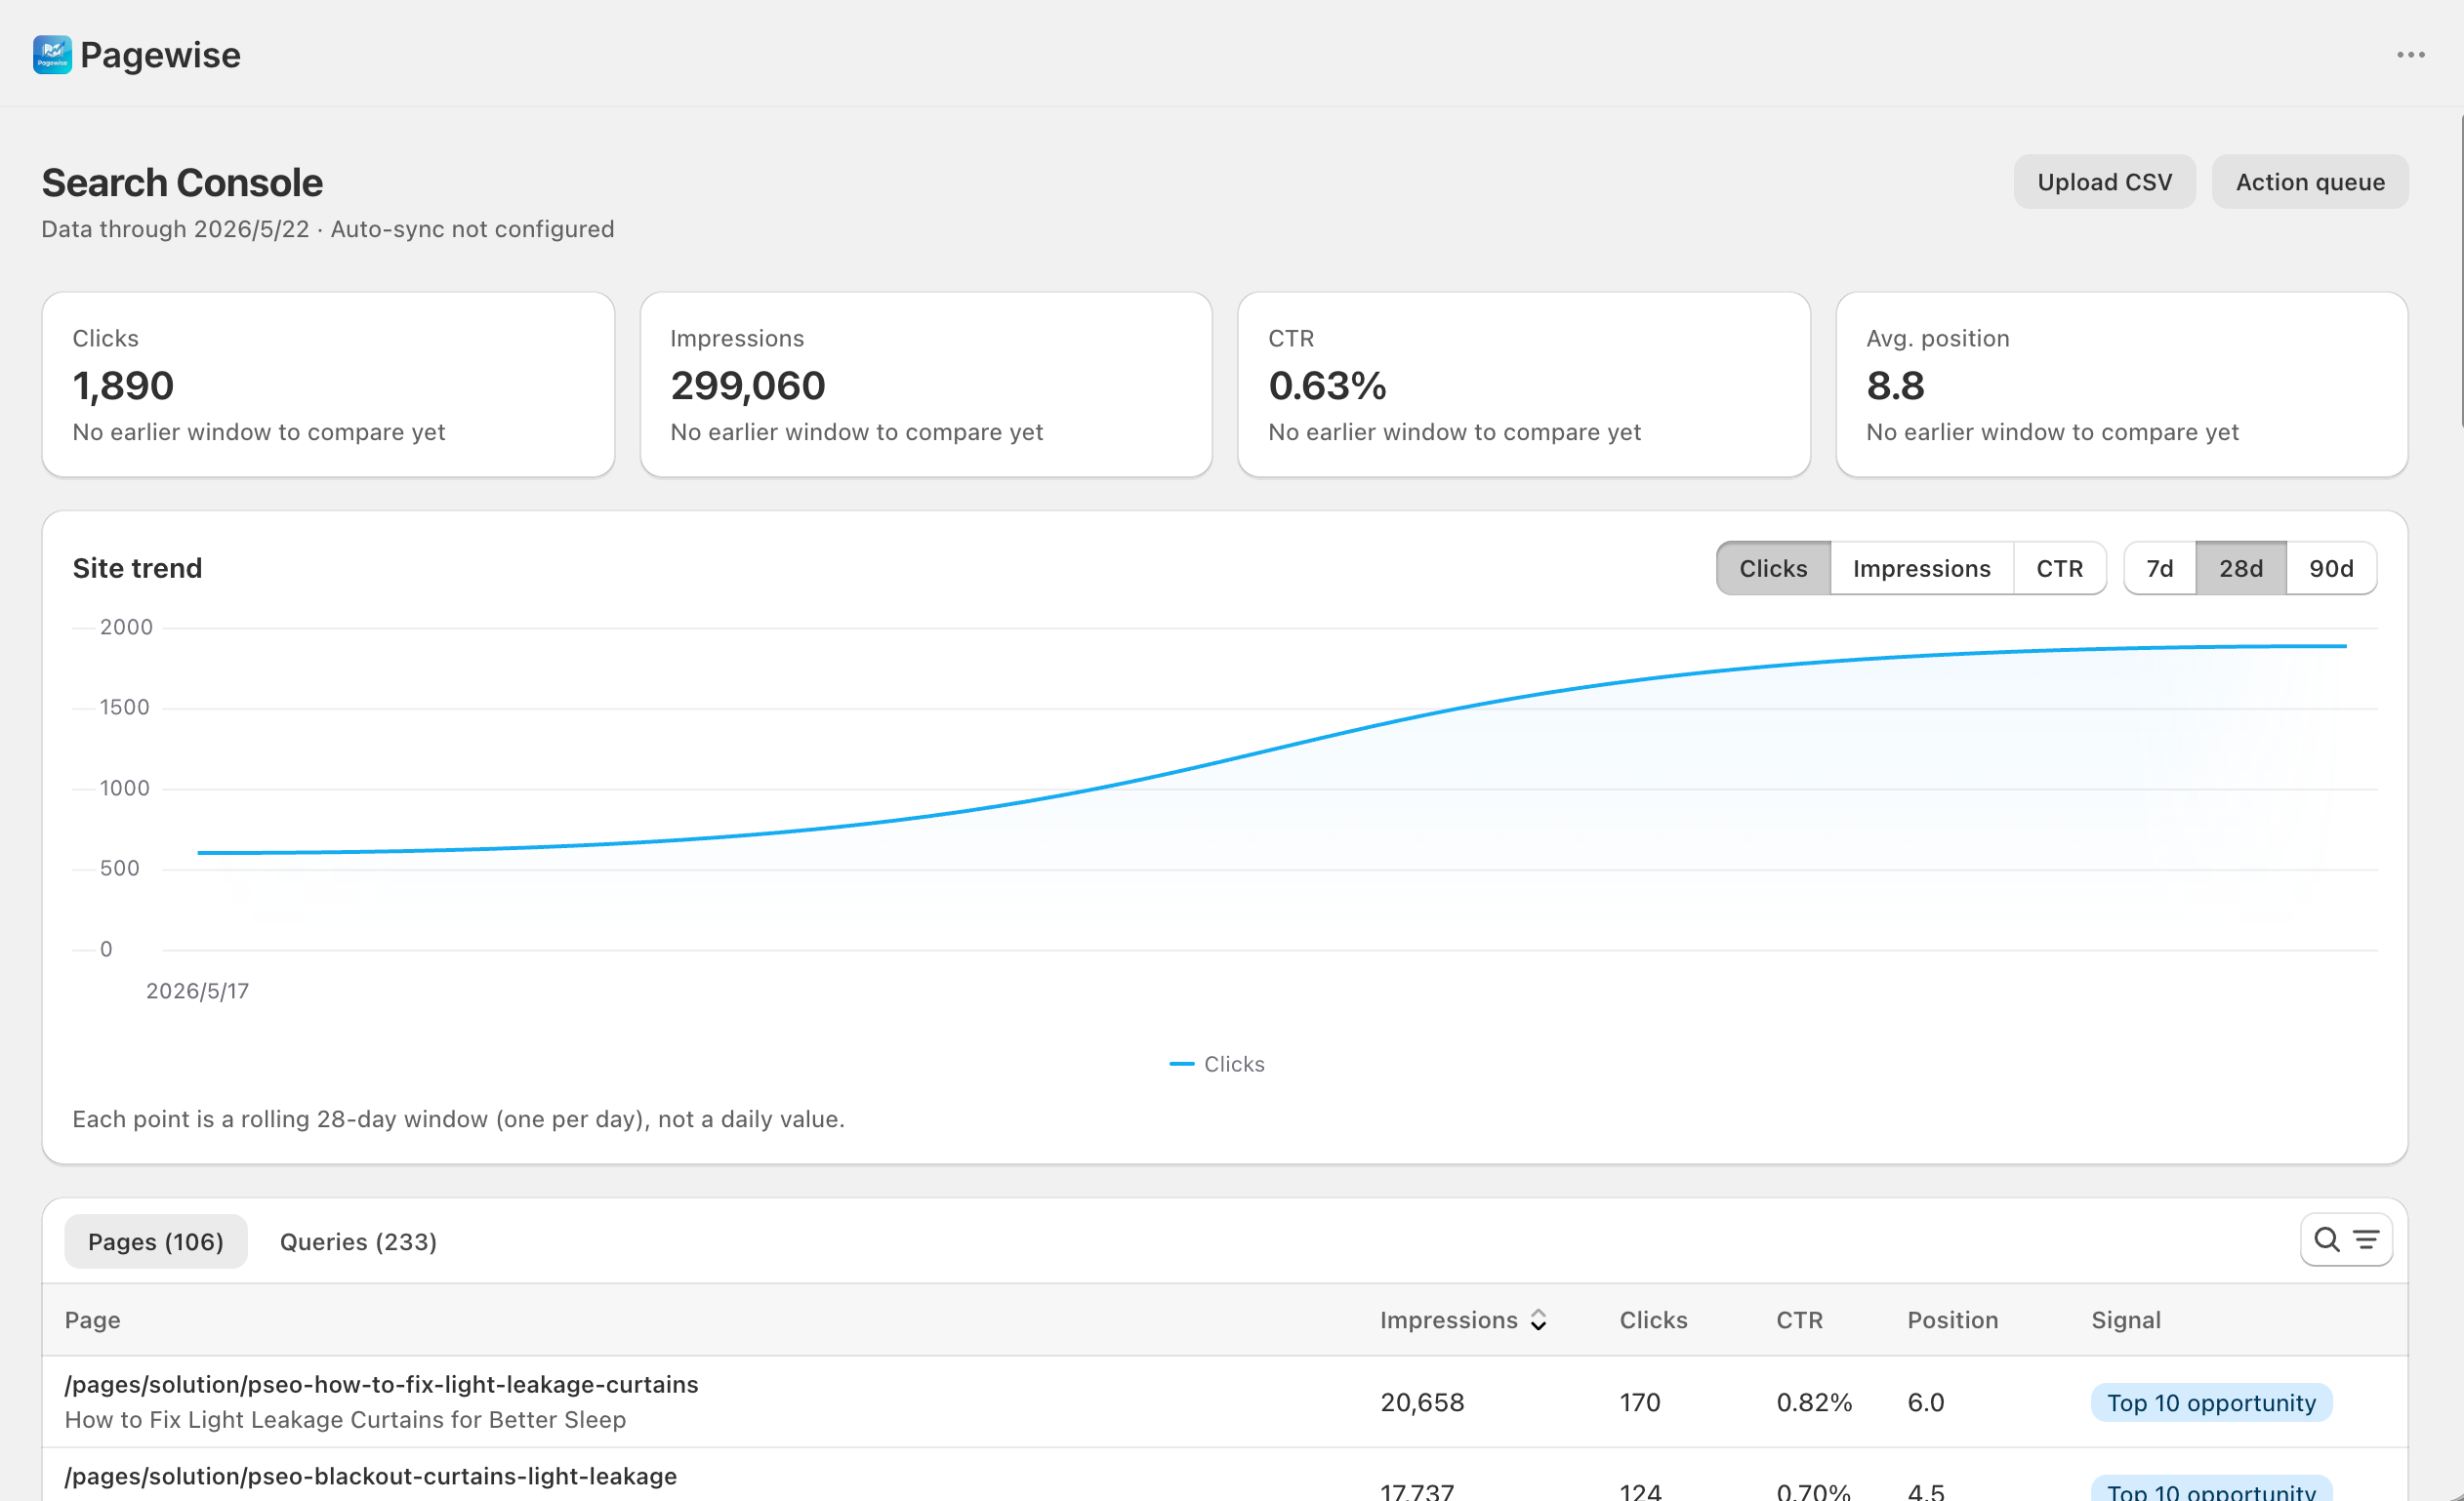
One place to see how your store performs in Google Search: clicks, impressions, CTR, average position, the site trend, and per-page / per-query detail tables. It answers two questions — "is overall performance up or down" and "which pages / keywords are worth working on". The app labels every page with a "signal", every query with an "opportunity", and computes an opportunity score.
Where to find it"Search Console" in the left nav; "Action queue" in the top right jumps to Monitor & Insights.
Interface overview
| Area | Description |
|---|---|
| Header & sync status | The subtitle shows "Data through X" and the auto-sync status; "Upload CSV" and "Action queue" in the top right. When Google sync fails, a red banner appears with "Go to settings". |
| Four KPI cards | Latest-period totals for clicks / impressions / CTR / average position, with change badges (vs. the previous 28-day window). Green = better, red = worse; note a lower average position is better, so a falling number shows green. |
| Site trend chart | Line chart with switchable metric (clicks / impressions / CTR) and range (7 / 28 / 90 days). Each point is a rolling 28-day window (one per day), not a daily value. |
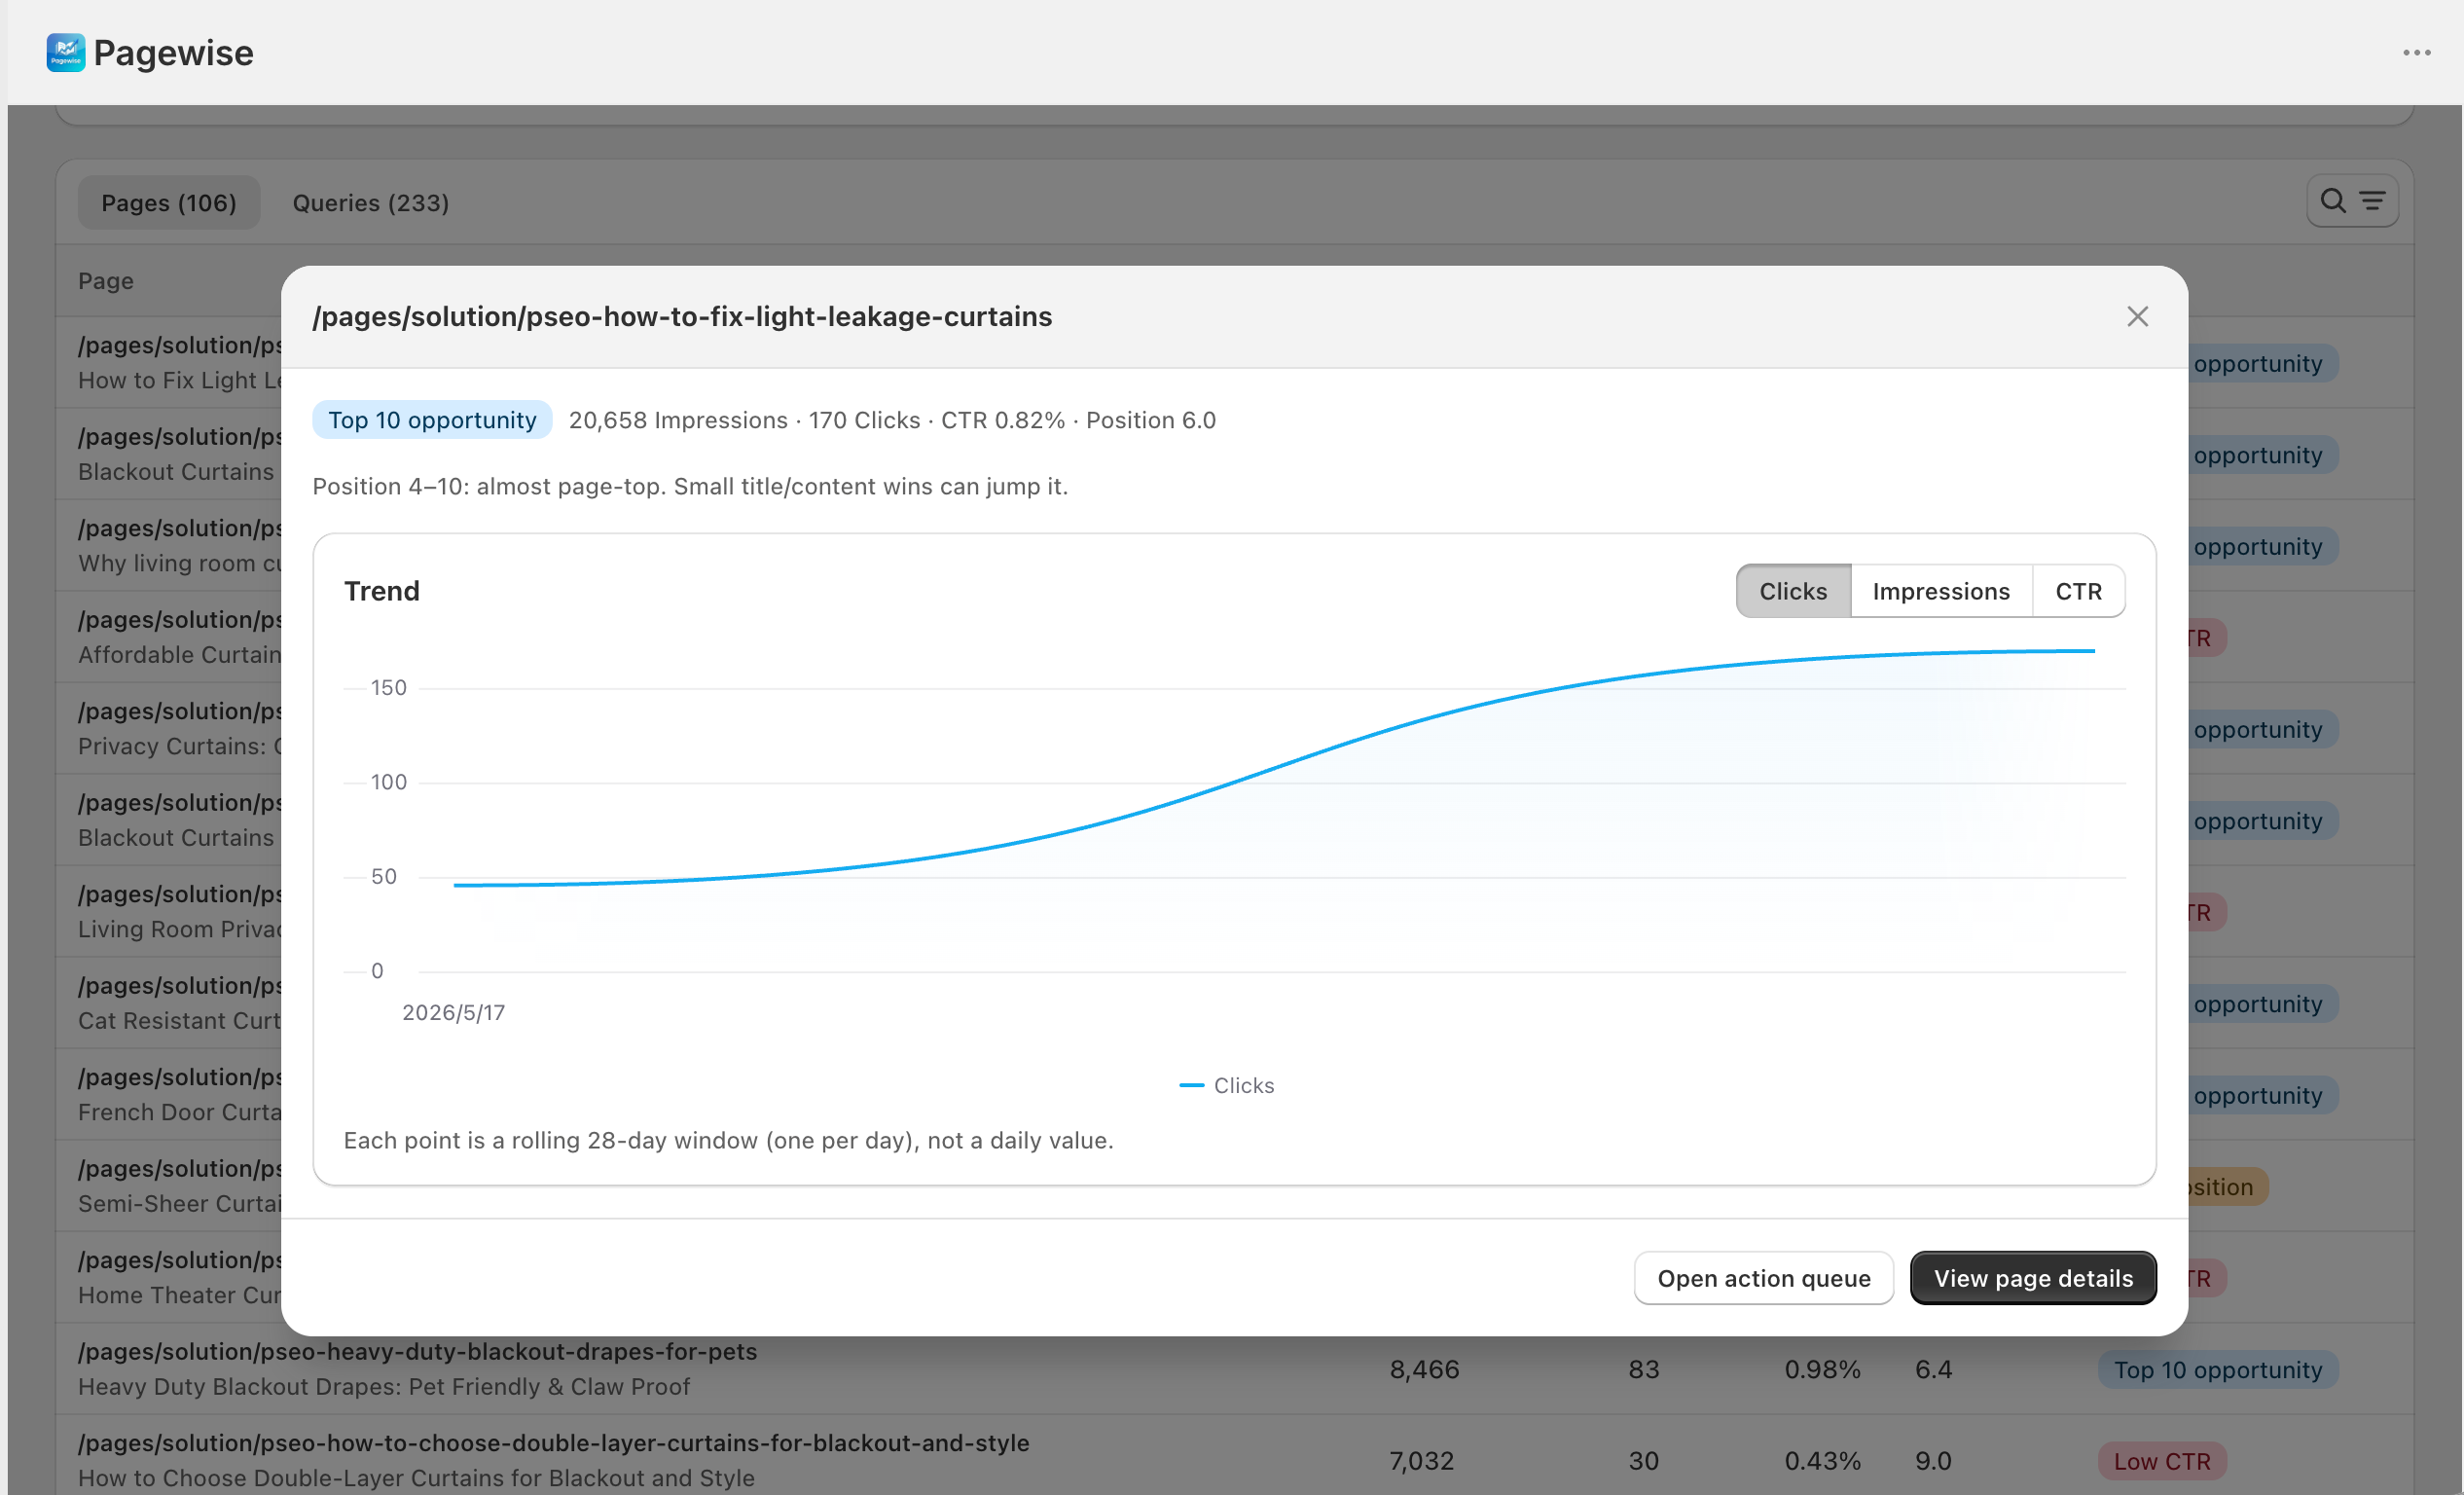
| Details · Pages tab | Columns: page, impressions, clicks, CTR, position, signal. Signals — Zero-click: high impressions with zero clicks, rewrite title / meta first; Low CTR: impressions ≥ 100 and CTR < 0.5%; Low position: beyond page 1; Top 10 opportunity: position 4–10, nearly page-top; Healthy. |
| Details · Queries tab | Columns: query, impressions, clicks, CTR, position, score, opportunity (zero-click / Top 10 tuning / page-2 opportunity, …), sorted by score by default. Both tabs support search, label filters, sortable headers, and pagination; the current view state lives in the URL, so refreshing or sharing the link restores it. |
| Row details dialog | Click any row: the label rule explained, key metrics, and the row's own history chart. Page rows offer "View page details" and "Open action queue"; query rows offer "Generate a page for this query" and show the associated page. |
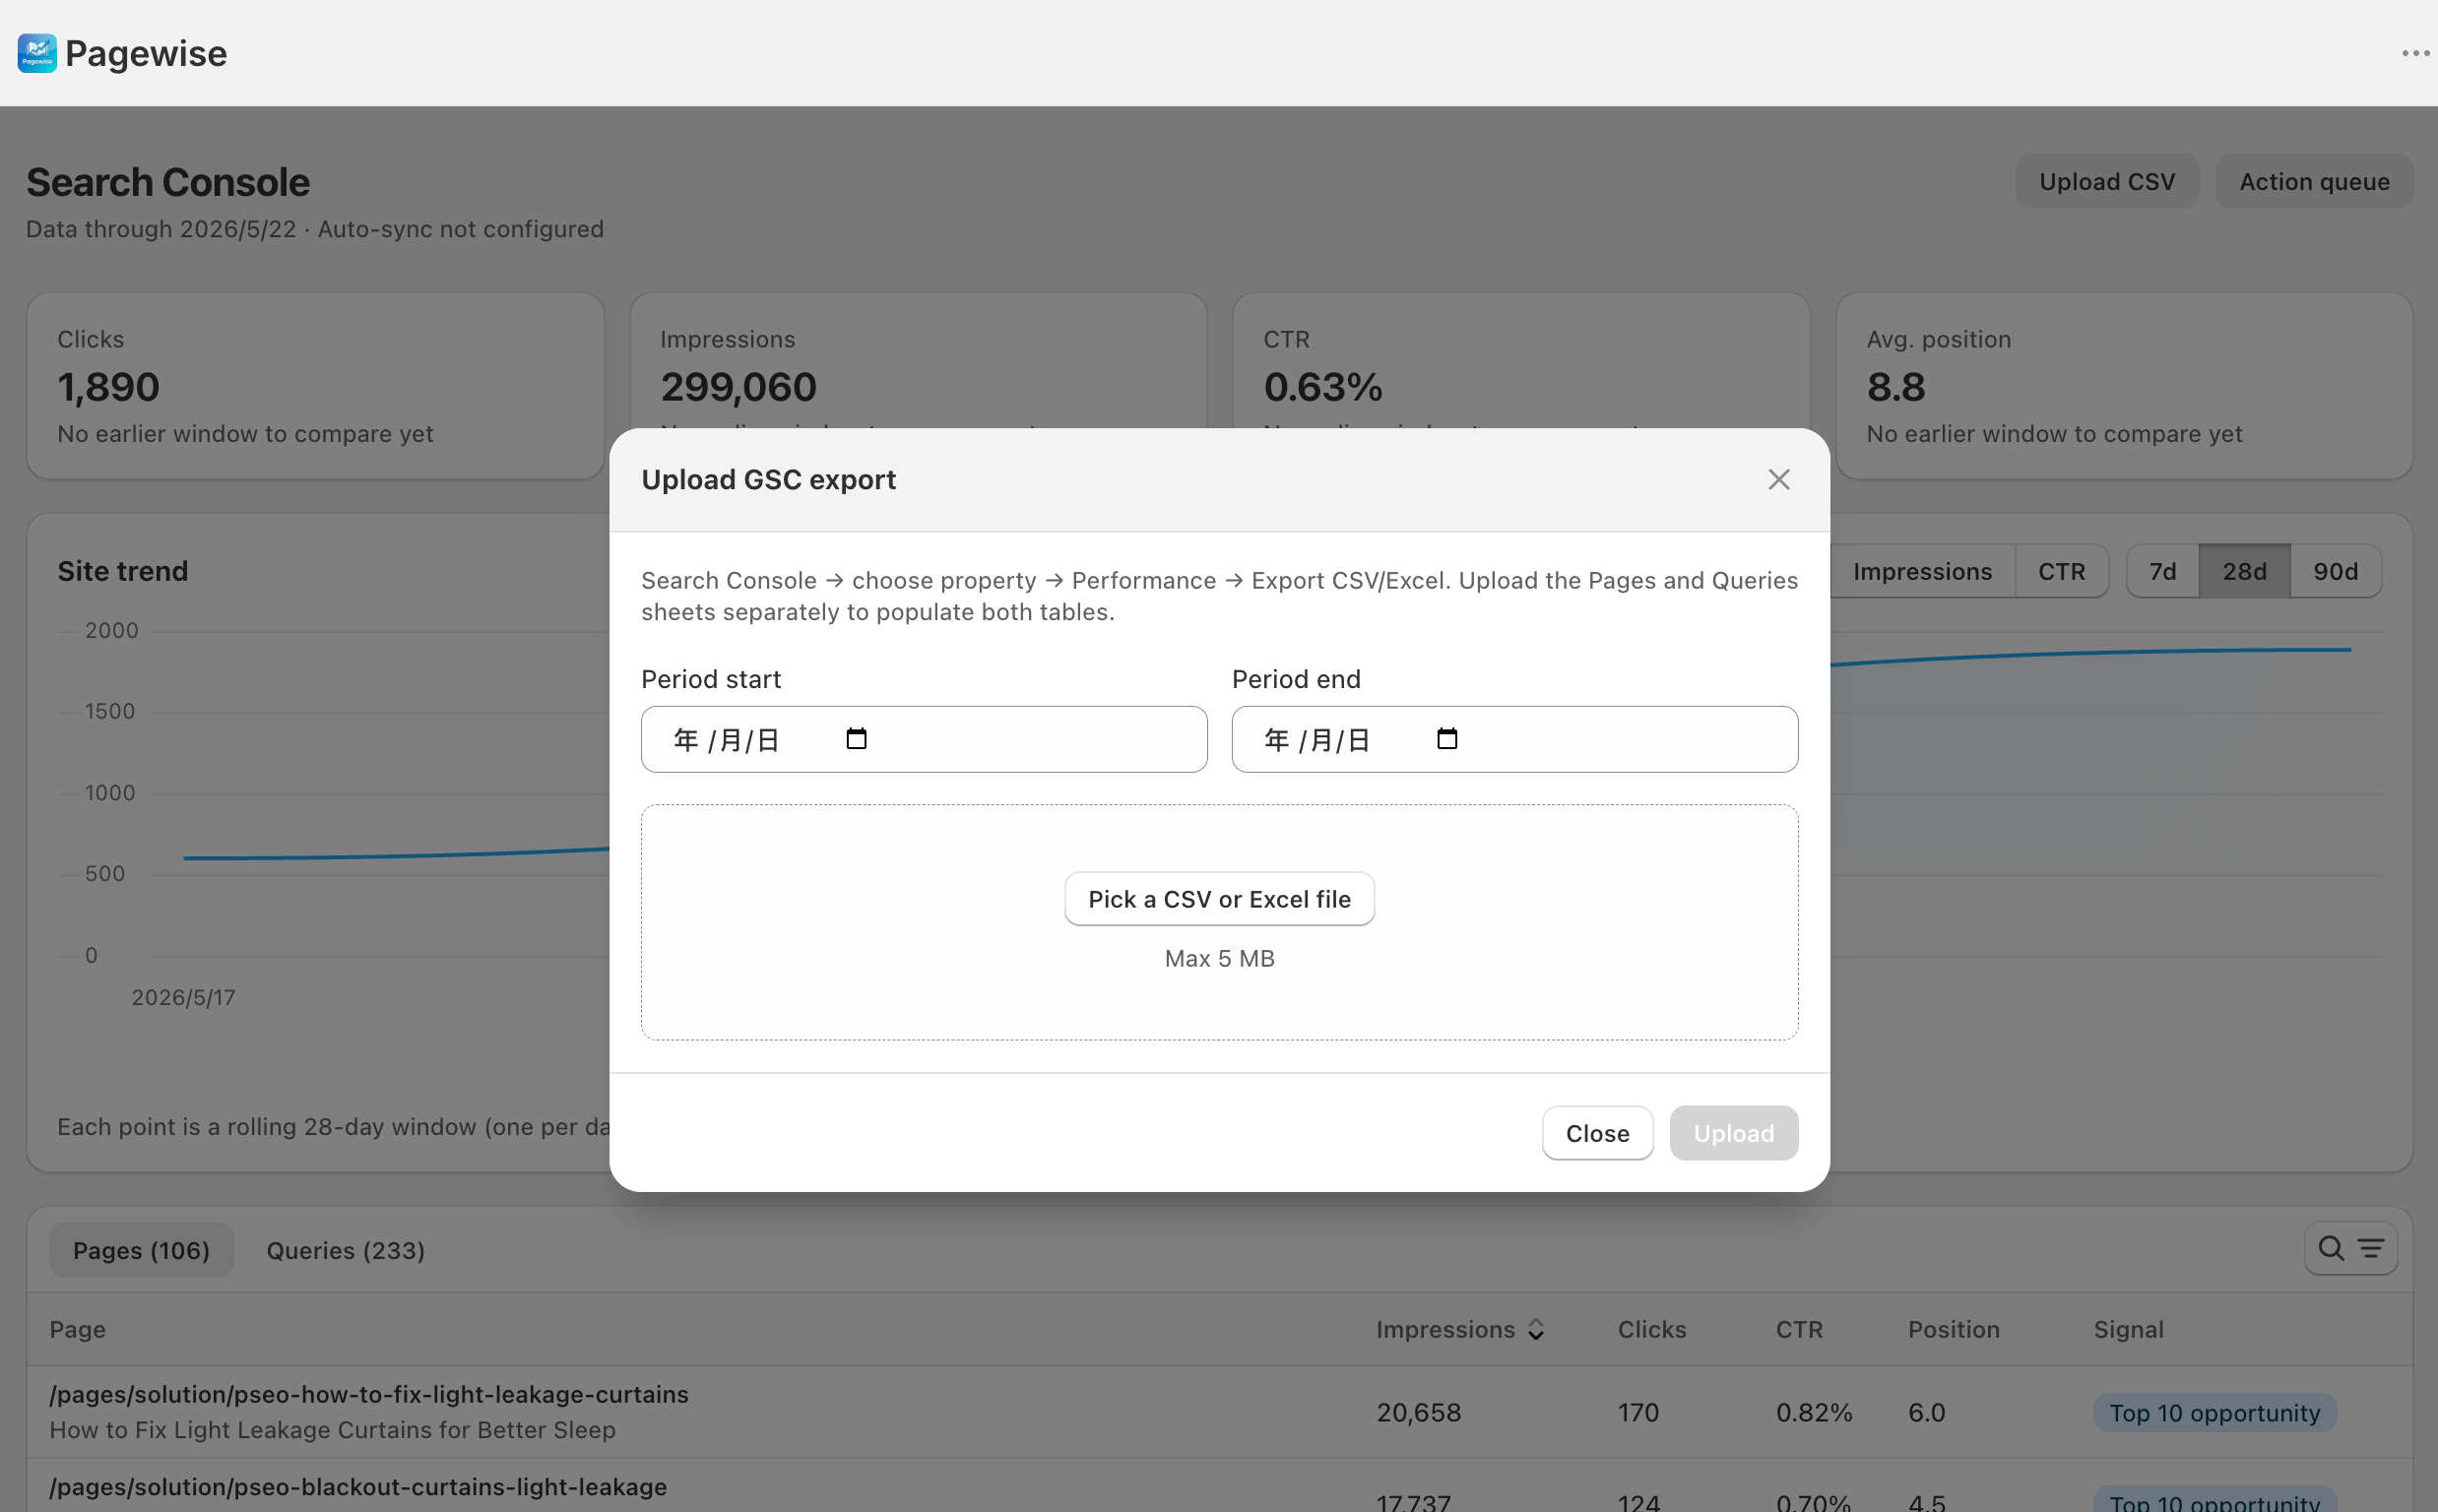
| Upload dialog | "Upload GSC export": set the data period's start / end dates and upload the Search Console "Performance" report export (CSV / Excel, max 5 MB); upload the "Pages" and "Queries" sheets separately — the type is detected automatically. |
Step by step
Find pages that need optimization
- On the "Pages" tab, click "Filter" and filter by signal: "Zero-click" or "Low CTR" for pages that urgently need a title / meta rewrite, "Top 10 opportunity" for pages a small push away from the top of page 1.
- Click a row to open its details dialog with the history trend and rule explanation.
- Follow the dialog buttons: "View page details" or "Open action queue".
Mine keyword opportunities and spin up new pages
- Switch to the "Queries" tab (sorted by score by default) and use "Filter" to pick "Zero-click", "Top 10 tuning", or "Page-2 opportunity".
- Click a query to check its history and whether a page is already associated with it.
- If it deserves a dedicated page, click "Generate a page for this query" — the keyword travels with you into the generate flow.
Upload GSC data manually
- In Google Search Console: choose the property → "Performance" → export CSV or Excel.
- Back on this screen, click "Upload CSV" and set the data start / end dates (the period the export covers).
- Upload the "Pages" and "Queries" sheets separately (max 5 MB each), click "Upload", and check the result banner for imported / skipped / unmatched row counts.
How the numbers work — read this before drawing conclusions
- Each period is a rolling 28-day window; the KPI comparison uses the most recent non-overlapping earlier period (at least 28 days apart) — otherwise the windows would mostly overlap and the comparison would be meaningless. With too little history you'll see "No earlier window to compare yet".
- Every point on the trend chart is a full window, not a daily value — a smooth curve is normal, don't read it as day-to-day movement. At least two periods are needed to draw a trend.
- When uploading page data, URLs not present under "Pages" are ignored (the banner reports "N rows unmatched"). If nothing matches, run "Pages → Sync existing pages" first, then upload again.
- Switching between the Pages / Queries tabs clears the current search text and filters.
Chapter 9
Monitor & Insights
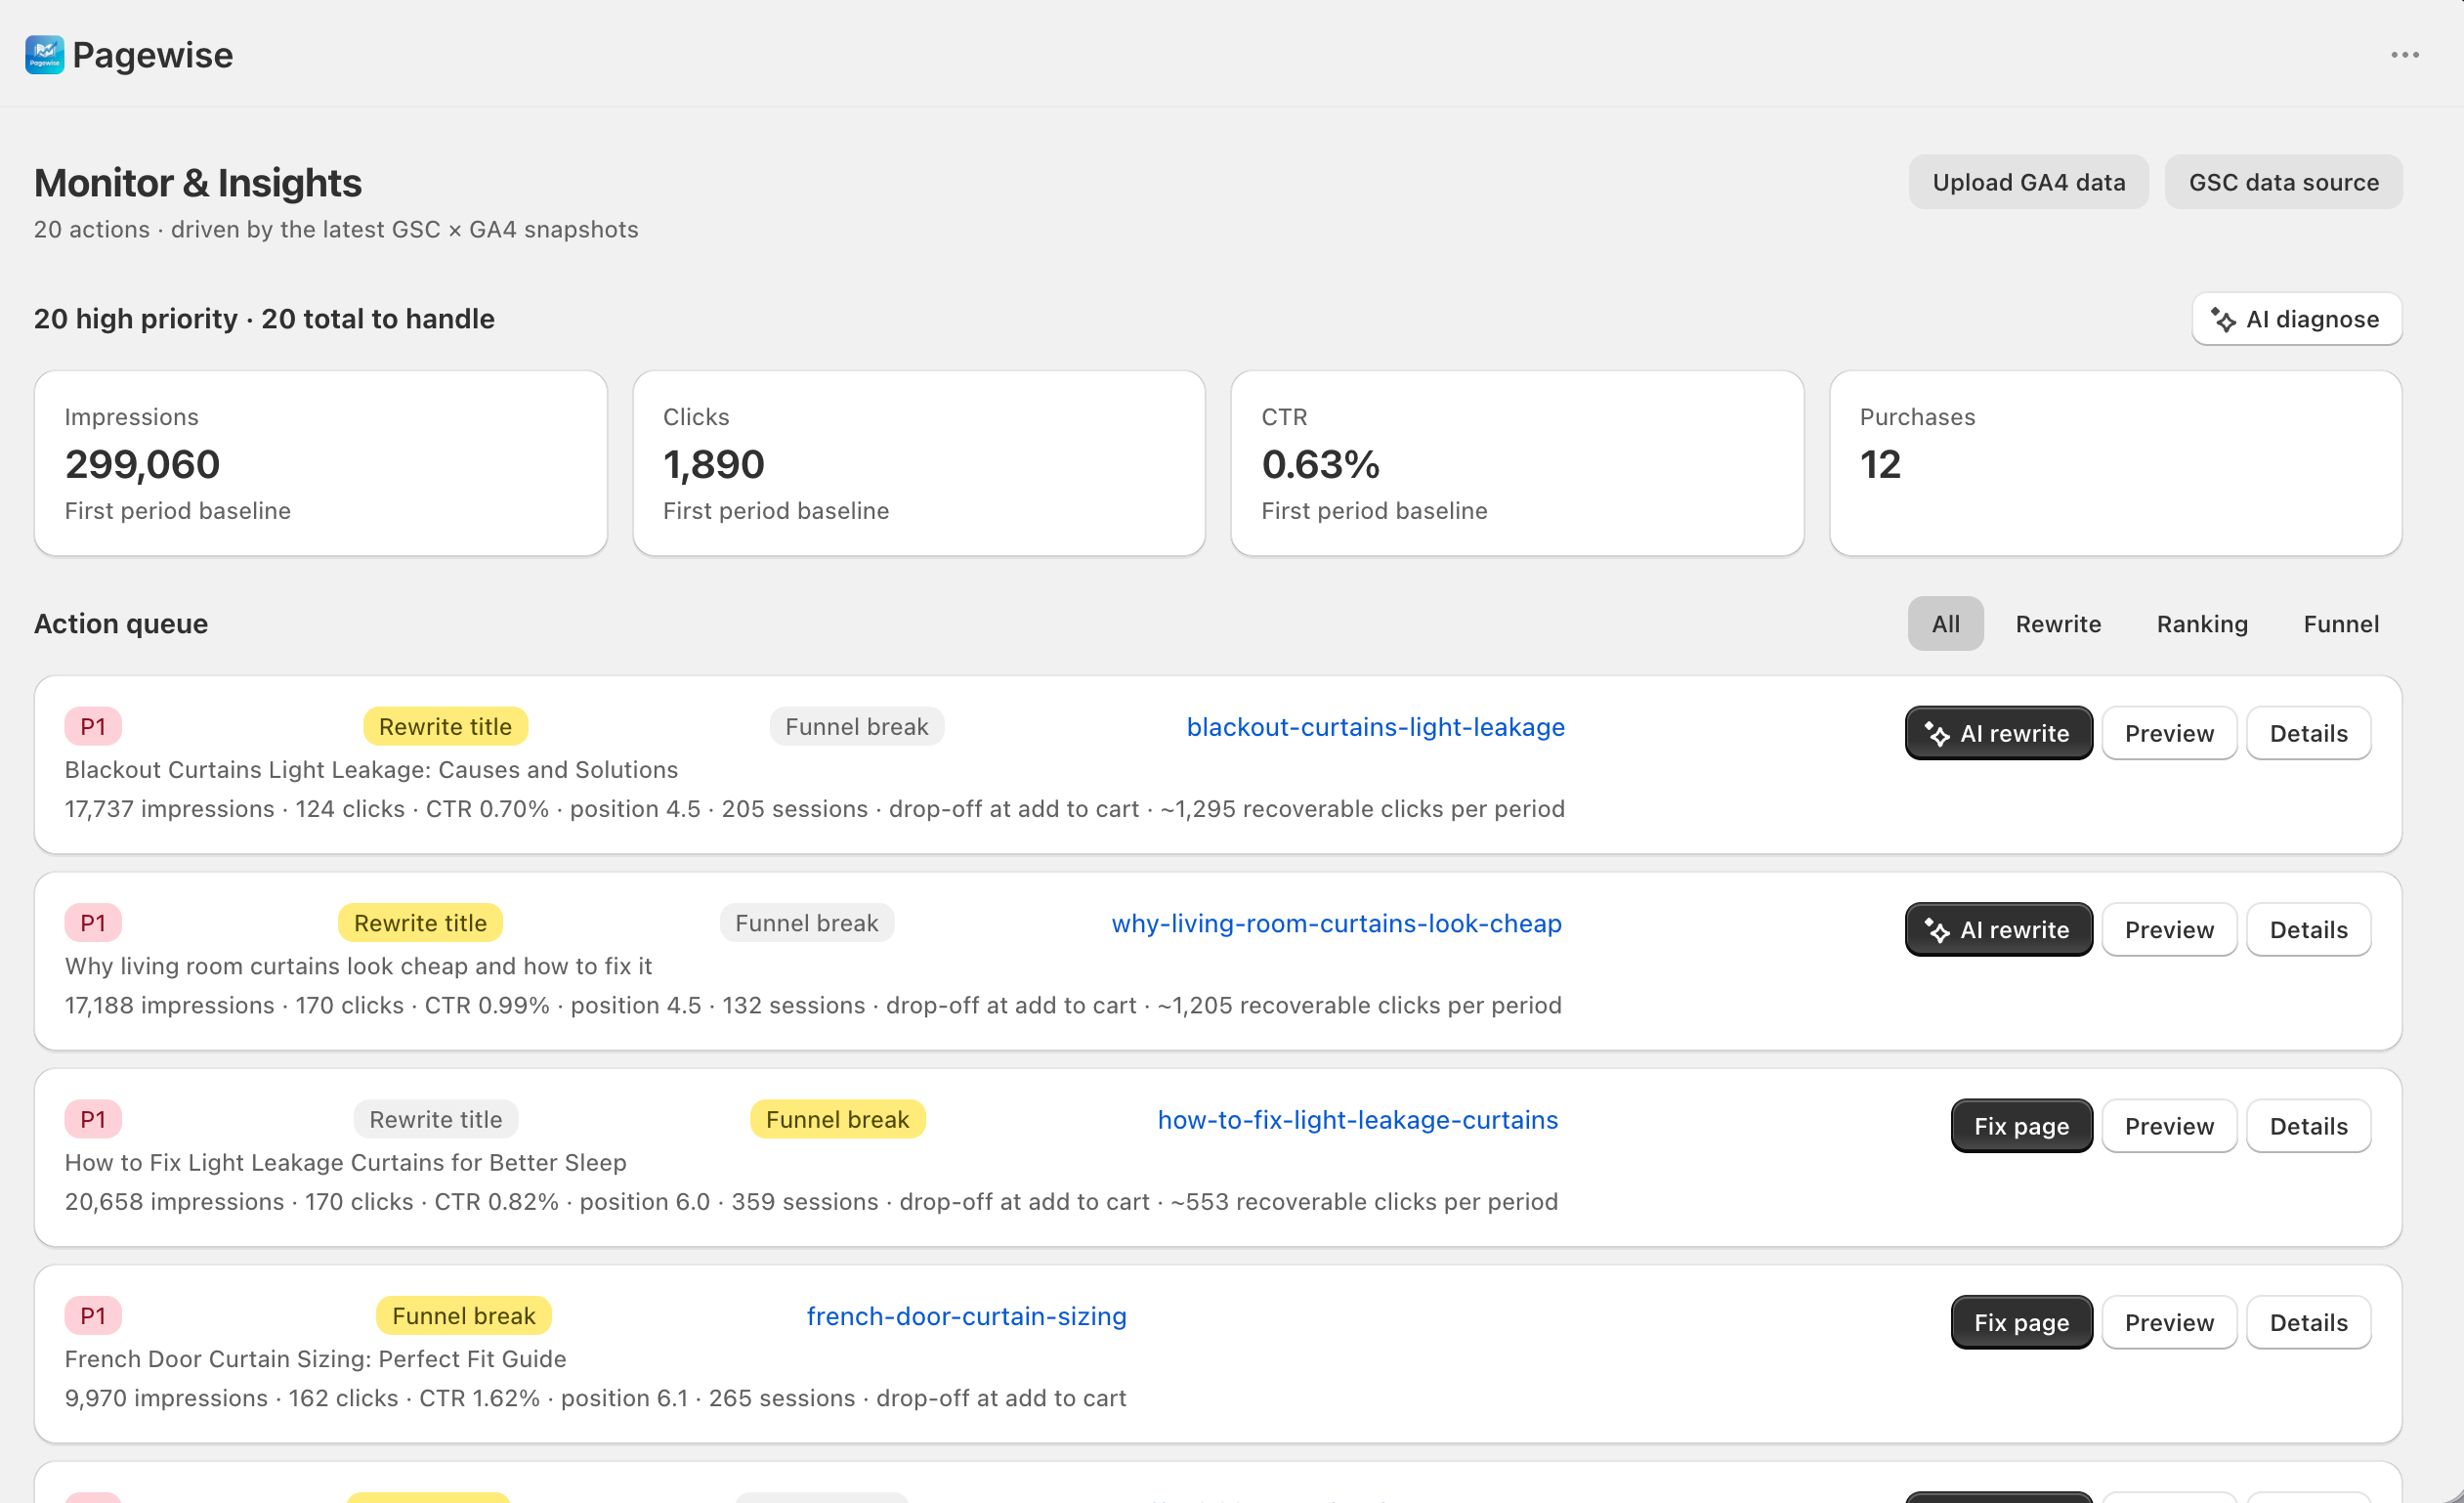
This is Pagewise's action center: it automatically crosses GSC (search performance) with GA4 (on-site behavior), finds under-performing pages, and ranks them into a priority queue by "estimated recoverable clicks" — every item carries its data evidence and one clear next action. Ideal as a weekly routine: check overall site health first, then work down from the P1 items. For pure data browsing, use "Search Console" — this screen is only about what to do.
Where to find it"Monitor & Insights" in the left nav; "Upload GA4 data" and "GSC data source" (jumps to Search Console) sit in the top right.
Interface overview
| Area | Description |
|---|---|
| Health overview | Status line "N high priority · M total to handle" + the "AI diagnose" button; 4 KPI cards: impressions, clicks, CTR (GSC), and purchases (GA4 — shows "—" until uploaded), vs. the previous 28-day window. |
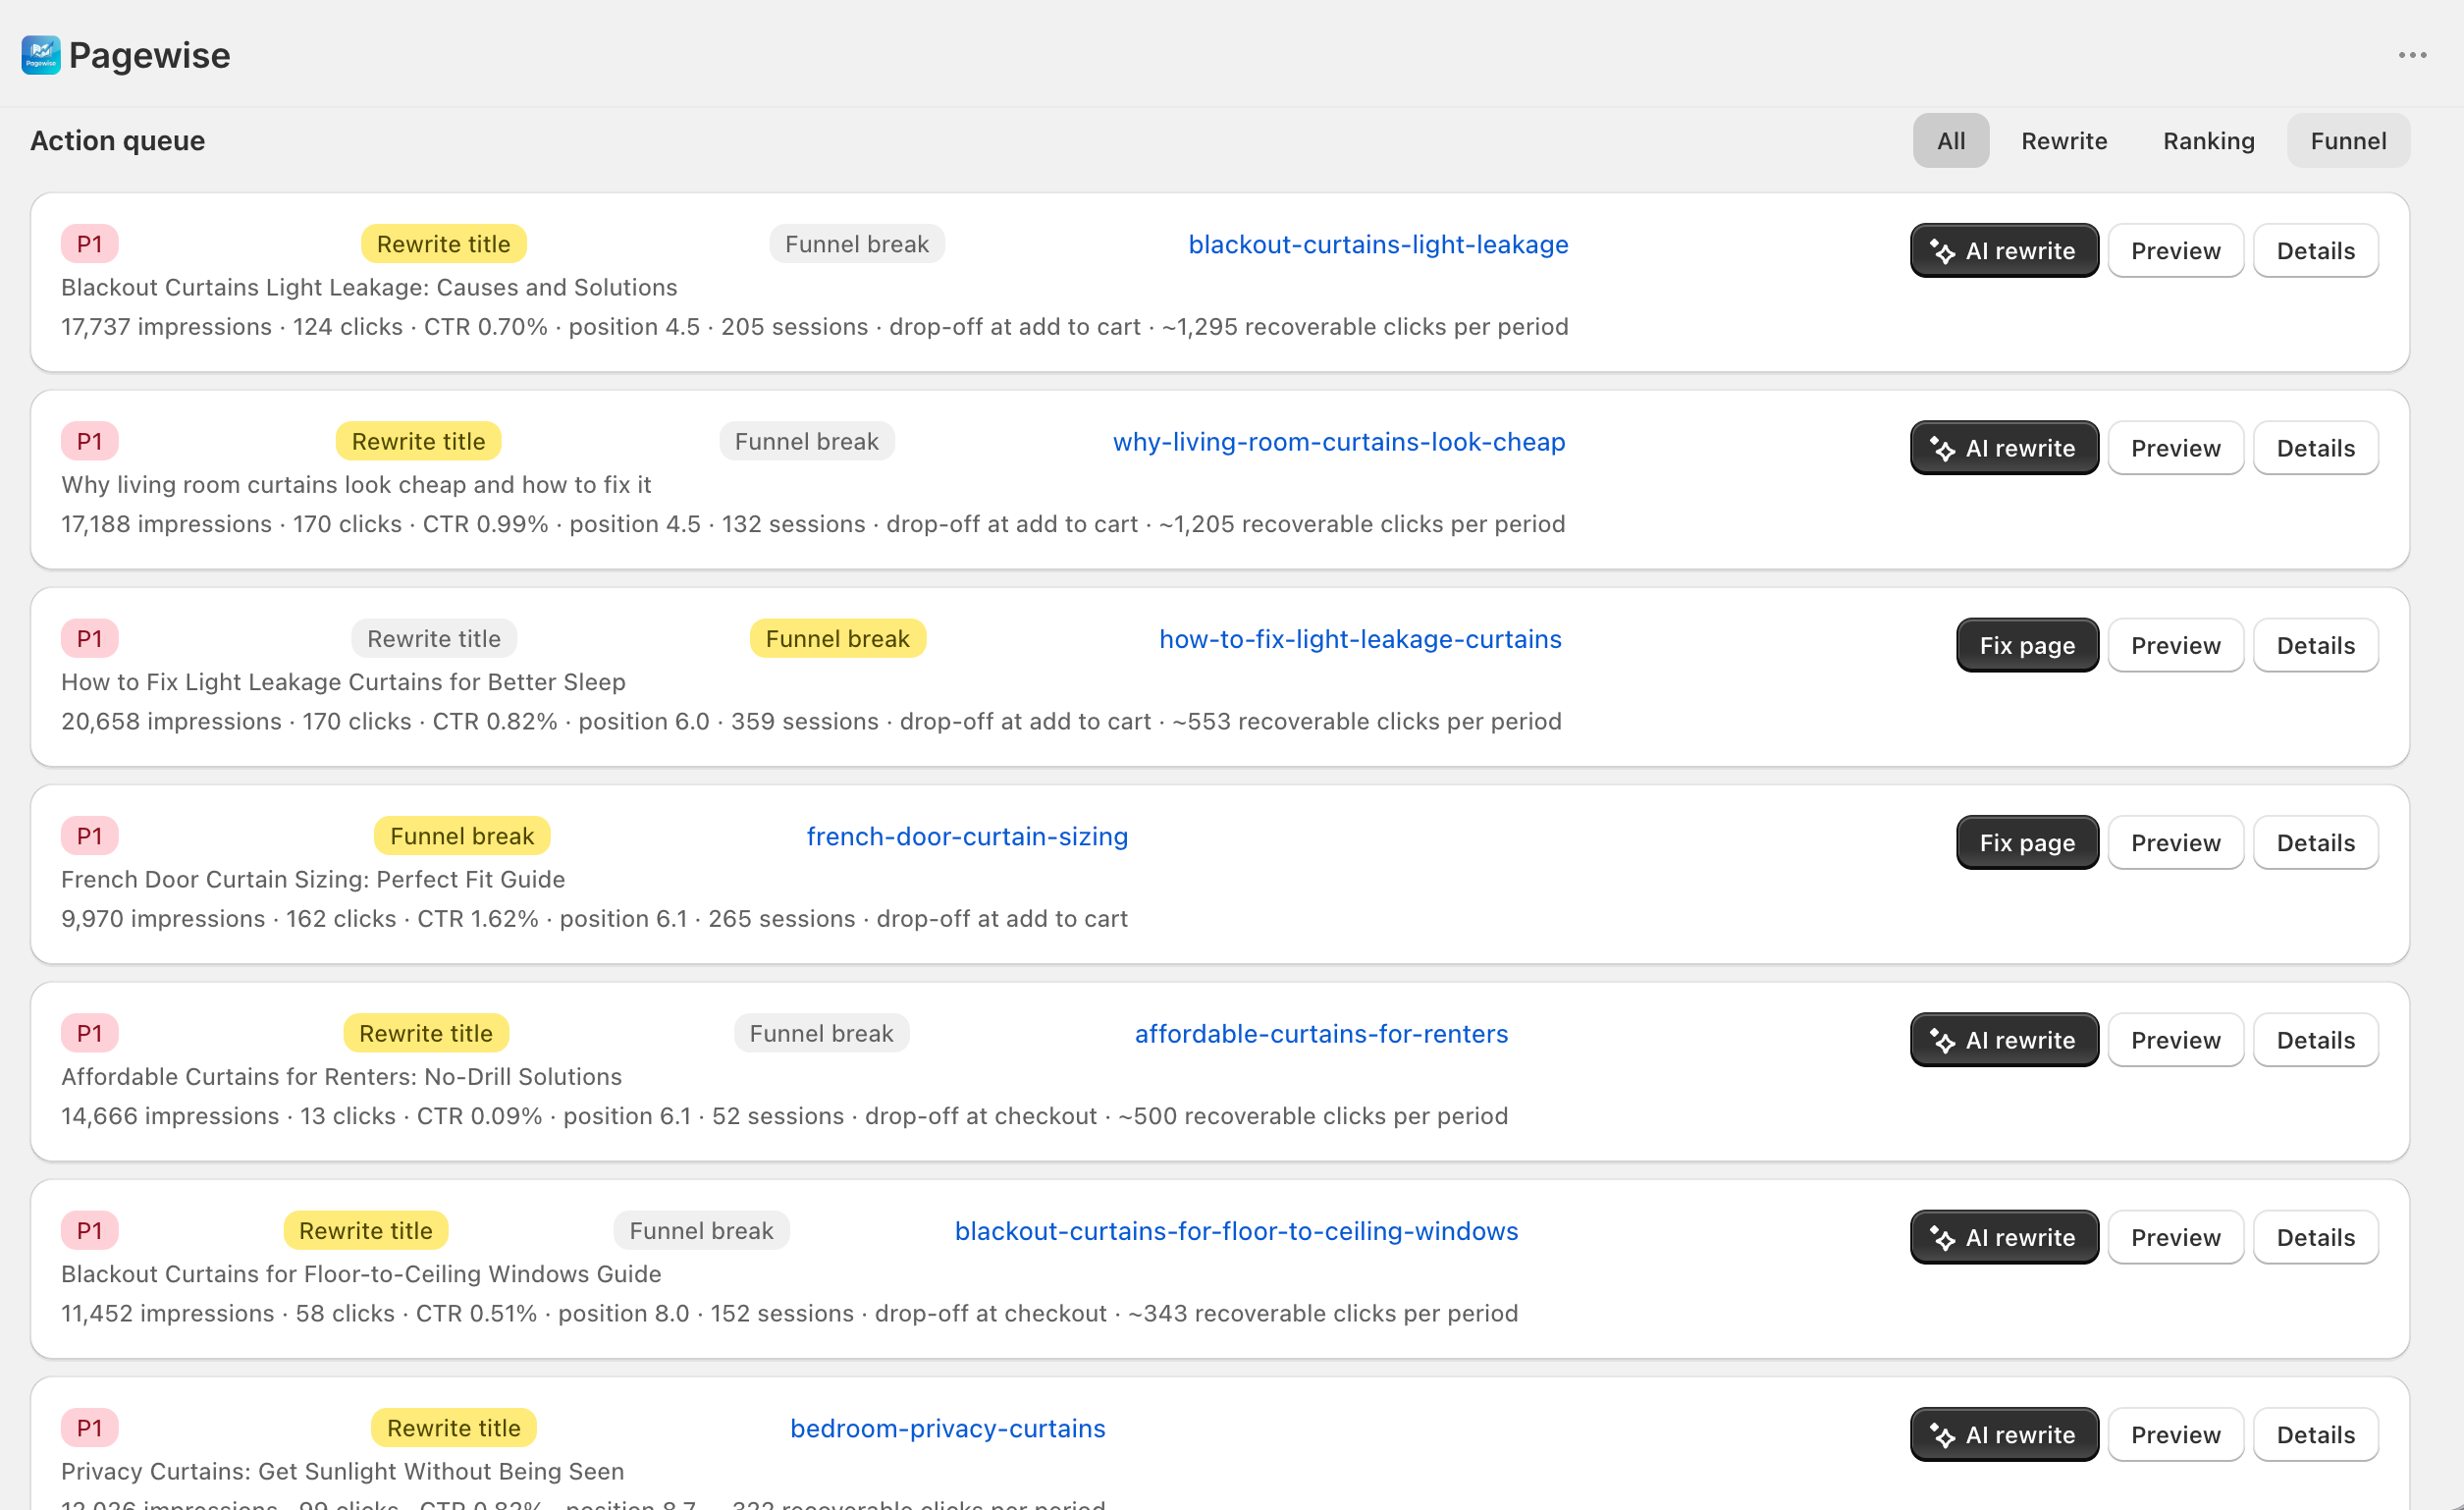
| Action queue | The core area. Filter buttons: All / Rewrite / Ranking / Funnel. Each item: priority badge (P1 P2 P3) + issue badge (Rewrite title / Low CTR / Low position / Funnel break — hover to see the rule) + page URL + evidence line (e.g. "12,000 impressions · 35 clicks · CTR 0.29% · position 6.2", "~85 recoverable clicks per period"). The primary button on the right matches the suggested action: "AI rewrite" (title / CTR issues), "View data" (ranking issues), or "Fix page" (funnel issues), plus "Preview" and "Details". |
| Site trend (GSC) | Site-level impressions / clicks trend + the "Biggest movers (impressions, WoW)" list, each row with a "View data" link. |
| Site funnel (GA4) | The four-stage funnel: sessions → add to cart → checkout → purchase; with add-to-carts but zero checkouts, a red alert appears ("Add to cart → checkout drop-off 100% · check the checkout flow"). |
| AI assistant dialog | Shared by "AI diagnose" and "AI rewrite": the analysis prompt is prepared automatically. With AI configured, click "Run with AI" for a direct result; without it, "Copy prompt" and run it on Claude.ai. |
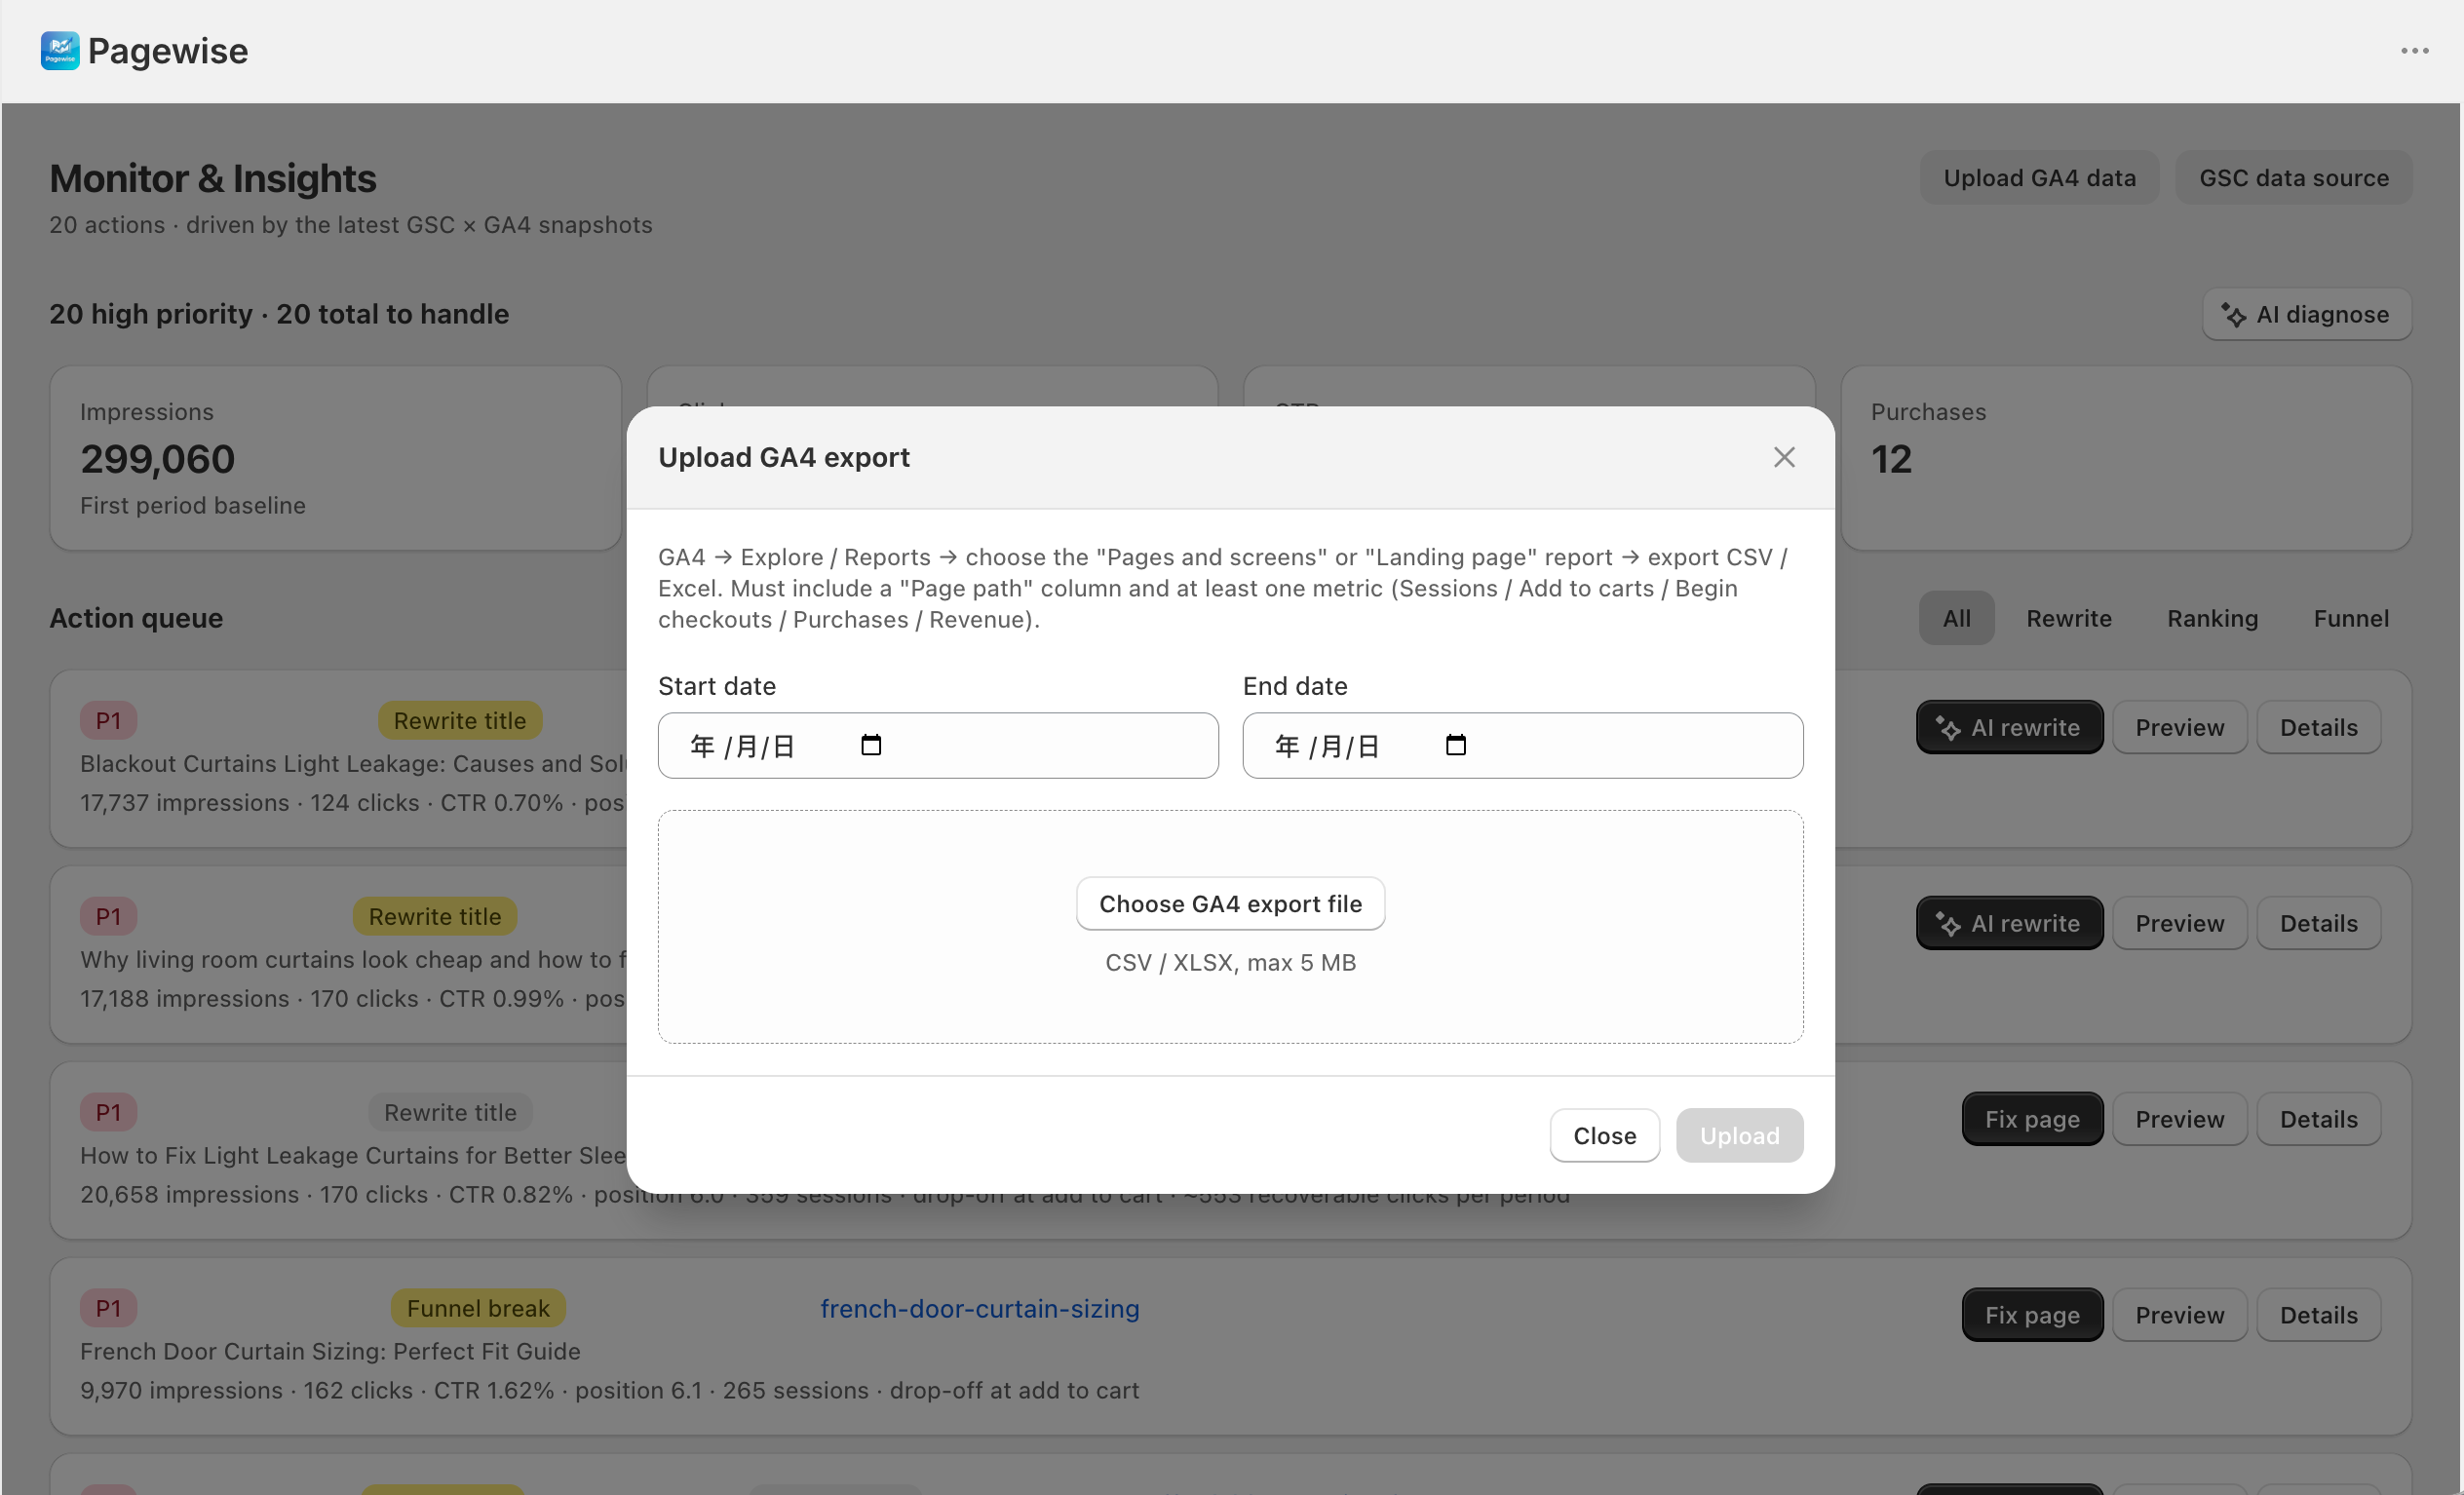
| Upload GA4 dialog | Pick start / end dates and upload a GA4 "Pages and screens" or "Landing page" report export (CSV / XLSX, max 5 MB, must contain a "Page path" column and at least one metric). |
Step by step
The weekly routine
- Check the status line and the 4 KPI cards for how impressions / clicks / CTR moved vs. the previous window.
- Start from the P1 items at the top of the action queue; read each issue badge and evidence line (hover the badge for the rule).
- Act via the primary button: "AI rewrite", "View data", or "Fix page"; use "Preview" or "Details" first if needed.
- After working through a batch, come back — the queue converges as data updates, and shows "Queue clear — nothing needs action" when empty.
Rewrite a low-CTR page title with AI
- Find an item with a "Rewrite title" or "Low CTR" badge and click "AI rewrite".
- With AI configured, click "Run with AI" for candidate titles right away; without it, "Copy prompt" → "Open Claude.ai" and paste it there.
- Happy with a title? Click "Fix page" to open the editor, apply it, and save; the queue refreshes when you close the editor.
Investigate a page's traffic swing
- Find the swinging page in the "Biggest movers" list and click "View data".
- You land on Search Console's "Pages" tab with the page URL pre-filled in the search box — you're looking at that page's own metric row and history.
- Judge from the trend whether it's a ranking change, seasonality, or a title problem, then return to the queue and act accordingly.
Things to note
- The queue and charts only appear once at least one data source (GSC or GA4) is connected; with neither, you'll see the "Waiting for data" empty state.
- Funnel-break detection and the "Purchases" KPI unlock only after uploading GA4; before uploading GA4, sync your pages under "Pages" first or every row will come back unmatched.
- The queue is sorted by estimated recoverable clicks per period and shows at most the 20 most worthwhile items — not the total issue count; "~N recoverable clicks" is a sorting aid, not a promise.
- Entry thresholds per issue type (hover the badge to see them): Rewrite title = impressions ≥ 500, CTR < 1%, position 4–10; Low CTR = impressions ≥ 1000 and CTR < 0.5%; Low position = impressions ≥ 100 and position 10–30; Funnel break = sessions ≥ 50 with a funnel stage at zero.
- "Preview" only works for published pages; "Fix page" and "Details" only for pages registered under Pages — rows that exist only as data snapshots have unclickable URLs and hide those two buttons.
Chapter 10
Templates
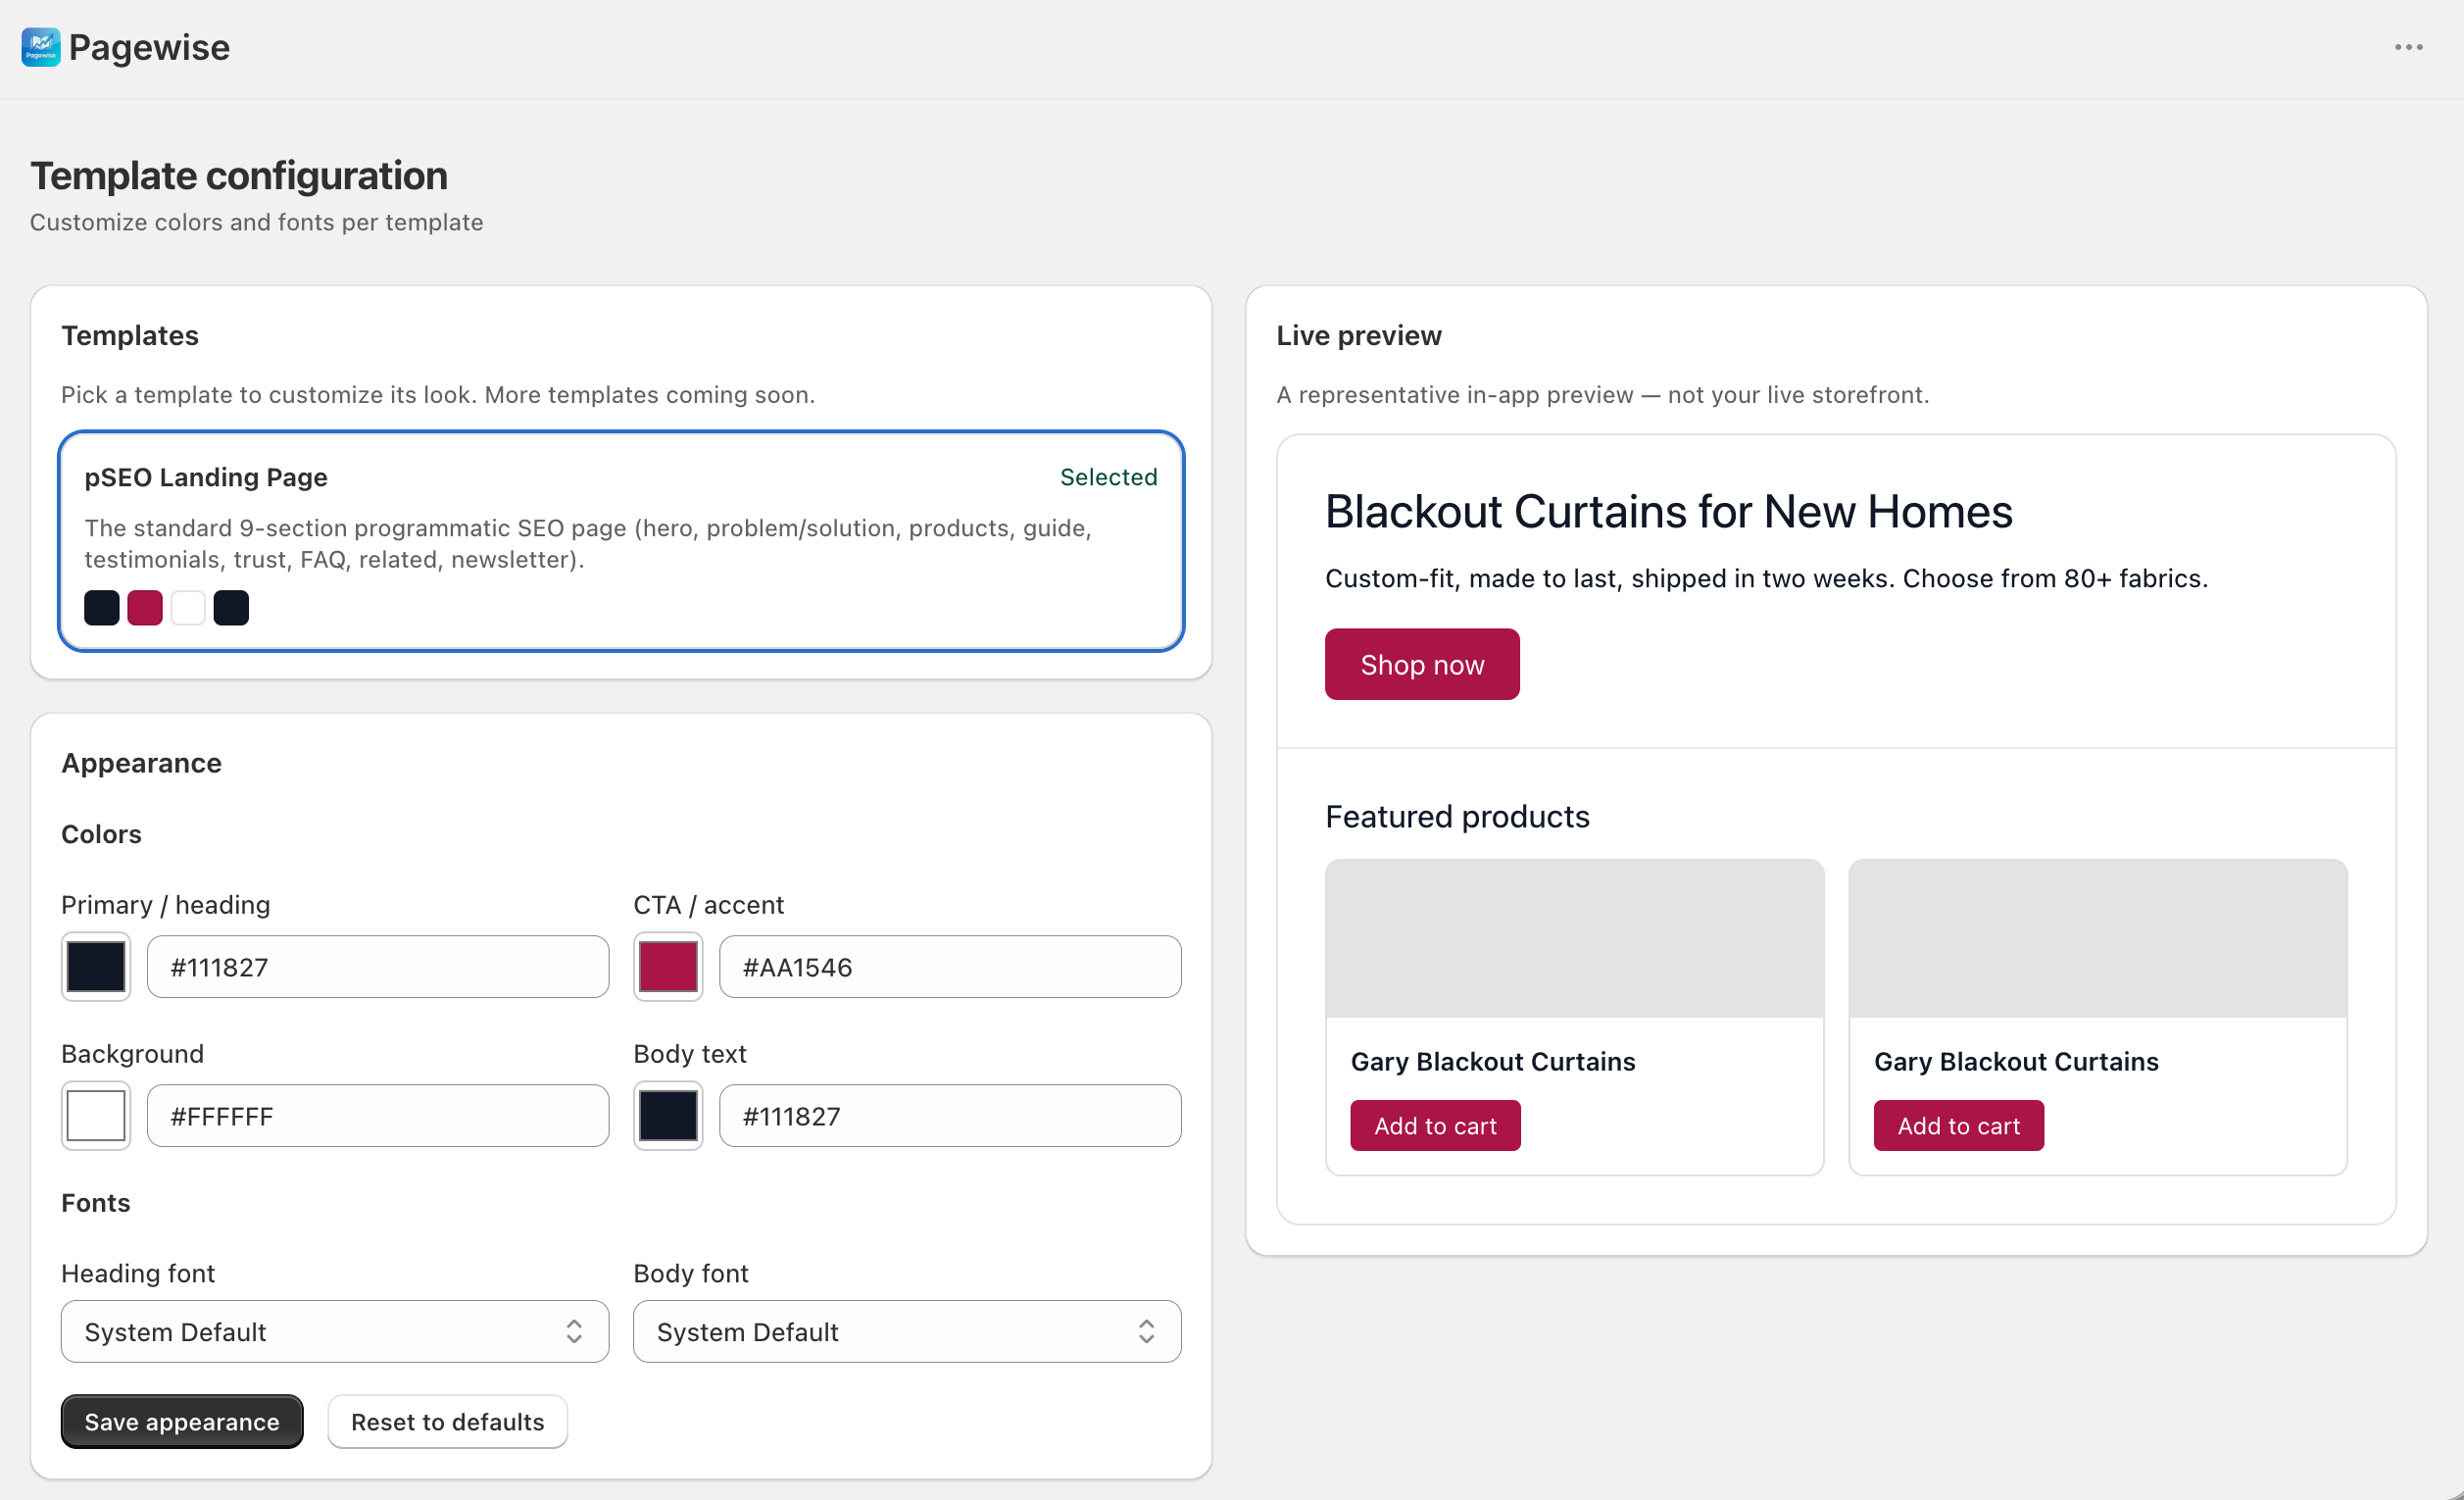
"Template configuration" defines the overall look of generated pages: four brand colors (primary, accent, background, body text) and heading / body fonts, with a live preview on the right. Once saved, it applies automatically to pages generated afterwards, to editor saves, and to previews — no need to pick it per generation.
Where to find it"Templates" in the left nav (the screen title reads "Template configuration").
Interface overview
| Area | Description |
|---|---|
| Templates | Template picker cards: name, blurb, and the current color swatch. One built-in template so far — "pSEO Landing Page", the standard 9-section programmatic SEO page (hero, problem / solution, products, installation guide, reviews, brand trust, FAQ, related content, newsletter). More templates are coming; custom templates and adding / removing sections aren't supported yet. |
| Appearance | "Colors": four fields — primary / heading, CTA / accent, background, body text — each with a color picker and a 6-digit hex input (e.g. #1A1A1A; invalid values turn red). "Fonts": heading / body dropdowns with System Default, Inter, Poppins, Montserrat, Playfair Display, Merriweather, Lora. "Save appearance" and "Reset to defaults" at the bottom. |
| Live preview | A representative mini page that refreshes with every change. Note: it's an in-app approximation, not your live storefront rendering. |
Step by step
- Click the template to customize in the "Templates" cards — it shows "Selected".
- Set the four colors (color picker or hex input) and the heading / body fonts under "Appearance".
- Watch the live preview on the right as you go.
- Click "Save appearance" — "Saved ✓" confirms it. To reset, click "Reset to defaults" (it only refills the form; you still need "Save appearance" for it to take effect).
Things to note
- A saved appearance only applies to pages generated or saved afterwards; already-published pages pick up the new look only after being re-saved / re-synced.
- Switching the selected template discards unsaved appearance edits — click "Save appearance" before switching.
- When you first finish the setup wizard, a palette extracted from your store theme is saved as the starting point; override it here any time.
Chapter 11
Settings
Settings is the global configuration center: come here for initial setup (brand info, page storage, Google data sources, AI model), and afterwards only when switching markets, changing models, or troubleshooting sync issues. Whenever a field changes, Shopify's contextual save bar appears at the top of the admin — click "Save" to persist all changes at once.
Where to find it"Settings" in the left nav.
Settings at a glance
| Group | Contents |
|---|---|
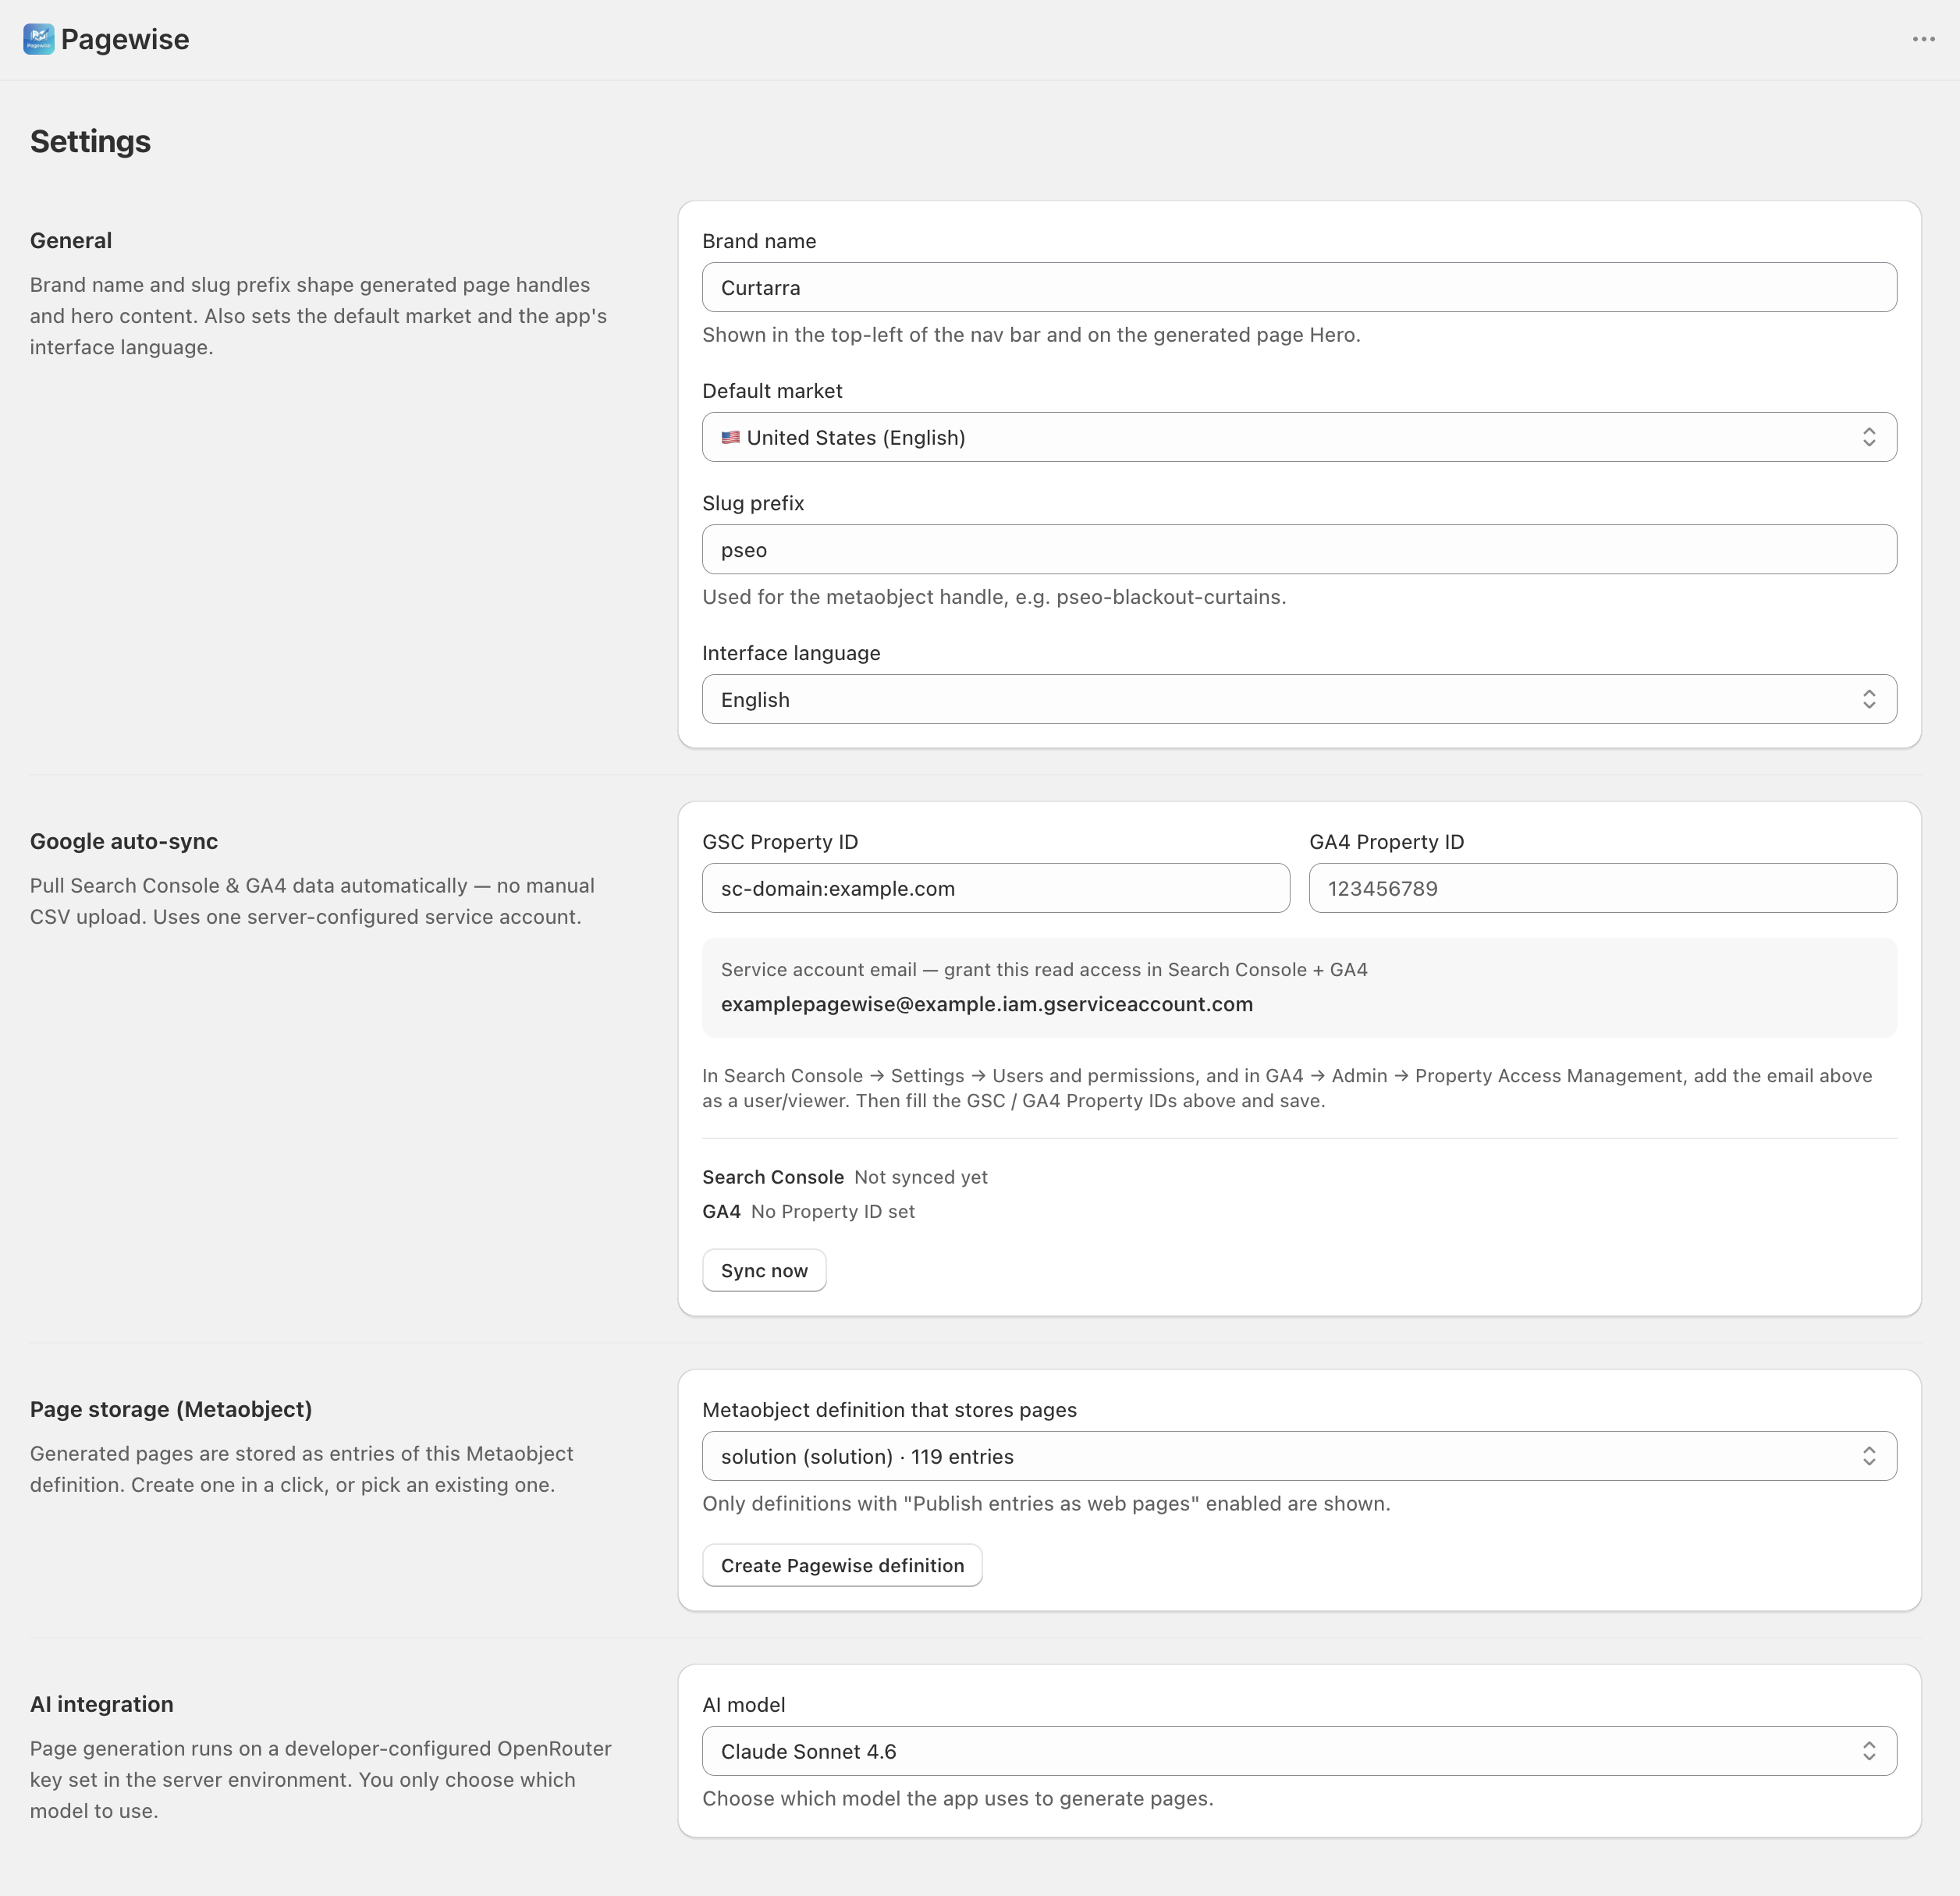
| General | Brand name (shown in the nav and generated pages' hero area); default market (United States / Germany — the market new pages target by default); slug prefix (default pseo, e.g. pseo-blackout-curtains, affects newly generated pages only); interface language (English / 简体中文). |
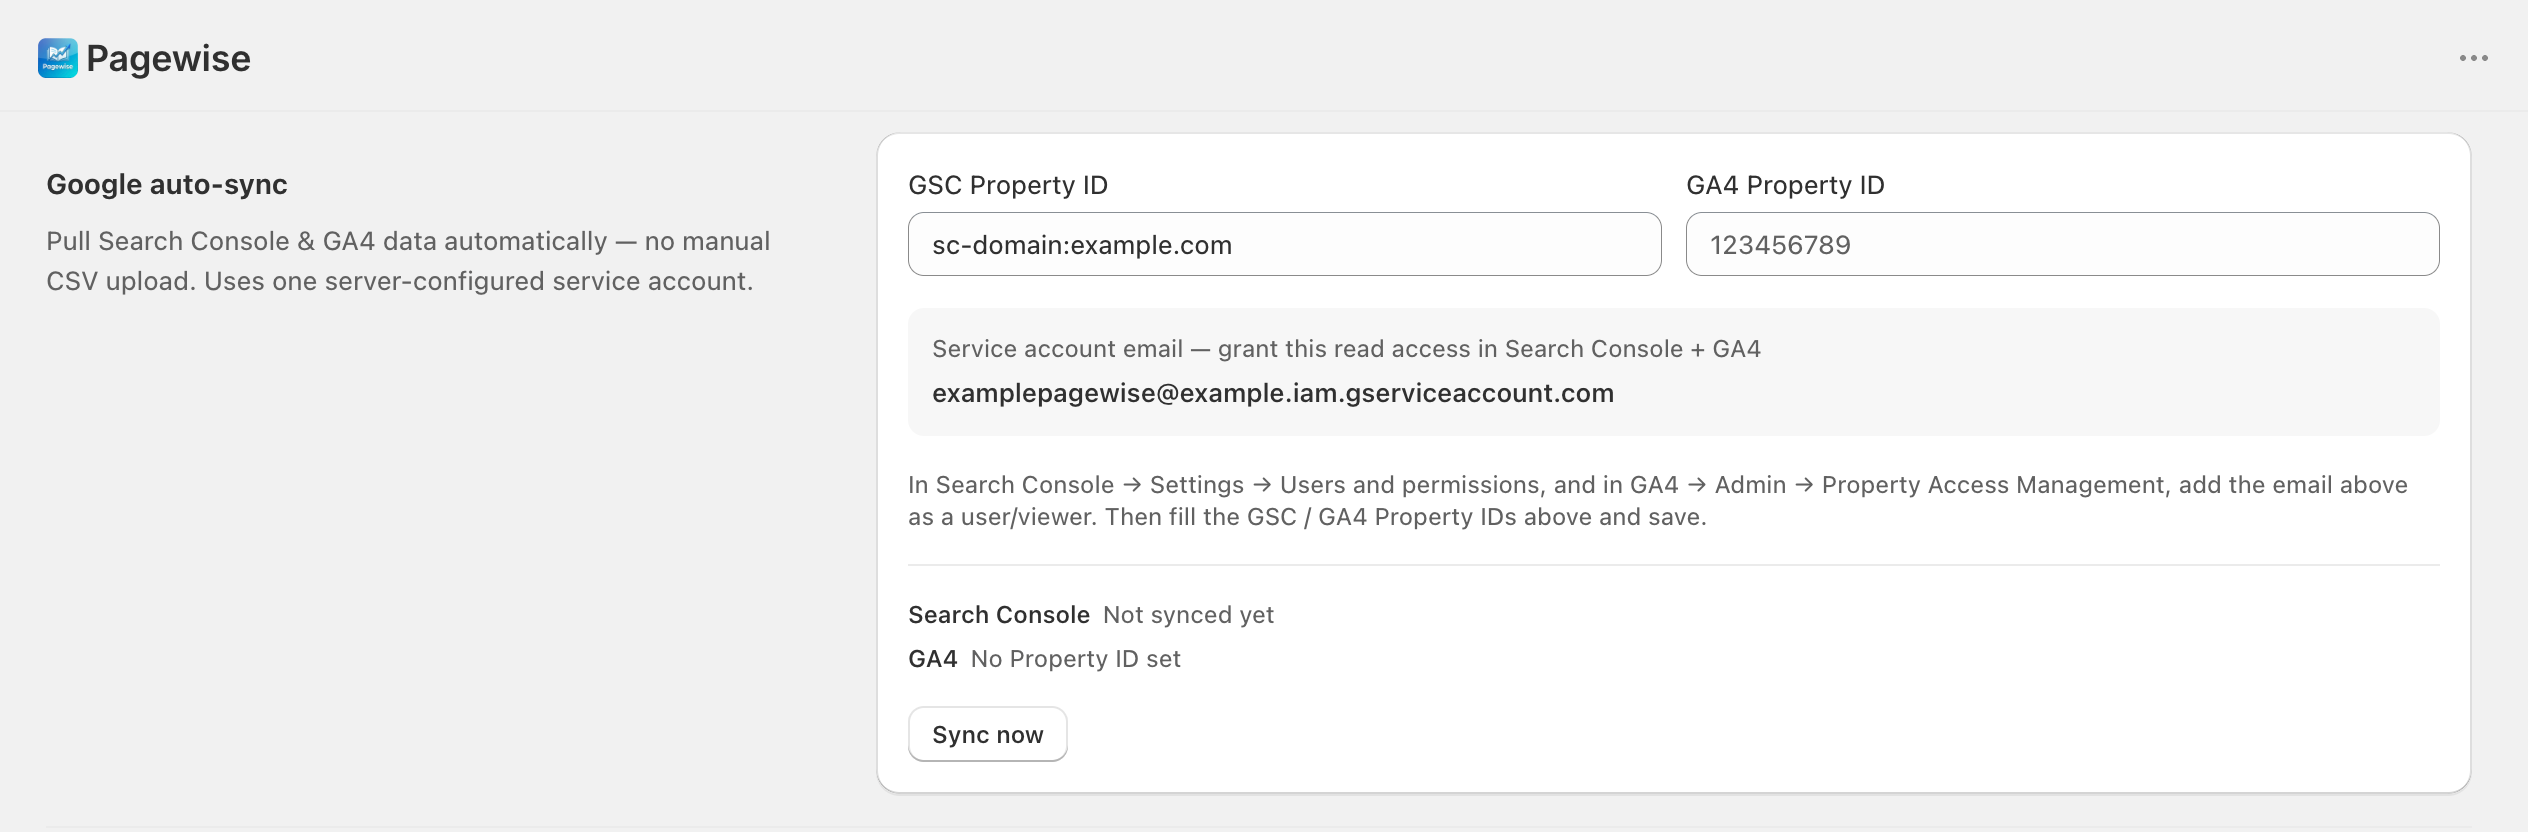
| Google auto-sync | GSC Property ID (format like sc-domain:example.com) and GA4 Property ID (numeric); a gray box shows the service-account email to authorize; below are per-source sync status lines; "Sync now" at the bottom. |
| Page storage | Choose the definition generated pages are stored under in Shopify (only definitions with web-page publishing enabled are listed); if there is none, "Create Pagewise definition" sets one up and selects it. |
| AI integration | Pick the "AI model" used to generate pages. The key is configured server-side by the developer — you only pick the model; without a server key it shows "AI not configured" and the dropdown is disabled. |
Configure Google auto-sync (recommended — replaces manual uploads)
- Copy the service-account email from the gray box in the "Google auto-sync" card.
- Open Google Search Console → "Settings" → "Users and permissions" and add that email as a user (read-only is enough).
- Open GA4 → "Admin" → "Property access management" and add the same email as a Viewer.
- Back in Settings, fill in the "GSC Property ID" and "GA4 Property ID", then click "Save" in the save bar.
- Click "Sync now" for a first manual pull; success shows "Google data synced" and the status line records the last sync time. From then on the app syncs daily.
Things to note
- "Sync now" needs at least one saved Property ID — save first; the button stays disabled with unsaved edits only.
- Syncing before authorizing the service account in Google fails, and the status line shows "Last attempt failed: reason". Partial failures show a yellow banner with per-source GSC / GA4 errors.
- If it says auto-sync isn't set up on the server, the developer must configure it; until then, upload exports manually under "Search Console" / "Monitor & Insights".
- If the definition already exists when clicking "Create Pagewise definition", the app tells you to pick it in the dropdown above — no duplicate is created.
- Clicking "Discard" in the save bar asks for confirmation, then drops all unsaved changes on this screen.
Appendix A
FAQ
"AI not configured" — the generate button is disabled?
The AI key is configured server-side by the developer; there's no input for it in the app. Once the developer sets it up, pick a model under Settings → AI integration.
The generate button stays disabled?
Check in order: are exactly 4 collections selected; is another generation job already running in the background (only one at a time); is the "Additional permissions required" banner showing (reinstall the app to grant the scopes).
A generated page doesn't show on the storefront?
First confirm the status is "Live" (drafts are never public); then confirm the store runs an Online Store 2.0 theme; if you recently switched themes, click "Repair pages now" on Home to re-push page templates to the new theme.
The images on my page are gray placeholders?
Expected: AI doesn't generate images yet. Except for product cards, which use Shopify product images automatically, other sections default to placeholders. In the page editor, open each section and swap them via "Upload image" or "Browse images" (ideally brand-supplied assets matching the page topic), save, then publish.
Uploading a GSC / GA4 file reports "No matching pages"?
URLs in the file are only recorded if they already exist under "Pages". Run "Pages → Sync existing pages" to pull the store's pages in first, then upload again.
The KPI change badges are gone / it says "No earlier window to compare yet"?
Expected: the comparison needs two non-overlapping 28-day windows (at least 28 days apart). Right after connecting data there's only one period ("First period baseline"); the badges appear on their own after a few weeks.
Average position went "down" — why is the badge green?
A smaller position number is better (rank 5 beats rank 8). Badges are colored by "did it improve": green = better, red = worse. Don't judge by the arrow direction alone.
The preview link won't open or says it expired?
Preview links expire — go back to the editor and click "Preview" again. If it says the page is unavailable (missing or not yet synced), the page was deleted or hasn't been synced to Shopify. Also allow popups for this site in your browser.
Why did a page's status become "Detached"?
Its content entry was deleted on the Shopify side and only the local record remains. The app marks this automatically after the Shopify-side deletion. You can delete the local record, or regenerate / re-sync the page.
Can I recover a deleted page?
No. Deletion is permanent on both ends (the Shopify entry, the theme template file, and the local record are all removed). To take a page offline, use the "Retired" status instead.
Want to change a page's URL (slug)?
Slugs are fixed after creation (to keep indexed links alive). If you truly need a new URL, generate a new page with the new slug and retire the old one.